How to Perform a Repair Upgrade in Windows 10

A repair upgrade fixes Windows system issues while preserving your files, apps, and settings.
When your Windows 10 installation gets funky or slow, you will try anything to get it fixed: system file checker, DISM, check disk, just to name a few. Usually, the last resort ends up being a clean install, but it doesn’t necessarily have to be that way. We all know, Microsoft’s reinstall options for Windows 10 include Start Fresh, Reset, and a clean install from setup media such as DVD or USB. But another handy option is the Repair Upgrade.
What exactly is a repair upgrade, though?
It is simply a way to perform a fresh install of Windows 10 without deleting your apps, files, and settings. In this article, we take a quick run through the process of performing a repair upgrade.
Perform a Repair Upgrade Using your Windows 10 Install Disc
What are the benefits of a Repair Upgrade?
Apart from preserving your personal files, apps, and settings, a repair upgrade can repair stubborn problems such as a corrupt Windows Installer service, Windows Update issues, registry entries, and corrupt system files.
Before you perform a repair upgrade, make sure you have reinstall media that corresponds with the edition of Windows 10 you have installed. So, if you are running the Windows 10 Anniversary Update or the Creators Update, make sure you have that version, along with the edition and architecture (Home, Pro, 32-bit, 64 bit). To find that information, press Windows key + X, click System, then review your system details. If your system came preinstalled with Windows 10 Home or Pro, you could follow the instructions to download Windows 10 and use that to perform the repair upgrade. Check out our guide for instructions on how to download and create bootable media.
Start the Process
You don’t necessarily have to create a bootable copy—the ISO itself will be sufficient. Just double-click the file to mount the ISO or right-click on it, choose Open with, and File Explorer. Once your install media is ready, you should be prompted to start the installation.

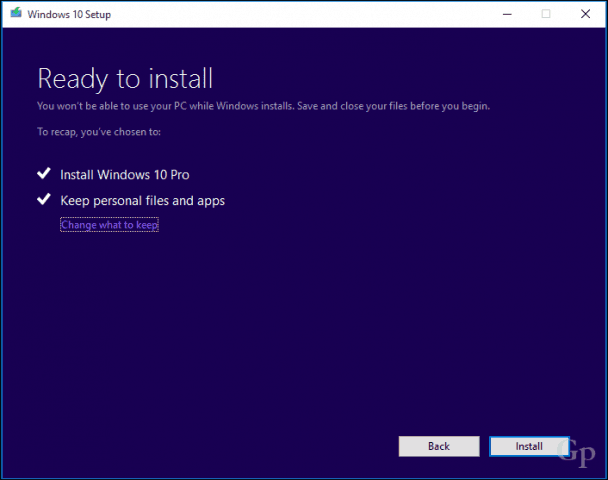
Go through the installation wizard as you normally would when installing a new feature update.

Remember to choose the option: Keep personal files and apps.

When you are ready, click Install to begin.
This will be your screen for a little while. After the installation is complete, you will be asked to sign in and finish up the install.

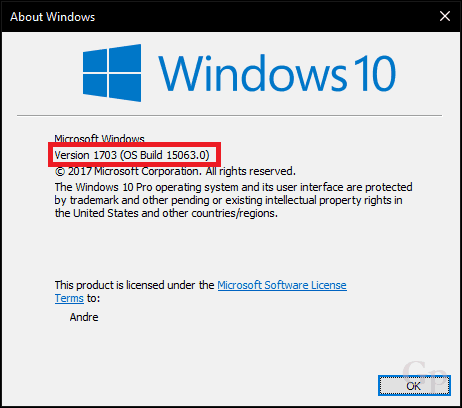
One thing you will notice is your Windows 10 installation will be reset back to its original release. So, for example, instead of having the latest cumulative update installed, you will see something like 15063.0 installed. If you were connected to the Internet during installation, Windows 10 setup might intelligently download and install those updates before reaching the desktop. If not, you can follow our guide to download the latest cumulative update to get your system current.
Summing Up
As a precaution, you should follow some of our pre-requisite tasks, such as disabling security utilities, disconnecting non-essential peripherals, before starting the upgrade. This can reduce the chances of conflicts occurring during the upgrade.
That’s pretty much all there is to a repair upgrade. Not only do you get to perform a fresh install, but you preserve your files and apps and repair any damaged system files or services while doing it.
Have you ever performed a repair upgrade? If so, let us know how it went in the comments.


Ziggy
July 7, 2017 at 6:22 pm
Have tried this method on numerous occasions and usually it works well – but it can be time consuming!
Regardless, it has been a life saver when all else has failed, yet I still subscribe to keeping a system image just in case.
Joe Delahaye
July 8, 2017 at 8:23 am
I tried it once because Edge would not work (Still doesn’t). I did not have to choice to keep my files and settings. The reason given was that my installation was not on the correct partition, yet it is installed on Drive 0, partition C: I do a system image, and for some reason, it insists on also adding two other drives in the image. I cannot remove those. Likely that has something to do with the files and settings not being available
Alan
September 4, 2017 at 2:23 am
Hi Joe.
I was having all sorts of trouble and tried many solutions. Eventually, I came across this one. Method 2 worked for me.
https://appuals.com/reset-microsoft-edge-on-windows-10/
Good luck.
Dick Pickens
July 8, 2017 at 2:55 pm
WHAT reinstall disk? Discs no longer come with a new computer! And what about these newer computers that do not even have a disc drive?!!!
Joe Delahaye
July 9, 2017 at 6:14 am
You can download an install disk from M$. It will work either as an ISO to be installed on DVD, or you can download to a memory stick and install from that.
Glenn Charles
September 14, 2017 at 1:28 pm
Go to Amazon and buy a repair dvd. They work. Look under Windows 10. This isn’t hearsay, I’ve used mine more than once. THIS DOES NOT PROVIDE A SEPARATE LICENSE, not that you indicated you were interested in one; it just has to be said every time.
j burke
July 8, 2017 at 4:23 pm
it insists on also adding two other drives in the image. I cannot remove those. Likely that has something to do with the files and settings not being available
this is another problem with early installers of win 10 with exceptionally slow running computer being the immediate problem
can this be fixed without losing apps and files
regards
Joe Delahaye
July 9, 2017 at 6:17 am
I was running 8.1 at the time, and this is not a slow computer :) 12 Gb of Ram, and the high end of speed. with the CPU. I will say that this system started as XP, went to Vista, then Win 7, etc. IOW, most incarnations of Windows to present, and also at least three different MB
pomijohn
July 8, 2017 at 8:59 pm
I’ve also tried it several times with no avail to induce MS Edge to work (still doesn’t) So will stick with Google Chrome
Tony
July 9, 2017 at 9:12 am
OK what do you do if you don’t have a Windows 10 installation disk. I downloaded it for free when it was offered. I am having problems with it and don’t know what to do!!!
Tony
Ziggy
July 9, 2017 at 9:29 pm
Tony, I’m assuming that you can boot into your machine and connect to the internet. If so, download Microsoft’s Media Creation Tool (the latest one is for the Creator’s edition, so be aware of that) and save it to your desktop. Google it and download it from Microsoft to get a clean, malware free tool.
Once you have it saved to the desktop, double click on it and choose Upgrade. It will then ask you if you want to keep your apps and personal files. Click “Yes” and the rest will be done for you – mind you this will take some time.
All you are doing is upgrading over an upgrade, so when all is finished you will find a Windows.old folder in your “C” directory. Do not delete this – Microsoft will delete it after 10 days or so for you.
Note that this folder will be largish but when you are happy that all is good you can also delete it with Microsoft’s native Clean Manager. I’d just wait and let Microsoft do it for you!
You should find that all is good but if there are any troublesome programs uninstall them and then re-install back with your installer disk if you have them.
If this upgrade over an upgrade fails, then you are looking at a “Clean Install” of Windows 10 where, unfortunately, you will lose all your apps and personal files!
But there is a way of copying these files to another storage drive, and then simply copying them back. Keep in mind that apps will not work, but personal files such as documents and pictures and videos will – as long as you have made a copy of them!
Good luck…
Tony
July 10, 2017 at 10:11 am
Thanks I will give that a try
Tony
Tom Pagh
July 9, 2017 at 1:24 pm
Regarding the latest Creator’s upgrade. Sometime early next year I want to do a clean install of Win-10. I want to change from BIOS to UEFI. I hope that option is available on the DVD I created using the Microsoft Media Creator. Can anyone verify.
Also, when I perform the clean install I assume I will have to re-install all of the updates. Or, can I go directly to the latest Creator’s update. Does it include all updates since Win-10 was released?
Glenn Charles
September 14, 2017 at 1:32 pm
Yes, it can, but you could (unlikely, but it could happen; it did when UEFI was just starting to be used) have to find a driver for your boot device, USB or optical drive, which you will need to set in your boot order/BIOS/most likely now F2 or F9 before the splash screen (with the logo, as in HP, Dell, Lenovo…unless you’ve changed that). By the way, the word you were searching for is “legacy” as in “legacy boot” vice “UEFI boot”.
Joe Delahaye
July 10, 2017 at 5:01 am
Well, I managed to do a Repair install yesterday. Kept all my files, etc, but Edge still will not work. I am now assuming it is something in the registry that is doing that. Too bad you cand uninstall it completely and download it to reinstall it.
Andre Da Costa
July 10, 2017 at 5:39 am
Did you try the following? https://www.groovypost.com/howto/reset-microsoft-edge-default-settings/
Joe Delahaye
July 10, 2017 at 5:51 am
I did do so before the re-install, to no avail. I will try again and see how it goes.
Joe Delahaye
July 10, 2017 at 6:08 am
I just tried the Powershell thing again. It went though all the steps, after I manuall had to remove the files because Edge wont stay open long enough to clear. Reinstalled using Powershell, Seemed to work alright, but it still will not keep running. Opens to a blank page, and then closes after about 4 seconds. Frustrating.
Ziggy
July 10, 2017 at 6:42 am
@Joe. Using powershell commands don’t always yield desired results! I had a similar issue with edge after using referenced powershell command.
The only thing that got edge back was to create a new user account and move over all my files.
More time consuming (but a better option for me) was to do an upgrade over an upgrade as mentioned in my earlier comment to Tony. Then again, there’s the option to use a different browser and not use edge at all. Good luck in your endeavours…
Joe Delahaye
July 10, 2017 at 7:34 am
@Ziggy. I am still using IE, and FF. I wanted to give Edge a try to see if it got any better since it was first released. I have several computers and this is the only one so far that Edge wont work any longer. I believe I tried the new user account fix and that didn’t work either. So far I have done all of the stuff on this blog, re-installed from a Restore Point, re-installed from an image backup, and then the restore keeping all files and apps. At least it kept the files and apps, but didn’t fix the Edge problem I then did the powershell fix again, to no avail. I have not yet looked, but like IE, I don’t think Edge can be removed using the Programs and Features option, or with the several removal programs I have.
Ziggy
July 10, 2017 at 8:35 pm
@Joe. Edge is an integral part of the operating system for windows 10 and mucking around with it (not to say that you did because corruption of system files is not foreign to Win 10) usually ends up in errors such as you are experiencing.
I came across the following which will disable it but not reinstall or fix it. Other than that I would just hide it from sight and not worry yourself about it because Chrome and Firefox are more than adequate for everyday browsing.
Seeing that you are playing around with one of your spare computers, here’s how to disable it.
Hope it works for you…
In C:\Windows\SystemApps rename the Edge folder to
NOT_Microsoft.MicrosoftEdge_8wekyb3d8bbwe.
Joe Delahaye
July 10, 2017 at 9:20 pm
Or I could just ignore it like I have been since 10 first came out :)
Ziggy
July 10, 2017 at 9:42 pm
Absolutely! Greetings from Australia and all the best in your endeavours with Windows 10.
Glenn Charles
August 12, 2017 at 9:14 am
If you go to Amazon and look for Windows 10 you will find repair disks (for computers that came without install media and particularly those that won’t perform an image backup, only a file backup). AS LONG AS WINDOWS 10 WAS PREVIOUSLY INSTALLED and quite possibly as an upgrade–in fact probably, if it’s not a low-end machine. The one I bought went from $10 to $12 in something like 2 days.
Raven Scheffert
September 13, 2017 at 11:23 am
I was referred to this page after putting up a post in the Microsoft community about having terribly long boot times since the creators update. I’m hoping I can find another solution to my problem, but It’s starting to look like this will be my only option at this point. With no programs set to on in the startup area of task manager, it takes 10 minutes (yes, I actually kept track) to get to the lock screen, log in, and waiting for it to start working normally since Windows computers seem to be notorious for being extremely slow once you log in after restarting or powering off and on for a few minutes.
Compare that to the 10 – 20 seconds it would take before the creators update, and log in slowdowns being nowhere near as bad as they are now on the very same computer, you can see my frustration here.
Even as I’m typing this, I’m seeing yet another problem I’m having that didn’t start until I got the creators update: Lag when I’m trying to type. Again, this only started after the creators update. It used to be so buttery smooth. Now, not so much.