10 Command Line Tips Every Windows 10 User Should Know

Whether you’re a power user or not, knowing your way around the command prompt can come in handy. Here are some basics to know.
Many users would probably say they have no reason to be exploring a command prompt in this day and age, especially with all the richness of the graphical user interface (GUI) advancements over the past 20 years. True, but it doesn’t hurt to collect a few tricks or more, especially for those times you might be in a tight spot. The command line is an interface that provides all the same facilities as those found in the GUI. In fact, for many years, this is how users operated a computer; it was just a fact of life. Sure, it’s the exception today, but it’s a great way to brag to your friends about what you know. Plus, once you get comfortable with the command line, you may even prefer it to the GUI for some tasks.
Today, we take a look at several commands you should know. Let’s jump in.
Command Line Operations in Windows 10 Every User Should Know
The command line is similar to Alice in Wonderland—it can at times feel like a land full of wonder, mystery, and (possibly) danger. Our psyche has been so greatly changed by the GUI’s power; for many of us, the command line can feel primitive. But it shouldn’t, and that’s why we are going to learn some fun ways you can use it to perform some of the same tasks you normally do using point and click. Of course, command-Line operations come in handy when you want to create scripts and automation tasks, too.
Before we begin, check out our previous article for instructions on finding and opening the Command Prompt. Some of these commands call for administrator privileges, so that’s a good way to start off our adventure.
1. List the Contents of a Folder and Clear the Screen
If you want to see what’s listed in a folder when you open the command prompt, type dir (short for directory), then hit Enter. A list of the folder contents will be displayed, which might include files and other folders.

Depending on the folder, a lot of information might flash across your screen. When you want to go back to a blank screen, type CLS to clear the screen.
![]()
2. Shutdown, Restart or Hibernate Your Computer
This is a task we perform every day: shutting down, restarting, sleeping, or hibernating. Once you have the command prompt up on the screen, just type in shutdown -s -t 01 to immediately power down your machine. You can change the timer to something longer. For instance, if you are performing a download and you know it will complete within a couple of hours, you can change the timer to shutdown -s -t 7200, which is 2 hours in seconds. So, a little basic math is required. If you want to restart, type shutdown -r -t 01

Hibernation uses a different command, which requires a little memorization on your part. At the command prompt, type: rundll32.exe PowrProf.dll,SetSuspendState
Sleep uses a similar command, but users should be aware: when hibernation is enabled, this command does not work particularly well. So, you should disable hibernation first before running it. To do that, type powercfg -hibernate off at the command prompt, then you can run the following command to initiate sleep: rundll32.exe powrprof.dll,SetSuspendState 0,1,0
3. Create a User Account
The command line supports creating a user account too. You can even create accounts with specific privileges. This is how you do it.
Type: net user Username Password /add then hit Enter.
Example: net user John mypassword123 /add
You should see the following message: “The command completed successfully.” Click Start > username, then switch to your new account.

If you want to add the user to a particular group such as Administrator, Power User, or Limited User, use this command: net localgroup GroupPrivilege UserName /add
Example: net localgroup administrators Andre /add
4. Navigate File System Using Change Directory (CD) Command
In the graphical user interface, browsing and navigating through the File Explorer file manager is a simple point and click affair. The command prompt requires an argument when you need to change from one location to the next. When you open the Command Prompt with administrator privileges, it defaults to the System32 folder. To go back to your user folder, you need to take a few steps back by typing cd..

This will take you a step back, similar to the Up icon in the File Explorer window. When you are within the vicinity of a folder location, for example, drive C:\ you can type cd folder name to open the subfolder within. Here I can perform actions such as listing the contents of the folder using the dir command.
An even simpler method is to type the path to the folder you would like to navigate to. In my case, I want to go directly to my User folder named Andre from my current location, type: CD C:\Users\Andre then hit Enter. This immediately takes me to that desired location. If I want to go back to the System32 folder, I will type the path to its location also CD C:\Windows\System32. You can also go back to the root folder by typing CD\

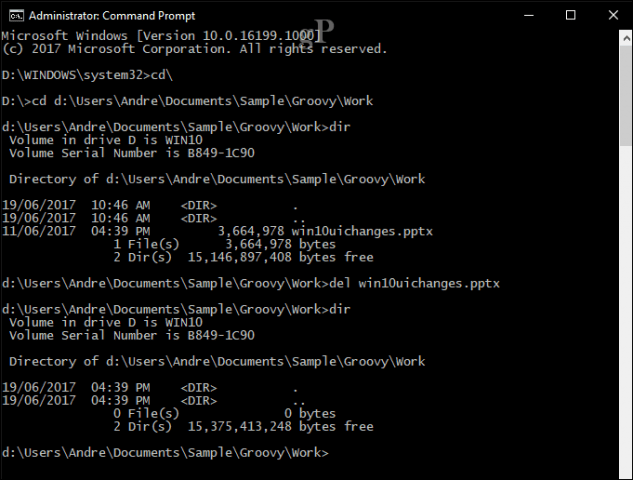
5. Make, Move, Delete Folder and Files
Creating folders, copying and pasting files; are everyday actions we perform in the graphical user interface. The command line can do it too. Here we have both the command line and File Explorer on screen, and we have changed our directory to the folder called Sample located in Documents. Right now, the folder is empty, but we want to create a folder called Groovy to store some files.
In order to do that, at the command prompt, type md Groovy

This will create a folder in the location we just specified. If you want to create it somewhere else, use the CD command to navigate to that location. If you want to create more than one folder at once, just type md (make directory) followed by the name of each folder with a space between. Example: md Work Files. This will create two folders called Work and Files.

If you want to move the folder to a different location on the drive, this will require using the move command and knowing the path destination where you want the folder to be moved. Let’s give that a try. I want to move the Work folder from the Groovy folder to the root of the Sample folder.
Type: move Work d:\Users\Andre\Documents\Sample

Deleting a folder is just as easy. In this case, I want to delete the folder called Files. At the command prompt, type rd (remove directory) followed by the folder or file name. Example: rd Files

Deleting a file requires a different command. At the command prompt, type del (delete) followed by the file name. Example: del win10uichanges.pptx
6. Copy, Paste, Rename Files
If something catastrophic happens to your computer and you need to recover your files, the copy command can be a lifesaver. The command line supports several types of copy commands:
- Copy: If you just want to copy files or folders from one location to the other.
- Xcopy: A robust copy option suitable for copying the contents of a folder with subfolders to a destination folder. Xcopy is being superseded by Robocopy, which provides the same functionality.
Here are some examples of how to use these copy commands.
I want to copy the PowerPoint presentation named Evolution of the Settings interface.pptx to the Work folder located in the Groovy folder we created earlier. First, change your directory to the location of the file.

In my case, the PowerPoint file is in my User folder under Documents. First, type the copy command, followed by a file name with open and close quotes, then the file path destination, example: copy “Evolution of the Settings interface.pptx” c:\Users\Andre\Documents\Sample\Groovy\Work

Since Robocopy has superseded Xcopy, we are just going to focus on using that command for this example. Robocopy includes a number of arguments you can use to copy lots of folders thoroughly. It’s particularly great for creating backups. For instance, if I want to make a backup copy of my Downloads folder to a folder on my thumb drive named Backup, this is how you do it.
robocopy “D:\Users\Andre\Downloads” “F:\Backup”

If you want to quickly recover the contents of a drive that won’t boot, this is one of the fastest and most reliable ways to do it. You can add other arguments for specific results; for example, /mir command added at the end of your command will ensure permissions from the source folder are maintained at the destination.
If you get an error System cannot find the file specified, the file name might be too long. Instead, try renaming the file using a shorter file name. To do that, type rename followed by the current file name then the new name, for example, rename “Evolution of the Settings interface.pptx” “win10uichanges.pptx”

7. Networking: IP Config, Ping, Tracert, DNS Flush
Network command-line operations are available, too; there are quite a lot, actually, but here are a few you should keep handy.
The ipconfig command is one you will likely come across from time to time. It’s used to view the IP address of your computer or network. Finding your IP address in the Windows GUI is easy but buried; the command line is a faster way to find it. Just type ipconfig or ipconfig/all to view the addresses of your network adapter. You can also use ipconfig to retrieve a new address. If you are on a business network, this can help resolve issues logging onto the network or accessing resources such as a mapped network drive.
At the command prompt, type ipconfig/release, hit Enter, type ipconfig/renew, then hit Enter again.
Ping is used to check the status of a network address, which lets you determine if packets are being sent and received. A packet is a method of sending information along with its address over the network in small pieces, which is routed using different paths depending on the type of protocol used.
You can ping any website as long as you know the address. For example, ping www.groovypost.com

Tracert or Trace Route determines the route information takes to reach its final destination over the network. Similar to Ping, Tracert is most effective as a diagnostic tool when you are experiencing problems reaching a website. If I want to know the route it takes for my ISP to reach groovypost.com, all I need to type is tracert followed by the domain name or IP Address.

DNS Flush: DNS converts IP Addresses into simple names such as 104.24.11.25 into www.groovypost.com. Sometimes when you are unable to resolve an address, clearing your DNS cache can fix the problem. You can use the DNS Flush command ipconfig/flushdns.
8. Browse and Mount Network Share
In the DOS days and even when graphical user interfaces became popular, accessing network resources required command-line knowledge. If you want to access a mapped network drive or shared folder over the network today, you can easily do it through Network and File Explorer. When connecting to network resources from the command line, the net use syntax is required, followed by the \\MACHINE-NAME\NETWORKSHARE. In my example below, I want to connect to another computer named ELITEBK-INSIDER. If the network resource is password-protected, you will be prompted to enter one along with a username. After connecting, you should see: “The command completed successfully.”
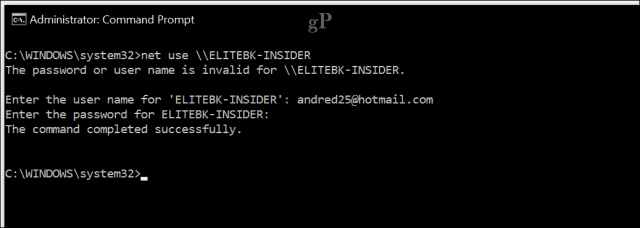
You can go ahead and browse the contents of the folder using the same commands we previously demonstrated.
If you want to connect to a specific subfolder over the network, you can use the pushd command followed by the network path, for example, pushd \\ELITEBK-INSIDER\Wiki Projects. This is similar to the change directory command.

9. Start an Application Install
You can also start an application install from the command line too. In fact, I recommend you give it a try when you experience problems with the GUI. Simply change to the directory, then type the name of the application setup file followed by its extension.

10. DISM and SFC
DISM (Deployment Image Service and Management Tool) is a tool you can use to perform command-line diagnostics on the health of your Windows 10 installation. It is primarily used in deployment scenarios, but for end-users experiencing problems such as system stability or performance, DISM can help fix such issues. At the command prompt, type each of the commands one at a time, allowing the operator to complete in between.
Dism /Online /Cleanup-Image /CheckHealth
Dism /Online /Cleanup-Image /ScanHealth
Dism /Online /Cleanup-Image /RestoreHealth
System File Check tool is an oldie but goodie. This command-line tool can be used in addition to DISM to scan and repair corrupted Windows system files. If it finds any corrupt files, it will restore a backup copy from a backup store in the System32 folder. To use it, just type sfc /scannow at the command line, then hit enter. The process can take some time, depending on the severity of the issue.
Bonus: View System Information, Format Partition Disks, and Check Disks for Errors
We have covered these in detail before, so I won’t go into details—check our previous article on How to Find Your Systems Complete Specifications in Windows 10 for details to learn more. If you want verbose details about your system, such as the initial date Windows 10 was installed, registered owner, BIOS version info, last time the system was booted, this is a great way to find it.
Working with disks through the command line is an important task you should learn too. We previously covered the steps of how to format, partition, and label disks using the built-in DiskPart command-line tools. Check Disk is another import command-line tool you should know since you can use it to diagnose and fix issues with your hard disks.
This is just the tip of the iceberg when using the command line. I don’t expect you to learn everything right away, but for beginner or intermediate users, these can be quite a helpful introduction to learning its hidden powers.
Are there any particular commands I missed that you think should be a part of this tutorial? If so, let us know in the comments.


Ian Hart
June 22, 2017 at 6:35 am
I use CMD mainly for diagnostics and troubleshooting but have now been using PowerShell, most of the simple commands prompts work here but I find this new tool a lot more powerful and loads of scripts are available from the community
Phil O'Sophocles
June 22, 2017 at 8:17 am
The commands I use most from the command line are:
FOR – this has some powerful features. Not just selecting a range of files but is able to extract tokens from within files.
FINDSTR – often a lot quicker than explorer search
ASSOC – to associate a processor with a file type
FTYPE – to relate the processor of ASSOC with an executable
You could cover usage of pipe (|) and output redirection (. and >>)symbols. There are also several other commands that are used within batch files.
Steve Krause
June 22, 2017 at 10:28 am
Great feedback Phil. Thanks for showing those. Will have to do a follow-up article on this – Command Line (Advanced) tips!
In scripting, FOR is critical. FINDSTR is also another great one that many ppl forget about. However, I never knew about ASSOC so that’s a new one for me.
Michael
June 22, 2017 at 10:47 am
Nothing like going “Old School”. :D Youngster look at me wide-eyed when I drop to a command line and start poking around. I go waaaay back, my first PC ran on PC-DOS 1.0, and I was part of the Beta Team for Windows 3.x Win9x.
I will be totally lost if they ever take the command line completely away from me. I guess I’ll just have to go back to the abacus.
SZ939
June 22, 2017 at 11:27 am
Come on Andre — Simple DOS level commands have been around since CPM BASIC! The factoid that DOS Commands aren’t taught anymore simply means that Computer OS Courses are not providing the Basics! I have long disparaged modern day Computer Programming Courses as deliberately ignoring the background on how such programming languages developed over time as Processors and Memory became as cheap as they are today. I find it fascinating that even with WIN10 and ServerX, so much still requires knowledge of the DOS Level Command Line.
wheelsey_4
June 22, 2017 at 12:38 pm
The last time I followed a groovypost command line suggestion was when Brian suggested automatically cleaning the temp folder during boot was a good idea way back in 2014. I followed it and then regretted it from having to wait so long for my set of Internet tabs to load. When I asked how to undo it I was directed to the community forum where I couldn’t find anything to help. I’m still regretting it to this day. Thanks for the advice, but no thanks.
wheelsey_4
June 22, 2017 at 3:20 pm
My bad, Andre! Brains tip was a batch file.
Ziggy
June 22, 2017 at 6:50 pm
@wheelsey. Your batch file maybe an autorun file in which you can stop it running by using a tool from the Windows Sysinternals suite of tools.
You can download the suite from https://technet.microsoft.com/en-us/sysinternals/bb545021.aspx
You will find the download link under the main heading UTILITIES to the left of the screen.
Once downloaded, look for autoruns and run it as administrator. Then look at the logon tab and if your batch file is there just untick it.
Good Luck!
wheelsey_4
August 30, 2017 at 7:18 pm
Thanks!
C4Dood
July 5, 2017 at 8:46 am
Batch (*.bat) programs use command line tools and are very helpful. Cleaning out your temporary internet files, local temp files and the Widows Temp folder are ones that everyone should run periodically. Too many programs fail to clean up their temporary files when they close.
At work I recently asked a local admin to check and clean out my Windows Temp folder. First, he had no clue that Windows requires you to first get permission to the Windows Temp folder or else you can’t cleanup the files. Then, lo and behold, we found 9.5GB (yes, Gigabytes) in left-behind Temp files. My laptop went from red-line disk space to an acceptable amount free.
All because I asked for my Windows\Temp folder to be cleaned.
Do yourself and your computer a favor and routinely clean out your temp files in:
%AppData%\Local\Temp (which is normally the same as %TEMP%)
%AppData\%Local\Microsoft\Windows\Temporary Internet Files\
%windir%\Temp
Such cleanup of Temp files also serves to delete any malware files that were downloaded, even if not activated. After years involved with Information System Security, I always set IE (and Edge) to delete temporary files upon exit. Don’t take chances.
Ideally, your Internet Explorer should be set to refresh each web page on access, not use temp files downloaded to your computer. Why? Many web pages change or are dynamic. Using the “old” copy means you are getting the page as it existed in the past. Best practice is sometimes a tad less convenient, but still best.
wheelsey_4
July 5, 2017 at 1:57 pm
I agree with you about cleaning them out periodically, but every time I power on my computer just got to be too much. That’s all.
Juri
June 24, 2017 at 2:55 am
Andre, a realy nice post. i used it several times to generate batch snippets. but actually, i’m from the unix world (Linux. MacOSX, BSD), and we are much more lasy in commands typing :-)
maybe you could drop a line about generating bat files to the kids, pretty usefull. thank you
Michael Af.
June 29, 2017 at 10:31 am
Incase you are helping someone out via Remote control typing ipconfig /release may get you disconnected. You can use the duo command release and renew like so
ipconfig /release && ipconifg /renew
Basically it will execute them one after the other.
:)
Andre Da Costa
July 2, 2017 at 1:34 am
Thanks for that tip Michael! Thats why we love when you leave a comment!
damien207
July 17, 2017 at 9:20 am
I am suggesting to try “Long Path Tool” program.