Getting Started with Windows Mail in Windows 10

Windows 10 includes a new email app that’s unlike Windows Live Mail or Outlook Express. Here is a basic guide to setting it up, using it, and getting it back up and running if it breaks.
While many of our day-to-day conversations are moving to real-time communications platforms such as Facebook, Slack, Twitter, and Snapchat, email remains an essential means of staying in touch with businesses, schools, organizations, and personal contacts. Certain aspects of email that won’t change, but Microsoft has made an effort to make the email experience more efficient and intuitive with the Windows Mail app.
Windows Mail is unlike previous versions such as Windows Live Mail or Outlook Express. Instead, Mail works more like a viewer that caches emails stored on a mail server, similar to how the IMAP messaging protocol works. In this article, I’ll show you how the Mail app works and how it can make your life easier. Whether you want to consolidate all your email accounts into a single inbox, search your inbox for messages, send attachments or send messages to multiple contacts, Mail lets you do it with just a few mouse clicks. Let’s take a look.
The Beginner’s Guide to Windows Mail
Windows Mail supports all the major webmail services out of the box such as Outlook, Gmail, Yahoo or iCloud. But you can still set up your standard POP and IMAP services, too; such as those from your Internet service provider and enterprise messaging services such as Exchange. When you launch Mail for the first time, you are greeted by the Add an account interface. Click Add account to begin.

You can choose from any of the major webmail services you use to download and view your emails. All you need to know is your email address and password. Sign in and wait while it downloads your recent batch of messages. If your email service or provider is not listed, Microsoft maintains a list of all the POP and IMAP ports and protocols for supported email services.

Here is an example setting up Outlook.com in Windows Mail. Enter your email address and password then click Next.

Wait while the account is set up.

If you are using two-factor authentication (which you should), setup will prompt you to approve the sign in using the Microsoft Authenticator app. Click Done to complete the setup.

During setup, you might be prompted to convert a local account into a Microsoft Account; this is optional. A Microsoft Account keeps your settings across devices in sync. Not all users want this option though. If you don’t, make sure you click the link, Just sign in to this app.

Click your account or Go to inbox.

Your email messages should automatically be downloaded into the inbox folder. If not, see the troubleshooting section at the end of this article.

To access other folders in your account, click the Folders tab. You can also click the plus icon to create new folders.

Add Another Email Account
I’m sure just like me—you have several email accounts and you would like to consolidate all of them in one email client. To add another address, click the Settings tab at the bottom left corner of the Windows Mail window then click Manage accounts.

Click Add account.

Choose the other account you would like to add.

Enter the address and password.

To access your other account, click the hamburger menu, then click on the mailbox.

Change How Often New Email Messages Arrive
Users can manually check for new mail by clicking the Sync icon at the top of your inbox. You can also adjust how often new messages are retrieved.

Open the Settings interface, click Manage Accounts, click the email account then choose how often you want messages to be synced. Click in the list box and choose from every time an item arrives up to every hour or manually.

Compose a New Message
Some users will spend most of their time in Mail composing new messages. To start a new message, click the (+) plus sign or New Mail menu.
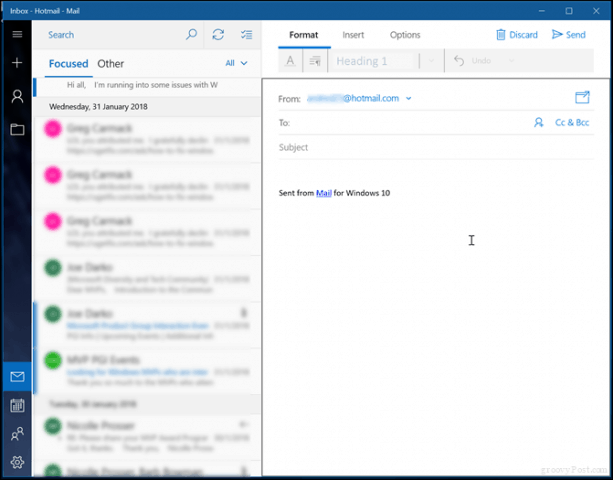
Windows Mail will open the compose form within its main window, but you can click the Open message in new window button if you need more room.

The first step to sending an email is to add a recipient. You can do that by typing the address in the To field or clicking the menu to open the People app, from which you can choose a contact.

Choose the contacts you want or simply type them in. If you want to send a copy of the same message to someone else, click on the CC field then enter the address. If you don’t want others to know to whom the message is being sent, activate the BCC field then enter their address. If you prefer to type in your address, do so and suggestions will be made.

You can then click on the body to start writing your message. By default, your message is written in Rich Text Format. This lets you choose different font styles, size, bold, italics, color, bullets. Mail currently doesn’t offer any options for plain text; your best option is to compose the message then convert it using your WebMail service if the option is available.

Check Spelling and Grammar
If you make a mistake or would like to check your grammar, you can access proofing tools multiple ways. To correct a word, right click it then choose the correct word or click the Options tab then click Spelling.

Searching Your Inbox
If you are looking for a message from a contact or specific content, you can do so by clicking in the search box at the top of your Inbox. Enter your query, name or subject matter and Windows Mail will search for available messages that meet your criteria.

Flag, Sort, Delete Messages
Keeping your inbox under control can become a full-time chore. To make it easy, Mail includes some basic functions that can help better manage your messages. If you just want to view unread messages, flagged messages, messages you are mentioned in, click the All menu then choose one of the available options. From the same menu, you can also sort messages by date or name.
You can bulk delete messages, too, by toggling on the selection mode menu, then check the boxes for the messages you would like to delete or move to a different folder.

Moving messages is easy too, after selecting your emails, click the Move selected items to another folder menu. A menu will pop up with a selection of folders or you can create a new one.
Adding Attachments and Inserting Pictures
Sometimes we need to add non-text based content in our email messages such as a picture or an attached file. If you want to insert a picture in your message, click the Insert tab, click Picture, browse your computer, select the image then click Insert.

Mail offers some basic editing options for images, too. Select the image; this will activate a Picture contextual tab. You can choose options such as cropping, sizing or alternate text.

To insert an attachment in your message, click the Insert tab then choose whether you want to attach a file or picture. To select more than one picture, hold down Control on your keyboard, then select more than one. Click Insert.

You can also browse to the folder in File Explorer containing your images, select them, and click the Share charm under the Share tab.

Click Mail.

Choose your account.

Review the images or files; click Delete if there is an item you don’t want to send.

Open and Save Attachments
Every now and then we will receive attachments, too. If you want to open an attachment, it’s very easy. Right-click the individual attached item, then choose either open or save, choose where you want to save it.

Choose where you want to save the attachment, then click Save. Alternatively, you can click Save all attachments.

Troubleshooting Mail
Windows Mail is still a maturing app; this means, there are occasions where you might see glitches or experience issues getting Mail. Here are some basic troubleshooting steps you can try when this happens.
Not Receiving Mail
If you are not seeing any new messages, try manually syncing your inbox by clicking the Sync button. You can also check if your account is verified. This will vary depending on the webmail service you are using. Launching your web browser then signing into the email service can correct it. You can also try deleting the account then adding it again.
- In Mail, click the Settings menu represented by the cog icon at the bottom.
- Click Manage accounts
- Select your account
- Click Delete this account from this device.
- Restart Mail, then set up your account again.
Windows Mail Refuses to Launch
If Windows Mail won’t load, you can try restarting your computer, then try launching again. If this does not work, check the Microsoft Store for updates then try launching Mail again. If the issue persists, try resetting the app.
- Open Start > Settings > Apps > Apps & features
- Scroll down to Mail
- Select it
- Click Advanced options
- Click Reset
- Restart
- Check the Store for updates
Your Account is Out of Date
Signing the webmail version of your email service usually resolves this. Sometimes, this needs to be done periodically just for authentication purposes.

Learn More About Mail
Brian wrote a great series of articles about various functions in Mail you likely want to know. Make sure you check them out.
- Create Automatic Replies in Windows 10 Mail App and Outlook.com
- How to Change the Windows 10 Mail App Default Signature
- Change Windows 10 Mail Background Image or Make it Blank
- Make Windows 10 Mail App Sync More Frequently
- Add Gmail and Other Email to Windows 10 Mail & Calendar (Updated)
That’s a basic look at using Mail. In future articles, we’ll look at some advanced steps like migrating messages over from Outlook Express, Mail or Thunderbird to Windows Mail. If there is something I missed out or you think should be in this article, please share your thoughts in the comments.


Jan Mc
May 6, 2018 at 4:36 pm
There is no mention of printing out an email. So far the only way I have found is to click on reply and print from there. Definitely couldn’t print from inbox
Katia Cooper
February 4, 2019 at 11:13 pm
Yeah, that’s true. I think the print option should have on the inbox section. Thank you for pointing that out.
Mohamed AbdelSalam
March 20, 2019 at 9:55 pm
There is no mention of offline availability.
How can one browse and search old emails while out of data coverage?
Scott Carriker
November 17, 2021 at 3:53 pm
If you have 2 email acts and only want to have one as default email how do you choose which one to use?