How to Clean a Virus Infected Windows 10 PC

A computer virus doesn’t have to be the end of the world. Try these simple steps to get your Windows 10 PC back to full health.
Cue the dramatic music. Yes, a virus. If there was ever a negative aspect to the Windows operating system, it is its infamous history of being one of the most attacked platforms. Viruses are still around, but these malicious programs are being superseded by even more severe types of attacks, which include: ransomware, espionage, botnet/CnC attacks, worms, and drive-by downloads to name a few.
Windows 10, Microsoft’s flagship OS is being re-engineered for this new generation of attacks. That said, it is still Windows, which means that bad guys are always looking for ways to break it. In this article, we explain what you should do if your PC becomes infected with a virus.
What To Do When Your Computer Gets a Virus
For me personally, the last time I had a computer infected that caused irreparable damage was in the summer of 2001. My computer was running Windows ME (it doesn’t get any better than this). I received a Word document as an attachment in Outlook Express, but it turned out to be a booby-trapped W32 virus. Not even Norton, which I had installed and updated could remove it. All I saw was a red screen with no options. Ultimately, I ended up performing a factory recovery using the Windows 98 SE disc that came with the system. In 2017, drastic steps like that might not be necessary.
- First of all: don’t panic. Reacting haphazardly can cost you time and money, or make your situation even worse. Before you even think of grabbing your Windows 10 reinstall media, set it aside a bit.
- Viruses can sometimes be more mischievous than damaging. For instance, they might hide your files or change them to shortcuts. This doesn’t mean your files are gone. They may just be changed into something you don’t normally see.
- Whatever you are doing on the computer, you need to stop. This means any activity you are engaging in needs to end for the time being until the virus is successfully removed. This will also reduce further infection. If you have removable storage attached to your system, such as USB thumb drives and external hard disks, they could be infected, too.
- You should enable Show hidden files and folders since some viruses are difficult to remove and can purposely attach themselves to hidden files. So, even if you perform a full system scan, the virus can simply reinfect your files again. Open File Explorer, select the View tab then check the box Hidden items.

Perform a Full System Scan
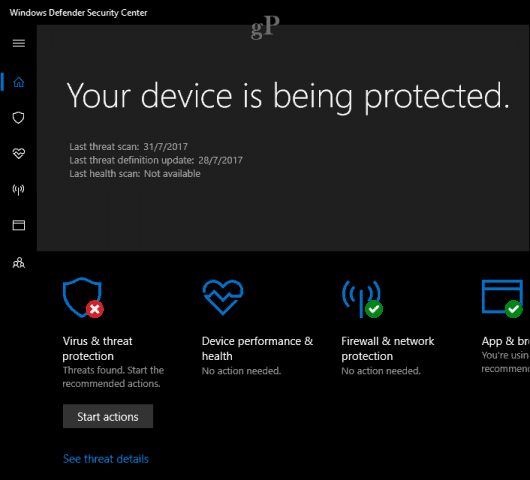
If you have an antivirus utility installed and updated, the first thing you can do is launch it then perform a full system scan. For the purposes of this article, I’m going to use Windows Defender Security Center. Third-party antivirus utilities such as Norton, McAfee, BitDefender, Avira, should have a similar option. For older versions of Windows 10, check out our tutorial on how to use Windows Defender.
In Windows Defender Security Center, click the Virus & threat protection menu. If threats are detected, you can immediately start a scan.
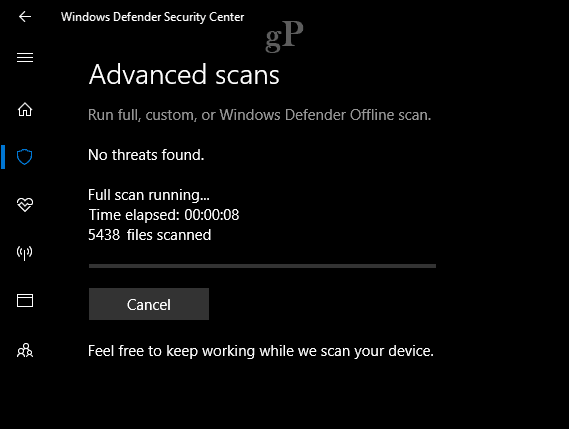
We want to perform a full system scan, so, go ahead and click the Virus & threat menu, click Advanced scan.

Select the Full Scan radio button then click Scan now.

The process can take some time depending on the size of your data and the severity of the infection. A single scan might not be able to successfully remove the virus, so I would perform a couple more scans.
After threats are found, you can click the Start action to quarantine the virus immediately or review it to see further details.

Use an Offline Scanner to Remove Stubborn Viruses – ESET SysRescue Live
For stubborn viruses and other types of malicious code like spyware, I recommend using a third-party tool such as ESET’s SysRescue offline scanner. There are other types of offline scanners such as Microsoft’s own malicious offline scanner. I’ve had more success with ESET which is a free download. I suggest you do this from a non-infected computer for best results.
After downloading, follow the easy instructions to build a bootable copy, which you can burn to a blank CD or create on an empty USB thumb drive.

The next step is to boot from the SysRescue Live CD, configure your BIOS to boot from the live media then follow the on-screen instructions. SysRescue is Linux based, so, it provides an extra buffer of security to ensure it does not become infected. When you arrive at ESET SysRescue Live screen, select the option Run ESET SysRescue.

Enable both the Live Grid and Potentially Unwanted Applications within their respective list box then click I accept the terms in the License Agreement.

After booting into the ESET SysRescue Live program, update your virus signatures to ensure known viruses are found.

You have several options to use, which include an On-demand scan, a Smart scan, or a Custom scan. If you have thumb drives that were connected to the infected system, you might want to attach them, then choose the custom scan option. When you are ready, click the Scan button.

Run the scan a couple of times to make sure viruses are removed.

When you’re done, restart into Windows 10 then check if everything is back to normal.

Restoring Hidden or Unreadable Files
Some viruses can modify files to make them unreadable. You might need to take extra steps to recover your files. If your files are blank or look like shortcuts, they are probably just hidden. Launch the command prompt, then browse to the location where the files are stored. Type the following command to restore your files: attrib *.* -h -s /s /d then hit Enter on your keyboard.
Conclusion and Next Steps
Hopefully, after performing the above steps, you’ve got your Windows 10 PC back up and running, and all your files back safe and sound. So, what’s next? Two things: (1) strengthen your computer’s security to make sure this doesn’t happen again and (2) back up, back up, back up your data! Here are some resources to get you started:
- Ultimate Windows 10 Backup and Restore Guide
- How to Protect Your Computer From Ransomware
- Manually Install Standalone and Cumulative Updates and Virus Definitions in Windows 10


beergas
August 9, 2017 at 4:11 pm
There’s also HouseCall in 32 & 64 bit flavors. Trendmicro. Free, fairly fast & goes fairly deep.
https://www.trendmicro.com/en_us/forHome/products/housecall.html
draly
August 10, 2017 at 6:05 am
Will Windows Defender not normally scan hidden files when run as quick scan?
Jm
August 11, 2017 at 2:13 pm
My option is to create an image file of the hard disk. Maybe once a month, I create the file on an external drive. If I can’t remove the virus, I’ll reload the image file.