The Windows 10 Creators Update includes a redesigned Windows Paint app called Paint 3D. Being a touch first / ink first app, I was excited to spend some quality time with its wide collection of inking and paint tools. It also has a community called Remix 3D where you can share what you create, adding a social flare to the new app as well. Granted, I’m no Picasso but, it’s still been a lot of fun particularly it’s three-dimensional features.
We previously touched on the new Paint app, but haven’t explored it in detail until now so let’s jump in and review some of the basics and how to get started with this new free!
Editors note: Be sure to check out our Microsoft Paint 3D reference guide if you need help performing basic actions or if you have additional questions after reading this article.
How to Create Your First Paint 3D Project in Windows 10 Creators Update
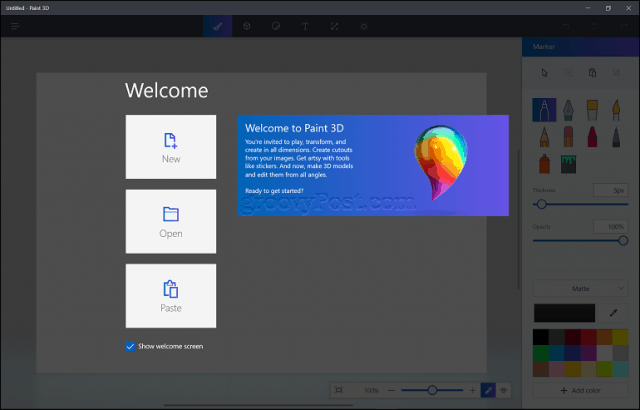
After launching Paint 3D, you’re greeted by a welcome page where you can start a new project; open an existing project; or paste content from the clipboard. Since this is our first time using Paint 3D, let’s start a new project.
The Paint 3D interface looks a bit different from previous generations of the app. Let’s go through a brief tutorial to learn about the different features of Paint 3D. If you want to learn more about Paint 3D; especially if you are a user of the old Paint app or a program like Paint.NET, check out our handy reference guide.
At the top corner, is the hamburger menu (Fig 1.), where you can create a new project, open an existing project, insert media, save your project, print it, share and publish your project, adjust Paint 3D settings and send feedback. Next to the hamburger menu are formatting tabs (Fig 2.). These are tools you can be used to manipulate objects, insert shapes, text, modify color, text and resize the canvas. Each tab will change the tools displayed in the task pane on the right (Fig 4.). Review the description of each tab below for details.
At the extreme right (Fig 3.) are commands for undo/redo and timeline. The timeline command lets you go through a history of all the changes throughout your project. When connected to the Internet, you will see the Remix 3D menu appear in this area.
![]()
A floating menu bar lets you zoom in and out of the canvas. By default, your canvas is displayed in edit mode, while the eye represents 3D mode. If you want to save your project as a 2D image, you can do so by clicking the camera icon, which you can save as a jpeg, png or bitmap graphic.

Tools – represented by a paint brush icon, this menu consist of selection, cropping and drawing tools you can use on the canvas. Users can choose from a variety of brushes such as the marker, calligraphy, oil brush, watercolor, pencil, Eraser, Crayon, pixel pen, spray can and fill. Below the brush, sliders can be used to adjust the thickness and opacity. Users can apply different styles such as Matte, Gloss, Dull metal and Polished metal. The color palette lets you choose from an array of colors, or you can create your own.

3D Objects – a major component of Paint 3D; users can choose from a collection ready-made 3D objects such as a cube, cylinder, capsule, doughnut, sphere, and cone. Paint 3D also includes 3D models you can use, but you can create your own using the 3D doodle command.

Stickers – Paint 3D also supports 2D objects. You can choose from popular shapes such as square, circle, star, heart, triangle or pentagon. A stickers tab includes pre-made stickers you can incorporate into your project. Pre-made textures can also be added, or you can use your own.

Text – Insert 2D or 3D text, apply different font styles, sizes, colors and formatting options such as Bold, Italic, Underline, left, center and right.

Canvas – this is where you work on a project, just like the old Paint app. The canvas can be resized using the free form selection or a specific specification.
Effects – One of the key aspects of creating 3D objects is the ability to add imagery that helps to highlight your content. The effects include a collection of textures suitable for different scenarios, such as sand, sky, mist and honey.
What are 2D and 3D and Why Would You Want to Create Such Content?
Before we begin, we should first try to understand what exactly 2D and 3D is. The obvious difference between the two, one is flat (2D), and the other has depth (3D). 3D tends to give an impression of realism, almost like it exist within a virtual space. It’s hard to simplify both, but the basic definition of 3D is the modeling of an object (living or unliving) or surface to provide depth, breadth, and width.
Why would you want to create 3D content? The reasons are endless. For example, animations or movies such as Toy Story, Shrek, Cars, and A Bugs Life have all revolutionized animation. 3D is also a building block of modern software such as computer aided grams (CAD) because they bring 2D imagery to life, making it easier for the user to envision what a completed project looks like; whether it’s a skyscraper; the inside of a plane, car or environment. Paint 3D can be a great stepping stone to using more advanced software like this on your PC.
Devices, such as 3D printers are becoming popular with the rise of easy to use 3D creation software. A 3D printer makes it possible to print digitally rendered objects such as a tool, toy or cup. Whatever you imagine, software like Paint 3D makes it possible for you to create, share and even produce into real life.
Creating Your First 3D Project Using Paint 3D
For our first project, I am going to use an existing image. Start by inserting an image. Simply select the hamburger menu, click Insert, browse to the desired image, select it then click Open. In my project, I am using a photo of the beach. The beach looks ok, but it’s a bit barren let’s add some objects that can give it a bit more pizazz.

Since we’re at the beach, some sun rays would be nice. Choose the Stickers tab, select the stickers sub-tab, then choose the sun sticker. When you insert a sticker, you have the option of converting it into a 3D object; give that a try by clicking the Make 3D button.
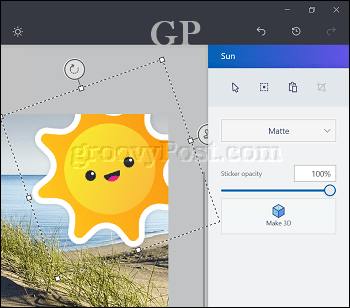
To preview your content in 3D, click the eye on the floating toolbar. You can also use the Perspective anchor to view the object in 3D on the fly.

If you want clouds, easy. Either use the doodle option or, select an existing shape or sticker. I prefer to just draw it.
Select the 3D Objects tab, under 3D doodle, click the soft edge 3D doodle, choose your color, then begin drawing using your mouse or pencil.
After drawing your cloud, you can move it around and resize it. Remember, if you don’t like your object, you can always delete it from the 3D objects pane, use undo or the timeline to go back. If you start drawing and make a mistake along the way, you might become confused because your lasso line can’t be stopped. Press the Esc key to delete it then start over.

Note: Don’t hesitate to use up your canvas space to draw 3D objects. Initially, I was drawing objects based on the dimensions of the image, for example, I was drawing a cloud in the sky of the image, but I wasn’t creating a cloud I liked. Instead, I drew a large cloud then used the anchors to resize it.
If you want to make a duplicate, select the object, from the 3D object tab, click Copy then Paste in the task pane.
So far, we’ve added some objects; giving our imagery more depth, but we’re still missing a couple of things. Living on an island, the coconut tree is a fact of life on the beach. Instead of creating one from scratch, I think we should check the Remix 3D community for 3D models that might be available.
Remix 3D is the social aspect of Paint 3D, where you can publish your completed projects and also find great content you can incorporate into your project. Click the Remix 3D icon at the top right-hand corner.
Note: Remix 3D, Sharing and Social Features are only available when you’re connected to the Internet. If you don’t see these features after connecting to the Internet or they remain grayed out, close Paint 3D then re-open your project.
If you don’t have an existing profile, you can set up one right away. Remix 3D also suggest available aliases you can choose if one is not available.

After setting up an account, you can explore the 3D community a bit. Play with it. View existing 3D models from other community members or search for something you need. To find a model, type in a query then hit enter. You might need to refine your search term to find what you are looking for sometimes; I initially searched for coconut tree but wasn’t able to find any. Changing the query to palm tree, came up with matching results.

After finding a 3D model, select it, then click insert.

Note: If you plan to re-use the model, you can add it to your project board where you can save it for future projects.

After inserting your objects, just like clip art, go ahead resize and move it around a bit to your liking.

Another simple yet powerful feature is adding text to your project. Paint 3D supports 2D and 3D text; since we know what 2D is like, let’s add something in 3D. To begin, select the text tab, choose 3D, select a font style, size, color, formatting, and orientation.
Viewing your content in 3D
Once you’re ready, Click the View in 3D icon then use your left mouse to click and rotate the canvas. You can also touch and move the canvas to view it at different angles.

Publish Your Project to Remix 3D or Share on Social Networks
When you’re ready to share your 3D image with the world, click the hamburger menu > Share, then choose one of the charms to share your content.

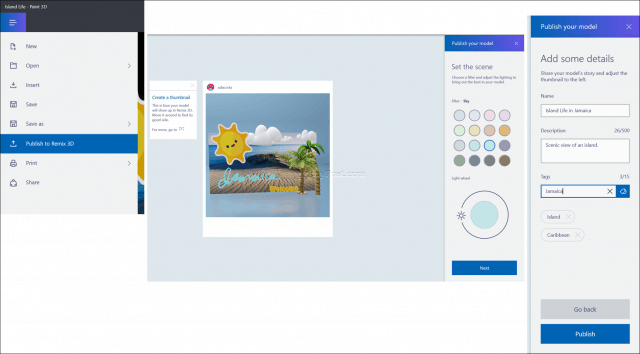
If you want to publish to the Remix 3D community where others might find your content useful, click the hamburger menu > Publish to Remix 3D. To get your content ready for the Remix 3D community, Paint 3D will guide you through a wizard where you can label your model and choose an appropriate texture to highlight the scenes in your project.
This first look at Paint 3D is just as new to me as it might be to you. The only limit is your imagination. Initially, I was skeptical about the app. But, the more I used it, the more I enjoyed the experience.
My suggestion, don’t be scared of it. Just jump in, add a few images and just play! The app encourages you to experiment and share your creations. If you find you’re not sure what to create, dive into Remix 3D and look at what others are creating. You never know, you just might get interesting again. ;)
Today, my primary purpose was to just introduce Microsoft Paint 3D to you in order to show you how easy it is to use. Over the coming months, however, be sure to check back because I am planning create more tutorials which explore some of the other features and options of Microsoft Paint 3D.
Let us know what you think, and if you’ve been playing with Paint 3D already. Share some of your tips with us in the comments.


Jim Shunamon
March 14, 2017 at 2:52 pm
Looks interesting. What would be really cool would be if you could make 3D wallpapers with it.
Andre Da Costa
March 15, 2017 at 1:41 pm
You can, but you probably would need something like the Windows Mixed Reality to see it.
Jim Shunamon
March 15, 2017 at 3:51 pm
Good point Amdre. I hope i live to see the day when that won’t even be necessary. :–D
Andre Da Costa
March 16, 2017 at 7:02 pm
Give it 3 to 5 years.
Paul Hoolahan
March 23, 2017 at 4:02 pm
Andre,
Paint 3D shuts down after I inset an object then attempt to make changes? Any ideas?
Paul H
Andre Da Costa
March 25, 2017 at 12:42 pm
Probably needs an update, I would also report the error using the Feedback hub.
Pam Brammer
August 10, 2017 at 5:07 am
Can you rotate a picture that you have placed on Paint 3D Canvas?
Bethanie
April 10, 2019 at 10:13 pm
How to you carve an object, like take chunks out of an object?
Joanne
September 19, 2019 at 6:08 am
Bethanie, did you ever find out how to do this? I see you never received a reply….