Your Guide to Using BitLocker Encryption on Windows 10

If you have sensitive data on your computer, you’ll want to ensure that it stays secure by encrypting the drive. Here’s how to use BitLocker for just that.
If you keep sensitive data on your computer, protecting it is a critical part of maintaining its integrity. This is especially true for mobile users. Since the release of Windows, Vista Microsoft introduced a new security feature called BitLocker Drive Encryption. Windows 7 introduced the BitLocker To Go feature for portable storage devices such as thumb drives and SD cards.
Windows 10
For Windows 10, you need to be running the Pro or Enterprise edition. Why Microsoft does not make this a standard feature across all editions is still mind-boggling, considering that encrypting data is one of the most effective ways to help keep it secure. If you are running Windows 10 Home, you will need to perform an Easy Upgrade to Windows 10 Pro to get it.
What is Encryption?
Encryption is a method of making readable information unrecognizable to unauthorized users. When you encrypt your information, it remains usable even when you share it with other users. If you send an encrypted Word document to a friend, they will need first to decrypt it. Windows 10 includes different types of encryption technologies, the Encrypting File System (EFS) and BitLocker Drive Encryption, which we will look at in this article.
What You Should Know and Do in Advance
- Encrypting your entire hard disk can be a long process. I strongly suggest before enabling BitLocker, make sure you backup your entire computer. This is recommended if you don’t have a UPS then a power outage occurs during the encryption.
- The latest Windows 10 November Update includes a more secure encryption standard you can take advantage of. Please note, though, the new encryption standard is only compatible with other Windows 10 November Update systems.
- If you are running Windows 10 on an older computer without the Trusted Platform Module chip (TPM 1.2), you might not be able to set up BitLocker. Please review the troubleshooting steps further down in this article.
Turn on BitLocker Drive Encryption in Windows 10
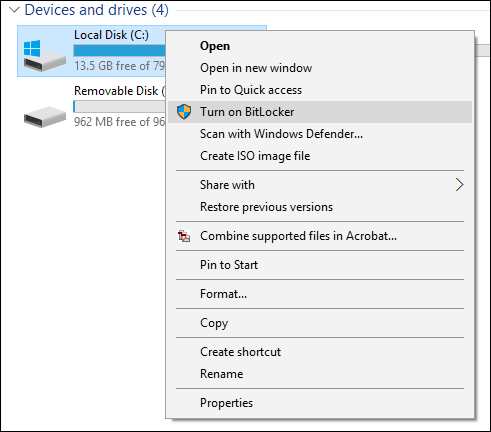
Click Start > File Explorer > This PC. Then right-click your system drive where Windows 10 is installed, then click Turn on BitLocker.
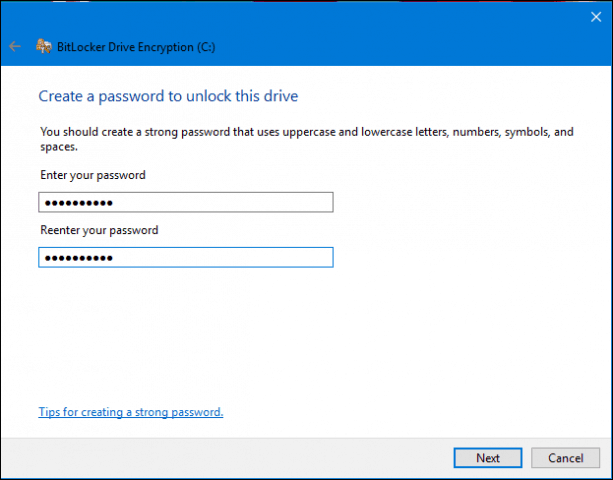
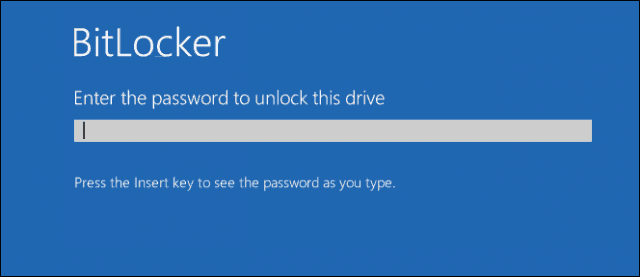
Enter a password to unlock your drive; this will be an important test to ensure you can boot the system if you happen to lose the recovery key.
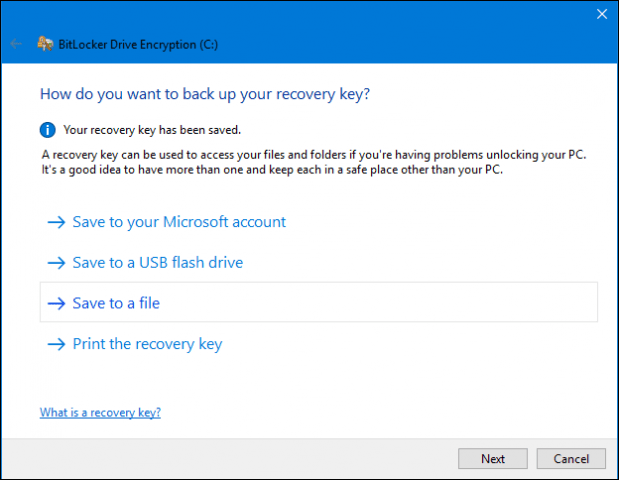
Choose how you want to back up your recovery key, you can use your Microsoft account if you have one, save it to a USB thumb drive, save it somewhere other than the local drive or print a copy. I will save my own to another computer then print a copy.
Choose the Drive to Encrypt
You have two choices when encrypting your local disk if it is a new computer just pulled out of the box, use the Encrypt used disk space only. If it’s already in use, choose the second option — Encrypt the entire drive. Since I was already using this computer, I will go with the second option. Note, it will take some time especially if it’s a large drive. Make sure your computer is on UPS power in case of a power failure.

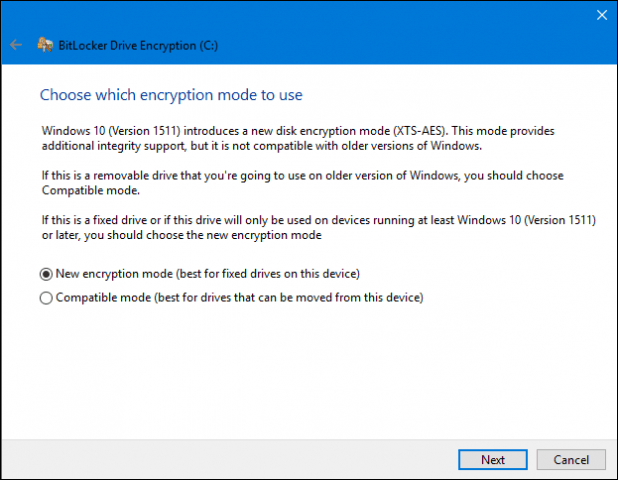
If you are running the Windows 10 November Update, it includes a more robust encryption mode called XTS-AES providing additional integrity support with an improved algorithm. If it is a fixed drive, choose this option.
When you are ready to encrypt, click Continue.

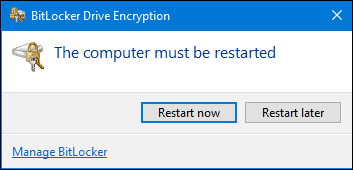
Restart your computer when prompted.
Remember that password you created earlier? Now is the time to enter it.
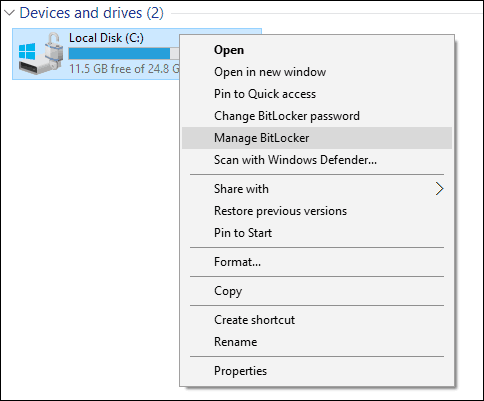
After logging into Windows 10, you will notice there is not much happening. To find out the status of encryption, click Start > File Explorer > This PC. You’ll now see a padlock emblem on the system drive. Right-click the drive then select Manage BitLocker.
You will see the current status which is C: BitLocker Encrypting. This will take some time, so you can continue using your computer while encryption takes place in the background, you’ll be notified when it is complete.

When BitLocker Encryption is finished, you can use your computer as you normally do. Any content created in addition to your communications will be secured.

If at any time you would like to suspend encryption, you can do so from the BitLocker Encryption Control Panel item. Click the Suspend link. Data created when in suspension is not encrypted. It is recommended you turn off BitLocker encryption when upgrading Windows, modifying the computer’s firmware, or making hardware changes.

Troubleshooting BitLocker Setup
If you receive the following error when trying to set up BitLocker, it likely means your computer does not support the Trusted Platform Module (1.2) chip.

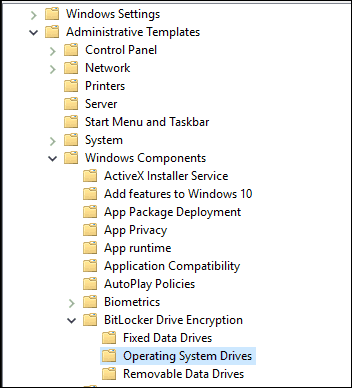
You can work around the error by launching Group Policy then make an exception. Press Windows key+R then type: gpedit.msc then hit Enter on your keyboard. Expand Administrative Templates then Windows Components then Bitlocker Drive Encryption then click Operating System Drives.
Right-click Require additional authentication at startup then click Edit.

Choose Enabled and then check the box to allow BitLocker without Compatible TPM in the Options section.

For more on this workaround, read our article: How to Enable BitLocker On PCs Without TPM.
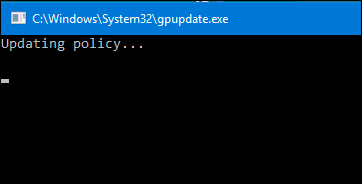
Confirm the Changes
Click Start then type: gpupdate.exe /force to ensure the changes are applied. I would also recommend you restart your computer after executing this command.
BitLocker might not be for everyone, but for people who work in environments with sensitive data that you travel with, it is recommended. I recommend you invest in a dedicated thumb drive to store your recovery key and also keep a printed copy of the 48 character key just in case you lose either. Also, make sure you create a thorough backup before starting this process. You can never have too many backups of the backup.
Remember that you can encrypt flash and SD drives, too. For more on that read our article: How to Encrypt a USB Flash Drive or SD Card with BitLocker to Go.


Tom
May 26, 2016 at 5:16 am
please would you have a tip how to solve issue with device manufacturer recovery partition? (Lenovo windows recovery partition)
Bitlocker is telling me that I have to manually move this partition but I dont know what it means and what will be the consequences.
Thank you
Gordon Murison
August 9, 2016 at 1:51 am
Tom, I just updated my desktop pc to build 1607 clean install. I had a drive bitlocker encrypted. I only reconnect the drive after windows is installed. The drive no longer shows up and I need to go into to disk management to intialize, but when I do windows wants to format the drive, its full of data I can’t replace.
Thanks
Me
August 29, 2016 at 6:26 pm
Same issue. Plz help
Andre Da Costa
October 13, 2016 at 11:35 am
You should always disable encryption before upgrading your operating system on all drives.
Pascal Hubert
August 20, 2016 at 5:45 am
Hi,
If you are using XTS-AES encryption algorithm you’ll cannot use hardware encryption with hdd or ssd like Samsung pro or Intel 5×0 series because they recognize only AES and not XTS-AES encryption.
I’m testing this since 2 days with an Intel 530 series!
no luck!
Best regards.
Matt
September 29, 2019 at 1:33 pm
Hi,
Just purchased in the UK a new HP Envy13 aq0000na (2019) with Windows Home (v.10.0.18362) and recognised that for me Bitlocker was actually turned on for the C drive by default.
Best,
M.
diskman
June 3, 2020 at 3:13 pm
For full disk encryption you need TPM!
Carlos Giraldo
June 2, 2021 at 9:23 am
I think he meant gpupdate /force lol
Dave Bee
July 12, 2021 at 5:42 am
Probably need to change that to GPUpdate.exe /force. There are no choices in Windows 10 for encryption options, I have not checked to see what it’s using but there’s no gp policy/folder. A TPM is not required for fake windows 11 they’re redoing the validator, it’s a work in progress. Follow this guide to enable Bitlocker and set Windows Updates for the fast releases and you’ll get it.