Windows 10 November Update: Reclaim 20 GB of Disk Space
When Microsoft releases a major update there are always previous Windows install files left behind. Here’s how to delete them to reclaim disk space.
When Microsoft releases a major update, like the November Update Version 1511 Build 10586, there are always previous Windows system and installation files left behind. They are left behind in case you need to roll back to the previous version.
However, if you’re happy with how everything is running after your update, you can clear it from your PC to save a considerable amount of disk space. I’ve installed the November update on a few different PCs and have been able to reclaim around 20 GB of space.
We showed you how to free up drive space after upgrading to Windows 10 back in July, and it’s worth revisiting.
Get Your Drive Space Back After the Windows 10 November Update
Open This PC, right-click your local drive (typically C), select Properties, and then launch Disk Cleanup.

Next, instead of selecting the files to delete, click on Clean up system files.
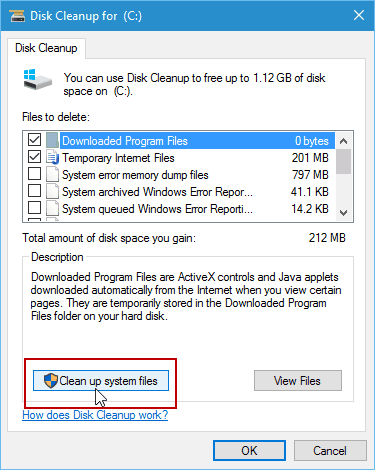
Wait while Windows 10 calculates the amount of space you’ll be able to free up.

When it’s complete, select the files to delete. Most importantly, make sure to check the Previous Windows installation(s) box. In the screenshot below, you can see, I’ll be able to free up 19 GB of space just from that alone. I always check the Temporary Windows installation files, too. You can reclaim even more space by selecting the other temp files. In this case, I’m freeing up just over 24 GB of space.

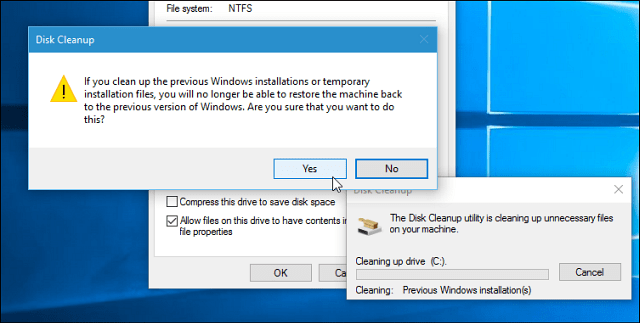
Click OK and click Yes when the verification messages come up. Then wait while those files are deleted, and your drive is cleaned up.
If your computer has a low-capacity SSD drive, this is particularly useful. One more thing worth mentioning is that with this latest update, you can now make Windows 10 install new apps to an installed SD card that helps you save even more storage space.


anil
November 20, 2015 at 6:15 am
Thanks for the article
when I delete the pervious version on OS and freeup the space, in future when I want to restore back the pervious OS is this possible
Thanks
Anil
Ron Lund
November 20, 2015 at 3:43 pm
I’m pretty sure that if you have enabled the backup and restore option within windows then getting rid of the files you mention here won’t have any affect on doing a restore to a previous time. A better option though is to create a system image. Not difficult to do and will get your computer back to exactly where it was and include all the windows systems files as well as your data files. In other words……if you wanted to maybe go back to a previous version of Windows then you should create the system image file and save it to a external hard drive or cloud option before you upgrade to the newer version of window. Hope this helps.
Ron Lund
November 20, 2015 at 10:03 am
I’m glad I used this suggestion. I managed to gain a considerable amount of disk space by doing this. I’ll have to do the same thing on another computer to see if I get the same results……probably will.
Ron Lund
November 20, 2015 at 11:06 am
When everything was finished I gained 212GB of extra disk space on my hard drive. That’s a fair amount.
colin carpenter
November 20, 2015 at 10:51 am
I noticed on the “local disk (C) properties, that the “allow files on this drive to have contents indexed….” is ticked. Does this really make a difference?
Ron Lund
November 20, 2015 at 11:04 am
Yeah!! I’m not really sure I know what the heck this means. Can anybody enlighten me?
Ron Lund
November 20, 2015 at 11:33 am
OK……I did a Google search on indexing and now I’m better informed.
Ziggy
November 20, 2015 at 10:29 pm
Can the ESD folder in the C directory be deleted? Ideas on this would be appreciated.
Ron Lund
November 21, 2015 at 2:05 pm
ziggy…….you might take a look at this link:
http://answers.microsoft.com/en-us/windows/forum/windows_8-files/can-the-esd-folder-be-moved-to-a-different/82f176e0-ee9e-46aa-9bfa-d6a1fb18bd9b?auth=1
Ziggy
November 21, 2015 at 4:50 pm
@Ron Lund: Thanks for the link Ron. I’d already copied the ESD folder to a USB, so it looks like I can safely delete and re-copy it back if the need arises. Much appreciated for your help.
clayto
November 21, 2015 at 8:37 am
I found that the reason why Cortana was not finding hardly anything on my local drive (C) but kept doing an online search instead, was that indexing was not turned on. Once I turned it on, local results came thick and fast.
Ron Lund
November 21, 2015 at 2:00 pm
Hmmmm…… Well, that’s kind of interesting. I’m glad I know that little ditty now. Thanks.
Mridul
December 8, 2015 at 8:19 pm
Great its working… i deleted around 16 GB of Cache Files from C Drive…Thanks for the Tips.
Felix
January 9, 2016 at 3:36 pm
Dang, I had no idea about this! I need to do this ASAP; my tiny 120GB SSD is so full it’s about to explode!
Ursula
May 17, 2017 at 11:15 pm
Yupp same here, just saved me a lot of space!
Cheers :)