Windows 7 update, KB2852386, is now available for all Windows 7 users via Windows Update. If you have automatic updates enabled, you probably already have it installed. If you want to install the update , the x64 version can be downloaded here. The x86 one is available at this address.
The update cleans up the WinSxS store, a place where Windows stores old update files. That’s done so you can later roll back to previous updates in case something doesn’t work as expected. Remember that, if you use this cleanup method, you may not be able to get back to an older update. However, in my experience, it’s rarely needed, if ever, and you can do it manually if it’s absolutely necessary.
Delete Old Update Files in Windows 7
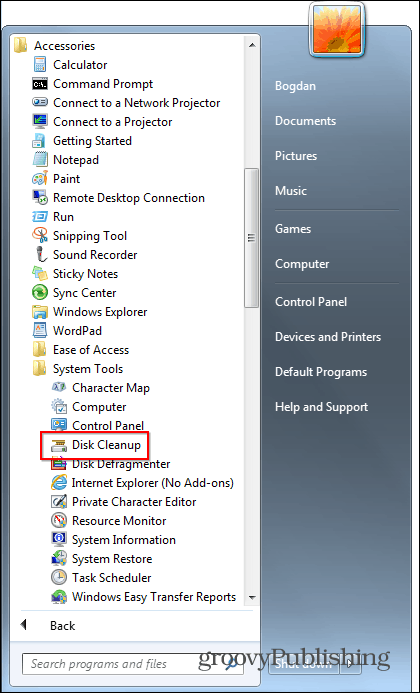
Using the new feature couldn’t be easier. Open the Start menu and navigate to All Programs > Accessories > System Tools > Disk Cleanup. Alternately, you can type: disk cleanup in the search box as explained in this article.


Next select your System Drive – in most cases that drive will be C:, but you may have things configured differently.


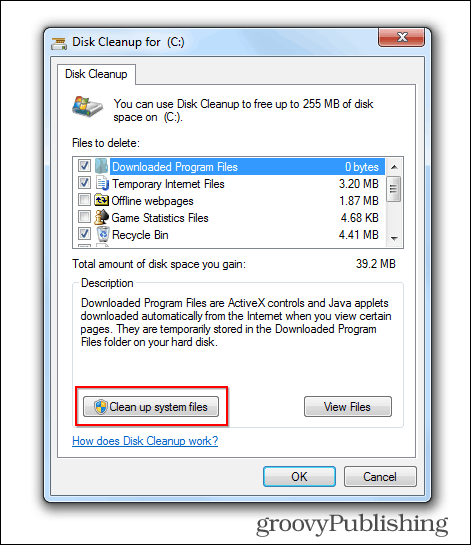
If you’ve used the Disk Cleanup tool before, you’ll notice one little change. The Clean Up System Files button appears at the bottom of the window, as seen below.


Click that button; you’ll be asked to select the drive again. Here comes the part where you get to find out just how much disk space you can reclaim by deleting old updates. Scroll down until you find Windows Update Cleanup.
Here you can see that old updates are using 3 GB of space on my drive.


There’s one thing left to do if you want to claim that space back. Make sure the box next to Windows Update Cleanup is ticked and click OK. You can, of course, tick whatever else you want to clean up. You’ll be asked to confirm the deletion of those files.
If you Disk Cleanup again and go in to Disk Cleanup again, you’ll see if the space has indeed been cleaned up.


8 Comments
Leave a Reply
Leave a Reply


Charles Billow
October 19, 2013 at 3:28 pm
I tried to install the update, but it said it was already installed…then I ran Disk Cleanup, but the button was not there.
Chuck Billow
PapaLee
October 19, 2013 at 8:20 pm
I’m running Win7, SP1, 64 bit, and have had KBKB2852386 installed for 4 days with two reboots.
However, the “Cleanup system files” option doesn’t appear. Do I need to remove the update and try again?
Adam
October 20, 2013 at 4:07 am
Same here – the update is installed, but the “system files” option is not available.
Adam
October 20, 2013 at 4:10 am
I take that back. What I did was run the clean-up tool anyway, and it rescanned the computer. This time, it DID list “system files”, and I was able to go ahead and clean it up.
Daniel
October 20, 2013 at 8:32 am
Bogdan,
I’m on Windows 7, SP1, 64 bit. This little trick allowed me to reclaim 5.3 gig on my C drive. Thanks man, for the cool tips! Keep up the good work!
Daniel
Austin Krause
October 21, 2013 at 1:58 pm
3 gigs saved here!
http://i.imgur.com/7wVKuUl.png
Steve Krause
October 22, 2013 at 11:49 am
You know what saved me a bunch of room? My old iPhone backups. https://www.groovypost.com/howto/space-delete-reclaim-location-ios-backup/
I saved several gigs just by blowing away old backups of phones I don’t even own anymore.
Austin Krause
October 22, 2013 at 12:22 pm
Nice! If you have an SSD it makes this even sweeter.