Windows 11 VPN Not Working: 9 Fixes

A VPN can help protect you and your data online. If you’re having issues with your Windows 11 VPN not working, try the fixes in this guide.
A VPN can help to protect you and your data from hackers and even marketers. You can also use a VPN to access location-restricted content from outside your region, such as BBC iPlayer or Netflix in other locales.
If you use a VPN, you won’t want to go back. That’s why it can be frustrating when your Windows 11 VPN stops working. Windows updates and other issues can cause problems that interfere with your VPN and stop it from working. The good news is that there are some workarounds that can help.
Here are some fixes to try if you’re having trouble with your Windows 11 VPN not working.
1. Update Windows
One of the regular updates to Windows 11 that was released in January 2022 caused a number of problems with VPN connections. A patch followed that fixed those issues. If you’re having problems with your Windows 11 VPN not working, updating Windows may help.
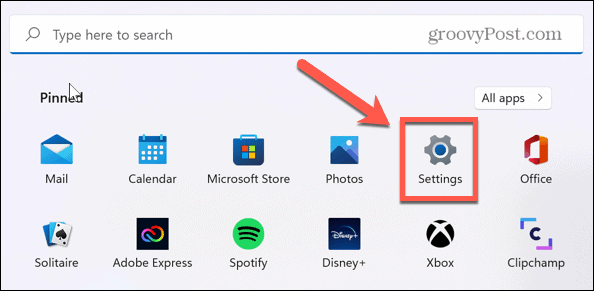
To manually update Windows 11:
- Open the Start menu.

- Select Settings from the pinned apps.

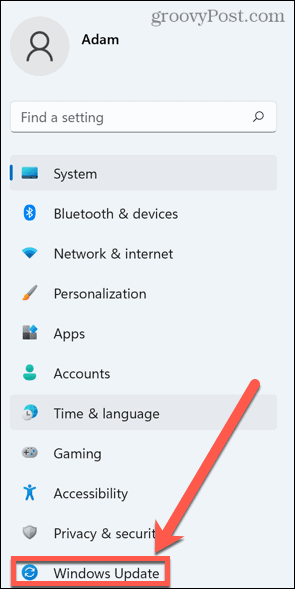
- In the menu on the left, click Windows Update.

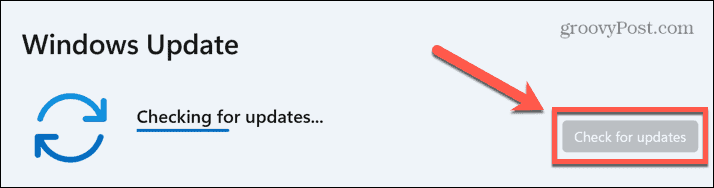
- Select Check For Updates to see if any updates are available.

- If updates are available, click Download Now to download and install the new updates.

- Once the update procedure is completed, try your Windows 11 VPN again.


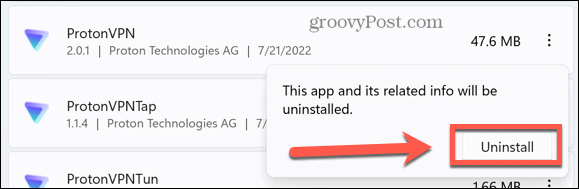
2. Reinstall Your VPN
Another reason that your Windows 11 VPN isn’t working may be due to some of the VPN files being corrupted or accidentally deleted. To fix this problem, try uninstalling and then reinstalling the VPN provider, which should restore all the files necessary for your VPN.
To uninstall your Windows 11 VPN:
- Open the Start menu.
- Select the Settings app.
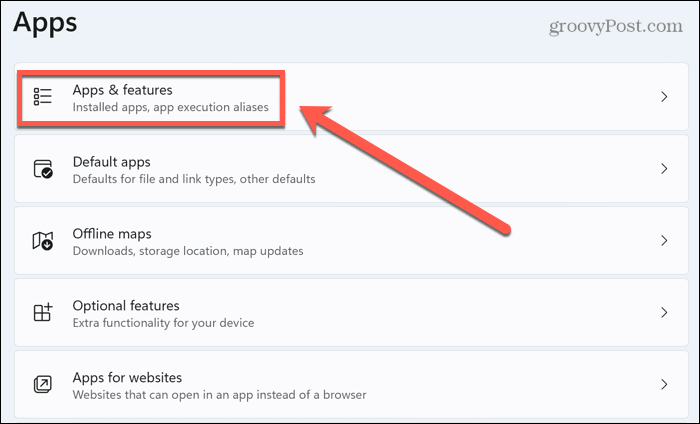
- On the left, click Apps.
- Click Apps & Features.

- Scroll through the apps until you find your VPN provider’s app.
- Click the three dots icon.

- Select Uninstall.

- Click Uninstall again to confirm.

- Once the app has fully uninstalled, download it again from the VPN’s official website and install it.
- Try your VPN to see if it now works.


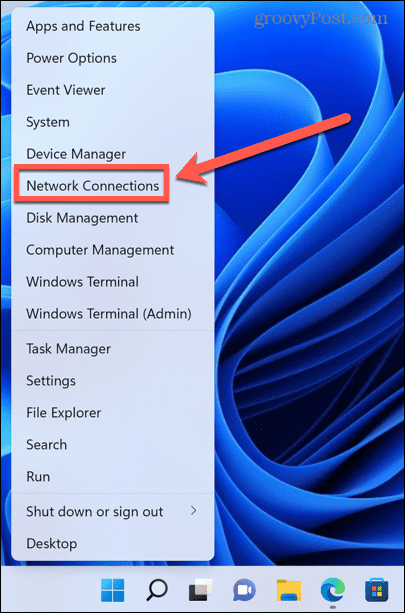
3. Reinstall WAN Miniport Drivers
WAN Miniport drivers are software drivers that are used for making network connections. Some of these drivers are used when making connections to VPN servers.
If there’s an issue with these drivers, then it may be the cause of your Windows 11 VPN problems. Reinstalling these drivers may fix your VPN troubles.
To reinstall your WAN Miniport drivers:
- Right-click the Start icon.
- Select Network Connections.

- Click the arrow next to Network Adapters.

- Right-click WAN Miniport (IP).

- Select Uninstall Device.

- Repeat these steps for WAN MiniPort (IPv6) and WAN Miniport (PPTP).
- Restart your computer and it will reinstall these drivers. You can now test your VPN to see if it works.


4. Flush Your DNS Cache
DNS stands for Domain Name System and is like the phone book of the internet. When you type a web address into your browser, DNS translates that web address into an IP address that your browser can load.
The first time you visit a site, your computer will use a DNS server to do the translation, but it will then keep a local record of that address for the next time you visit that site. Flushing this DNS cache can remove any out-of-date or corrupt DNS settings and may fix your VPN problems.
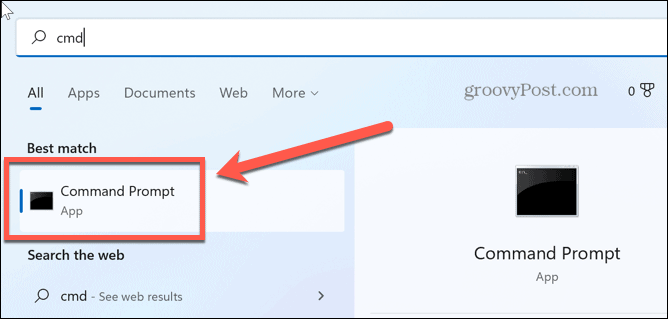
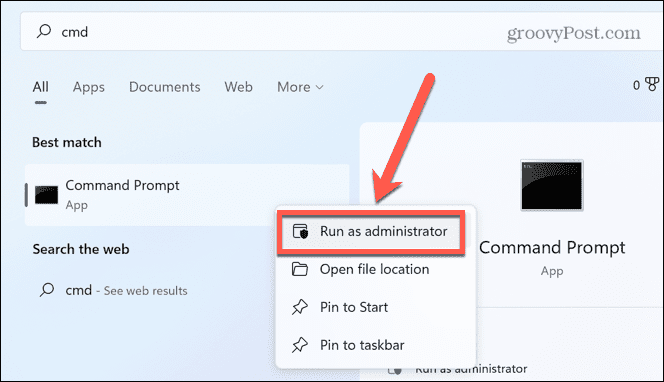
To flush DNS in Windows 11:
- Click the Start icon.
- In the search bar, type cmd.

- Right-click Command Prompt.

- Select Run as Administrator.

- Confirm you want to allow the app to make changes to your computer.
- Type ipconfig /release and press Enter.

- Once the command is complete, type ipconfig/ flushdns and press Enter.
- Type ipconfig /renew and press Enter.
- Type netsh int ip reset and press Enter.
- You’ll see a message stating that you need to restart Windows. Don’t do this yet.
- Type netsh winsock reset and press Enter.
- Now restart Windows for the changes to take effect.
- Test your VPN again.


5. Disable IPv6
IPv6 is the latest generation of Internet Protocol (IP) address standards. IP addresses provide a unique address for every device connected to the internet. IPv6 is an updated version of the commonly used IPv4 protocol that can handle 128-bit IP addresses.
While IPv6 offers a number of benefits over IPv4, it can also cause some issues. Disabling IPv6 can help to fix your problems with your Windows 11 VPN not working.
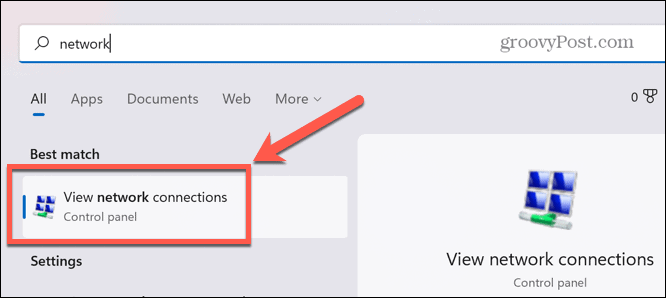
To disable IPv6 in Windows 11:
- Open the Start menu.
- In the search box, type network.

- Click View Network Connections.
- Right-click your VPN in the Network Connections window.

- In the list of properties, make sure that Internet Protocol Version 6 (TCP/IPv6) is unchecked.

- Click OK and test your VPN again.


6. Change Your Windows Firewall Settings
Windows Firewall is intended to protect your computer from unauthorized network traffic, reducing the risk of problems from viruses, spyware, and other malicious software. Sometimes, however, your firewall may block your VPN from connecting successfully.
You may want to configure the firewall to add your VPN to the authorized list of apps that are allowed to connect through it.
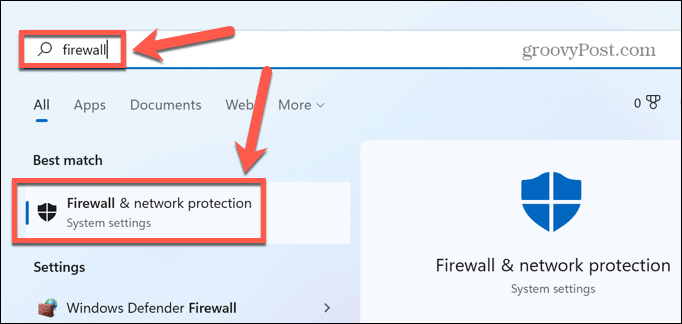
To allow your VPN in Windows Firewall:
- Click the Start icon.
- In the search box, type firewall and select Firewall & Network Protection.

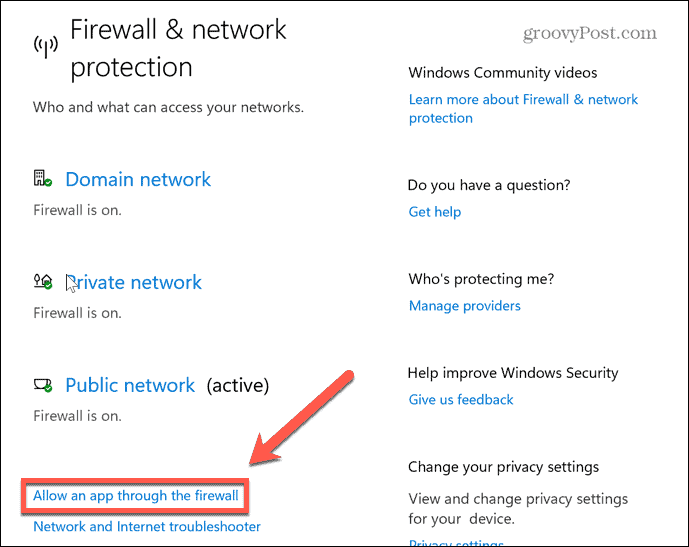
- Click Allow an App Through the Firewall.

- Click Change Settings. You’ll need to be signed in to an administrator account to make changes.

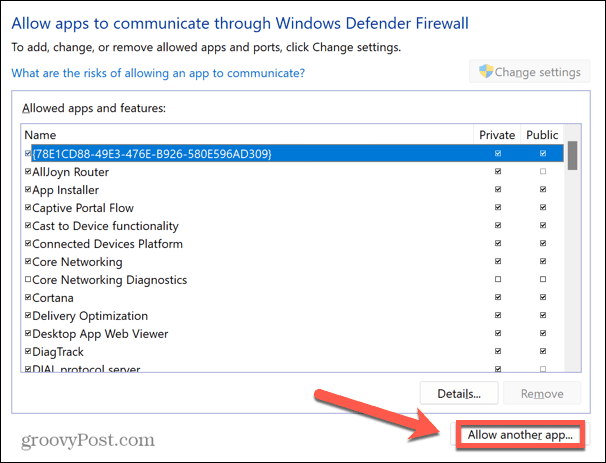
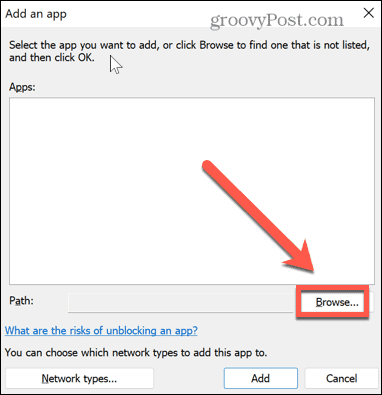
- At the bottom of the window, click Allow Another App.

- Click Browse.

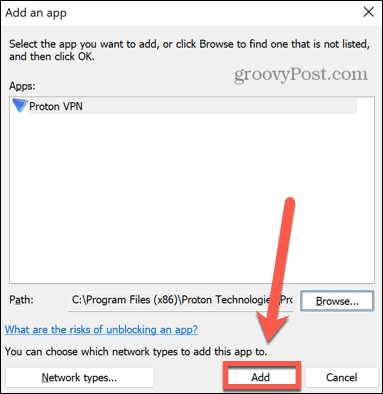
- Navigate to the location of your VPN app and click Open.

- Click Add to allow your VPN through the Windows Firewall.

- Try your VPN again.


7. Disable Windows Firewall
If the above steps don’t work, you can try disabling the Windows Firewall completely.
We wouldn’t recommend leaving your firewall switched off for long periods of time. Windows Firewall protects your PC and local network from malware attacks and hacking attempts. However, as a troubleshooting measure, temporarily disabling the firewall is a good way to test whether or not it’s causing VPN issues on Windows 11.
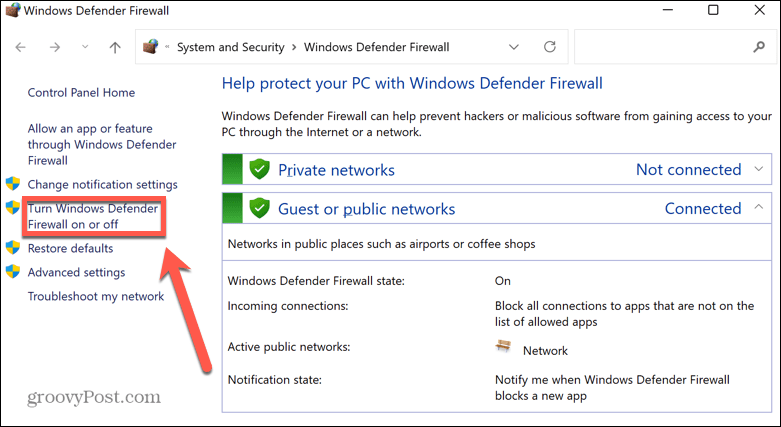
To disable Windows Firewall on Windows 11:
- Open the Start menu.
- Type firewall into the search box and select Windows Defender Firewall.

- In the left-hand menu, click Turn Windows Defender Firewall On or Off.

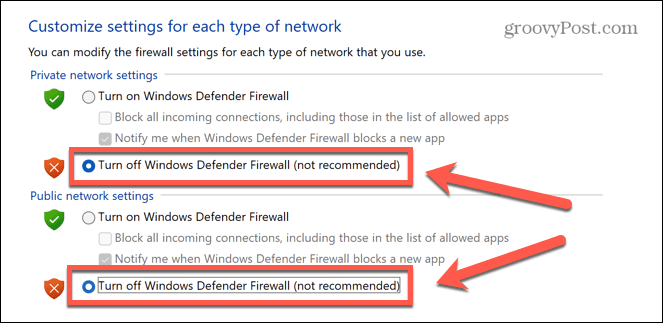
- Select the Turn off Windows Defender Firewall radio buttons.

- Click OK and test your VPN again.
- If it doesn’t work, the firewall is probably not the cause of your problem, so you can turn it back on.

8. Disable Proxy Server Settings
A proxy server is a gateway between you and the internet. It can help to protect you from cyber attackers, but it could also cause problems with your VPN.
Some VPN providers come with proxy server functionality. If you have a proxy server enabled, disabling it may solve your Windows 11 VPN troubles.
To disable a proxy server in Windows 11:
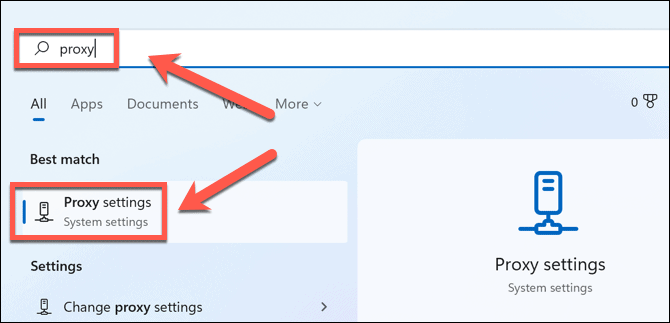
- Open the Start menu.
- In the search box, type proxy and press Proxy Settings.

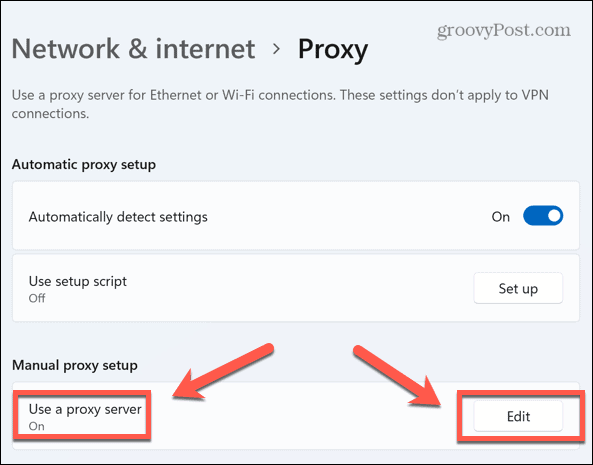
- Scroll to the Manual Proxy Setup section.
- If Use a Proxy Server is set to on, click Edit.

- Toggle the Use a Proxy Server slider to the Off position.

- Click Save and try your VPN again.

9. Configure UDP Encapsulation
This last fix involves making changes to the Windows Registry. Making changes to the Registry without care can cause serious issues if you change the wrong thing. You should only try it if none of the other fixes have worked.
The reason for making this change is quite technical—your computer may not be able to make an L2TP/IPSec connection to the VPN server. Reconfiguring UDP encapsulation in the Registry can overcome this problem.
To reconfigure UDP encapsulation in Windows 11:
- Press Windows+R to open the Run dialog box.
- Type regedit and press Enter.

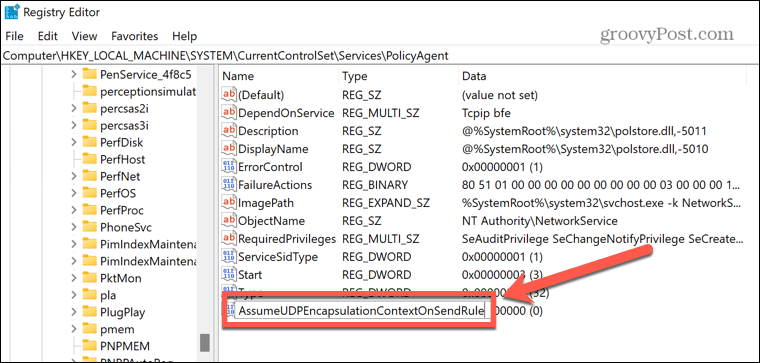
- In the Registry Editor, select HKEY_LOCAL_MACHINE > SYSTEM > CurrentControlSet > Services.

- Scroll down until you find the PolicyAgent key and right-click it.

- Click New > DWORD (32-bit) Value.

- Type AssumeUDPEncapsulationContextOnSendRule and press Enter.

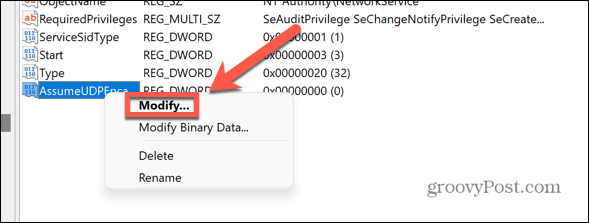
- Right-click on this new entry and select Modify.

- Change Value Data to 2 and click OK.

- Exit the Registry Editor and restart your computer.
- Try your VPN again.


A VPN Can Keep You Protected
If you’re having issues with your Windows 11 VPN not working, one of the fixes above should help to resolve the issue. You may find that the VPN provider itself is the problem. If that’s the case, you may want to switch to a provider like NordVPN or Private Internet Access instead.
Having a working VPN is important to keep you and your data safe online. VPNs aren’t just good for laptops and desktops—you can set up a VPN on iPhone or iPad or other mobile devices. If you’ve got a lot of connected devices in your home, you can consider using a VPN on your router to protect all of your devices at once.


dan
September 8, 2022 at 9:10 am
Will these tips work for Windows 10 Pro?
Thanks,
Dan