How to Record Your Screen With Internal Audio on a Mac

Native screen recording on Mac will only pick up audio from your microphone. If you want to record other internal sounds, follow this guide.
Recording your screen on Mac is simple to do with the native screen recording tool.
Frustratingly, you can only record audio from your microphone. Any internal audio, such as the sound from a video playing in a browser window, doesn’t get picked up. The good news is that it is possible to record internal audio, but you’ll need to make use of a third-party app.
Here’s how to record the screen with internal audio on a Mac.
How to Install BlackHole
In order to record the screen with internal audio on a Mac, you’ll need to install a free piece of software called BlackHole. This software allows you to pass audio from one application to another, and you can also use it to set up your internal audio as a recordable source.
To install BlackHole on a Mac:
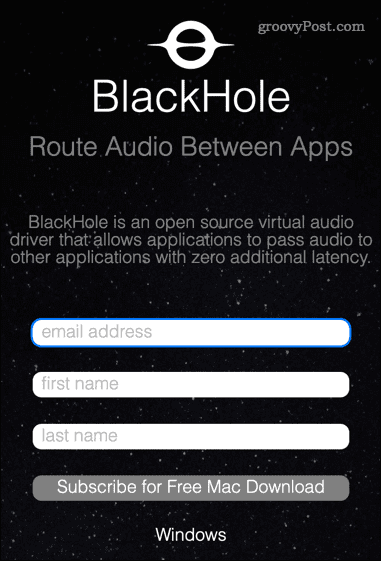
- Navigate to the BlackHole download page.
- Enter your details and click on Subscribe for Free Mac Download. If you’re worried about receiving spam, you can sign up with a temporary disposable email account.

- You should receive an email from Existential Audio Inc. Click on the link in the email to access the BlackHole download page.
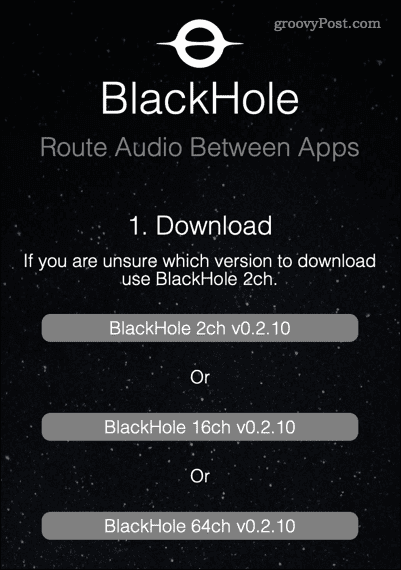
- There are three download options. Click on the BlackHole 2ch option—this is sufficient for recording your internal audio.

- Once the installer has downloaded, open your Downloads folder in the Finder app, and double-click on the BlackHole pkg file.

- If you’re asked, for permission to install the app, enter your system password and click on Install Software.

- The installer will launch—click Continue.

- Read the license and click on Agree if you’re happy to proceed.

- Work your way through the installer until the installation is complete, and then click Close.

- Unless you have a reason to keep it, click Move to Trash or Move to Bin to delete the installation file.


BlackHole is now installed on your Mac.
How to Set Up BlackHole to Record Internal Audio on a Mac
The next step is to set up BlackHole so that it turns your internal audio into a recordable output.
To set up BlackHole to record internal audio on a Mac:
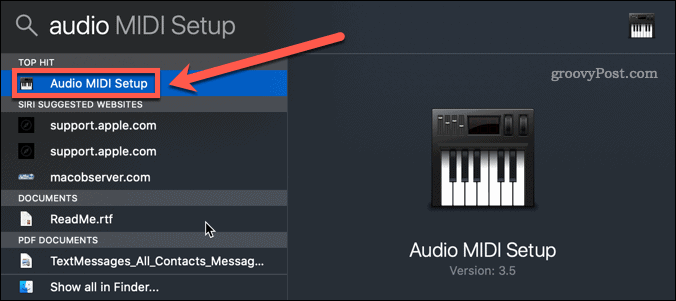
- Open the Audio Midi Setup app on your Mac. The quickest way to do this is to open Spotlight using the shortcut Cmd+Space and then type Audio Midi Setup.
- Double-click on the Audio Midi Setup app.

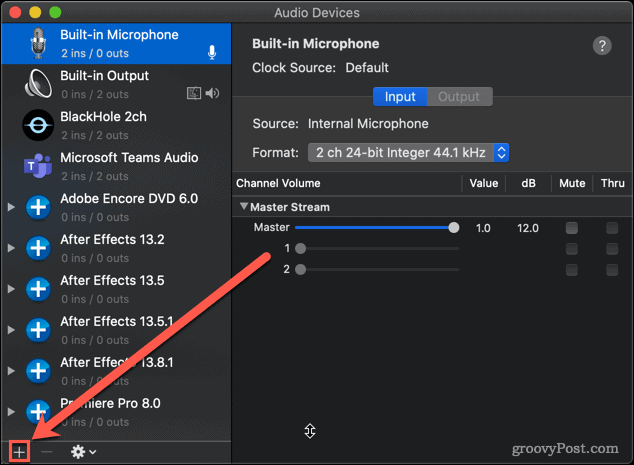
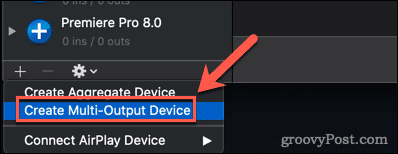
- Click on the + icon at the bottom of the screen.

- Click on Create Multi-Output Device.

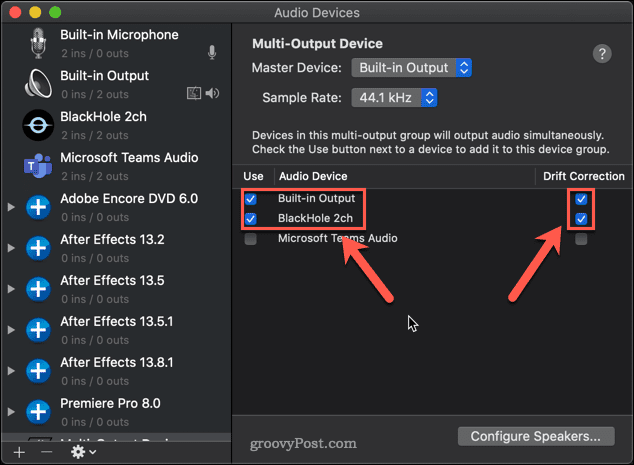
- Ensure that both Built-in Output and BlackHole 2ch are checked. It’s also worth clicking Drift Correction for best performance.
- It’s important that Built-in Output is the top option; if this isn’t the case, uncheck BlackHole 2ch and recheck it again, and Built-in Output should appear at the top.
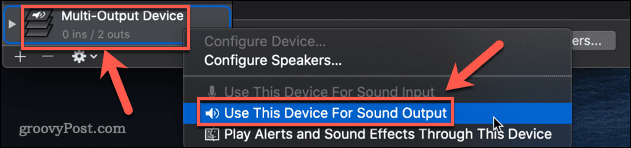
- Right-click on your new Multi-Output Device and select Use This Device For Sound Output.

BlackHole is now set up.
How to Record the Screen With Internal Audio on a Mac Using BlackHole
Now that all the settings are complete, it’s time to record your screen. The quickest and easiest way to do so is with your Mac’s native screen recording tool.
To record the screen with internal audio on a Mac:
- Launch the screen recording tool with the keyboard shortcut Cmd+Shift+5.
- Select your screen recording option. The left-hand option records the whole screen, the right-hand option allows you to select an area to record.

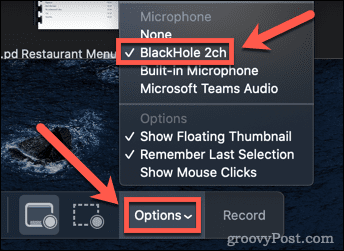
- Click on Options and under the Microphone section, click on BlackHole 2Ch.

- Click on Record to start the recording.

- When you have finished recording, press Cmd+Shift+5 again and click on the Stop Recording icon. Alternatively, you can use the keyboard shortcut Cmd+Ctrl+Esc.

- A thumbnail of your recording will appear in the bottom-left corner of the screen. Click on it and press the Play button to play back the recording and ensure that your internal audio has been captured.
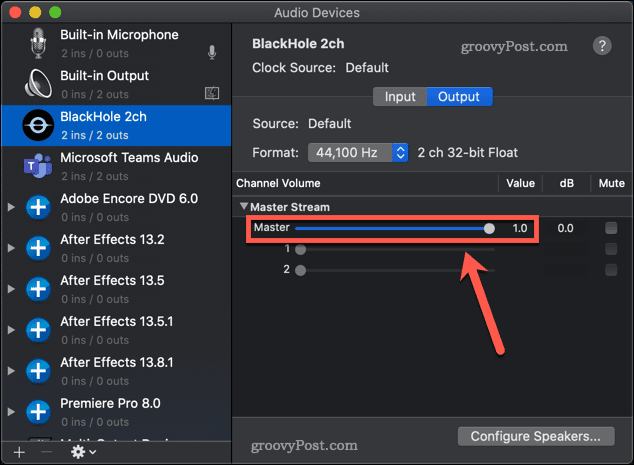
- One issue with using BlackHole is that you can’t change your system volume using the volume keys. To do so, you need to change the volume slider in the Audio Midi Setup.
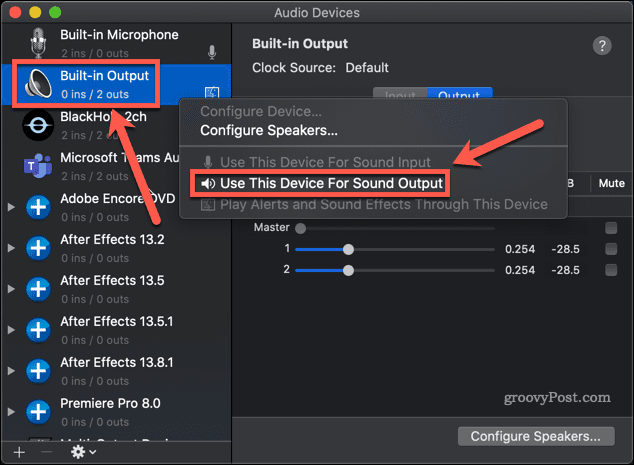
- To return your audio settings back to normal, right-click on Built-in Output in the Audio Midi Setup app and select Use This Device For Sound Output.
- You should now be able to control your system volume with the volume keys again.


Take Control of Your Mac Audio
It’s frustrating that for a company that prides itself on user experience, figuring out how to record the screen with internal audio on a Mac isn’t nearly as simple as it should be.
If you want to take more control of your Mac audio, there’s more you can learn. Knowing how to fix audio problems on Mac is a good place to start. It’s also useful to know how to Airplay audio from iPhone to Mac.


ken
October 14, 2022 at 12:47 pm
Thanks for your excellent how to. Great step by step instructions.
Calum
November 4, 2022 at 8:58 am
“It’s frustrating that for a company that prides itself on user experience, figuring out how to record the screen with internal audio on a Mac isn’t nearly as simple as it should be.”
I strongly suspect you can thank the Netflix legal department (and others) for that… that’s why you can’t take screenshots or video captures from the DVD player app, either.
orangefizz
November 26, 2022 at 1:06 pm
This is unbelievably frustrating. Cannot get this to work with Scarlett & Logic Pro.
Emelie
July 13, 2023 at 11:52 am
Great overview, worked on the first trial! However now I cannot steer the volume on my Macbook Pro control touch panel anymore. Do you know what settings I need to change to enable that again while also being able to record with audio? Thanks!