How to Rasterize in Photoshop

If you want to edit a vector image (like an SVG image) in Photoshop, you’ll need to rasterize it. Here’s how.
Adobe Photoshop is an incredibly powerful graphics editor—so popular it’s become its own verb.
When you’re trying to ‘photoshop’ an image, you can easily run into issues, especially if these images are vector images. That’s because some of Photoshop’s tools will only work with raster graphics—vector images (like SVG files) are harder to edit.
The good news is that it’s quick and easy to rasterize a vector image in Photoshop. You can then apply any of the Photoshop tools or effects that you wish.
If you want to rasterize in Photoshop, here’s what you’ll need to do.
What Is Rasterizing in Photoshop?
Rasterizing in Photoshop is the process of converting a vector image into a raster image. To explain this, we first need to explain the two main types of digital images you’ll see in Photoshop.
The first consists of a grid of pixels. The word pixel is a combination of the words ‘picture’ and ‘element’ and that describes a pixel perfectly. Each pixel is one tiny piece of the whole, which when combined produces your digital image. An image stored as a grid of pixels is known as a raster graphic. These types of graphics are usually saved using the JPG or PNG image file format.
The second type of image is a vector graphic. Instead of a collection of pixels, a vector graphic is a set of mathematical equations that define the position and shape of each part of the image relative to one another. A vector graphic typically uses the SVG file format.

An example of a non pixelated raster graphic image.
Instead of existing in a set physical space, as pixels do, vectors exist in an abstract mathematical space. That means that you can enlarge them or shrink them down without losing any information, so the image will always remain the same quality.
When a raster image is enlarged, Photoshop must add in extra pixels to fill out the image, which usually causes the image to become blocky and pixelated.
An example of a pixelated raster graphic image.
Why Should You Rasterize an Image in Photoshop?
If vector images can be resized without any loss of quality, why would we ever need to know how to rasterize in Photoshop at all?
The main reason is that some tools and effects in Photoshop will only work on raster graphics. If you want to apply these tools to a vector graphic, you must rasterize it first. For example, brush tools, fill tools, eraser tools, and filters will not work when using vector images.
How to Rasterize in Photoshop
Rasterizing in Photoshop is quick and easy to do. In just a few clicks, you can convert a vector image into a raster image.
To rasterize an image in Photoshop:
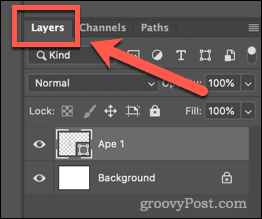
- Make sure that the Layers panel is visible. If it isn’t, press F7 to make it appear.

- Click on the layer that contains the vector image that you want to rasterize. Any layer containing vector graphics will have a small shape icon in the bottom right-hand corner.

- Duplicate your layer so that you still have the original vector image in case you need it later. To do this, right-click on the layer and click on Duplicate Layer.

- Name your layer and click OK.
- Click on the eye icon next to your duplicated layer so that the duplicate image is no longer visible.

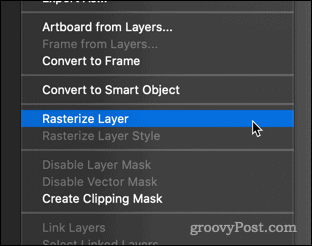
- Now right-click on your original vector layer, and click on Rasterize Layer.


How to Avoid Rasterizing in Photoshop
Although rasterizing an image in Photoshop is simple to do, it may not always be the best option.
As we’ve already learned, raster images will lose some of their quality if you resize them. It is possible to convert raster images back into vectors, but you will probably lose some image quality by doing so.
In some common cases, you can avoid having to rasterize in the first place.
Change the Fill Color in Photoshop Without Rasterizing
A common reason to rasterize a vector image is to use the Paint Bucket tool to change the color of the image. You can do this directly to the vector image using the shape tools as follows:
- Click on the layer containing your vector image.
- Click on the Custom Shape tool.

- To change the color of the outline, in the options bar at the top of the screen, click on the box next to Stroke.

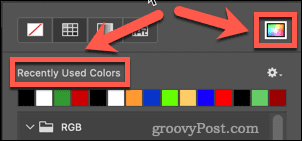
- Select a color from the recently used colors or use the Color Picker to select a new one.

- Choose your color and click OK.

- To change the fill color, click on the box next to Fill in the options bar at the top of the screen.
- Select your new color—your vector image will now reflect your changes.


Become a Photoshop Pro
Learning how to rasterize in Photoshop (and how to avoid it) is one of the many skills that can turn you from a Photoshop novice to a Photoshop pro.
You can learn how to use presets in Photoshop to speed up your workflow. If you’ve always wanted to be able to remove backgrounds from photos in Photoshop, you can learn how to do that, too.
If you really want to look like a pro, you can learn some of the essential Photoshop shortcut hotkeys.