Outlook 2013: How To Create and Use a Signature

Using a signature in Outlook 2013 makes your emails more personal and provides your contact info to people. Creating one and then getting Outlook 2013 to put it in your emails automatically is easy.
Using a signature in Outlook 2013 makes your emails more personal and provides your contact info to people. Creating one and then getting Outlook 2013 to put it in your emails automatically is easy. Here’s how to do it.
First, click the File tab in the Outlook 2013 menu, then select Options.
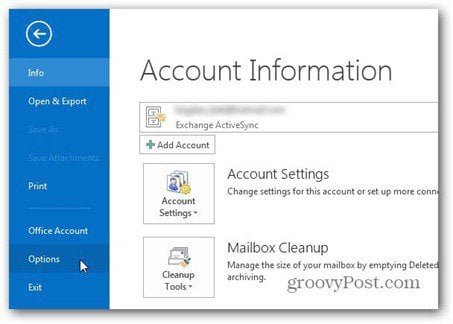
When the Outlook Options screen comes up, click the Signatures button.

Click New and give your signature a name. This lets you distinguish it from other signatures you may be using.
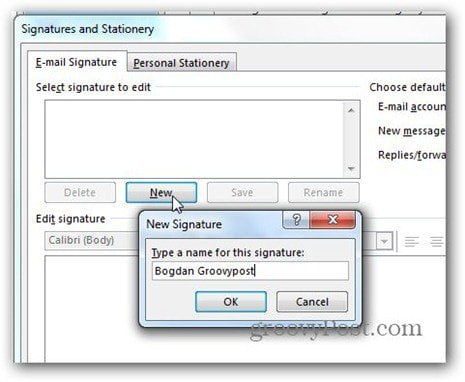
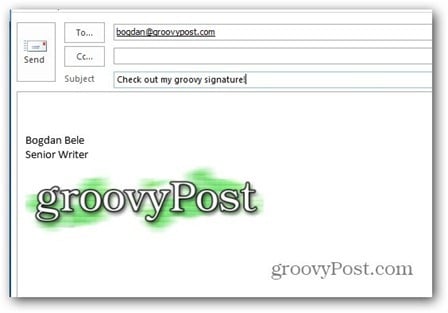
Now that it has a name, type everything you want your new signature to contain in the box below Edit signature. You can use whatever font you like, in any size. Here I’m using the Verdana font.

Clicking Business Card on the top right side of the editing box lets you use a business card you have saved in your signature.
You may wonder what the two buttons next to the business card one are doing. The first one lets you insert a picture from your hard drive into your signature. Here I’m using our groovy logo.
![]()
The second button lets you create a link to an email or web address, as well as a file on the computer or a link in the document. I’ve decided to go with a link to our website.
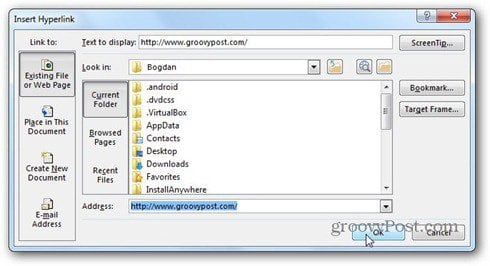
There’s also a little trick here. If you’ve inserted an image in the signature and you click it before clicking the link button, the image will be linked. So, people clicking the logo will get to groovyPost, in my case.
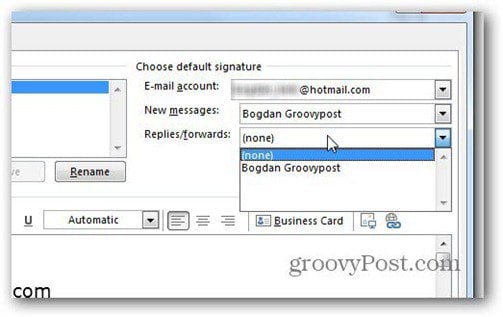
Now you’ve created your signature, all you have to do is click Save and then decide when it should be used automatically. You select that below Choose default signature. You can choose which email account, as well automatically use it – for new messages, replies and forwards. Selecting different signatures for each one of these actions is possible.
It’s that simple. Click OK to get back to the main window and now your new signature will appear on emails.
If you decided not to use it automatically, you can always insert it into new emails from the Signature button on the ribbon.

And now that you know how to use a signature in Outlook 2013, how about learning how to add Gmail to Outlook 2013 via POP?


smauler
February 21, 2013 at 7:17 am
I’m trying to insert an automatic signature in my Outlook 2013 but it doesn’t allow me to choose the email address on the right. The button is not live. Can someone please help?
Yousef Ali
March 3, 2013 at 9:08 am
Thank you very much, this is the most clear explanation in very clear and simple steps.
Bogdan Bele
March 3, 2013 at 10:45 am
Thanks, it’s always good to hear an article was useful.
Jagen De
May 23, 2013 at 9:05 am
When I add our logo within the Outlook 2013 signature and stationary editor, the graphic does not appear. If I save it and send an email and choose that signature the graphic shows though not positioned properly. Rebooting has not helped, What am I doing wrong?
Koen
July 20, 2013 at 11:43 am
hey Bogdan Bele,
I really got a problem that I can’t fix.
In outlook 2013 I’ve made a signature with hyperlinks (one for mailto and one url). Both green color and no underline. But when I open it in other e-mail boxes like live.nl/hotmail.com I still get the blue underline. The text is perfeclty green but the line..I can’t get rid of it.
I’ve tried copy paste the signature text/image, type it all in outlook 2013, drop the .htm file in de signature folder but everytime the blue line is back. Any tips/tops to help me out here? I appreciat it!
cheers Koen
bob
January 7, 2014 at 7:44 am
your lost mate!
Bogdan Bele
January 8, 2014 at 5:13 am
Try using the signature editor, selecting the text, then enabling and disabling underline – it worked for me.
Ann C
March 17, 2014 at 12:20 pm
Thank you for your help. The directions were simple and easy to follow.
Sarah
February 9, 2015 at 1:15 am
I see this article is little old, I hope you can still help me out! I am inserting the image I need into my signature, but is appears really small and I cannot change the size in the email signature. I can change the size once it is inserted into the actual email, but I don’t want to have to do this every time I send an email! If I click on the image while editting the signature, the boxes and arrows for dragging the corners of the image to make it larger do appear, but when I try to expand the image, nothing happens. Any ideas I can try?
Joanne
February 10, 2015 at 8:28 am
How do I add the Facebook and LinkedIn logos to my signature and link w/ my Facebook Page and LinkedIn Page?
Paula
May 14, 2015 at 10:16 am
I have my auto signature set up fine, I use auto black for the color. My problem is that it is fine when I create an email, but not when I reply or forward an email. I use a different color in my reply/forward email text, but I would prefer my signature always be black. Any ideas?