Change The Default Line Spacing in Office Word 2010
A couple of days ago, we showed you How-To Bookmark Parts of a Word 2010 Document. Today, we’ll bring you another neat Word 2010 trick. If you’re looking for that classic Office 2003 look and really hate having to change your line spacing options every time you start Word, we’ve got a solution that quickly changes the default line spacing in Word 2010. For those of you who prefer watching this tip live, checkout my video on YouTube.
Option 1 – Change The Style to Office 2003
The first way to change the default line spacing is to make the Word 2003 style your default. To do this, Click Change Styles, then Click Style Set and Check Word 2003. You can go ahead and type in a few words to see if this style fits your needs.

If you want to set the Word 2003 style as a default for every new document, simply Click Change Styles again and then Press the Set as Default button. I wouldn’t fully recommend this method since it changes the entire layout to be like a document made in Word 2003, and you may not want this, but hey, perhaps that’s exactly what you want!

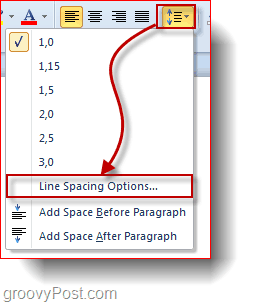
Option 2 – Change The Line Spacing Options Only
This is the method I would probably recommend. Click the Line and Paragraph Spacing button and then Click Line Spacing Options.
Now find the Spacing section of the Paragraph window and Change the value from “At:” to 1,00.

Then just Click Set as Default below, and you’re done.


Diane
November 21, 2011 at 1:03 pm
I tried option 2, but it didn’t work. . . .HELP!
John Tate
July 29, 2019 at 4:02 pm
Thank you – this did work – but you need to include directions as to HOW to get to the “PARAGRAPH” screen … on the same screen as were you pick the line spacing, near the bottom is “Line Spacing Options …” Click on that line and the indicated “PARAGRAPH” screen will appear. That’s where the “Set As Default” option will be found.