7 Ways to Maximize Storage Space on Low Capacity Windows 10 Devices

Feeling boxed in because your Windows 10 device is running low on space? Here are some tips for maximizing what you have.
A few years ago, starting with Windows 8.1, Microsoft and industry partners launched devices that could compete with Apple’s iPad. These devices were severely limited in their storage space, including some with around 16 GBs of storage. The use case was multimedia consumption and casual usage – web browsing, email, listening to music, streaming video. You were expected to use Windows Store apps, keep your files on OneDrive and use On-Demand Files to manage storage. In reality, this never really worked as expected, partly due to Windows 8 eating up most of the space for itself and the compressed recovery partition.
Fast-forward a few years, and these are still great mobile devices that run full versions of Windows. But that small storage capacity is becoming more of a challenge. The default setup for Windows 10 is quite small – around 8 to 10 GBs. But with each passing update, Windows 10 will start expanding. This makes the operating system a chore to manage on lower storage capacity devices with 32 GB drives or less.

This article will explore some of the options you can perform to make the experience easier.
Manage Limited Disk Space on Tablets and Laptops Running Windows 10

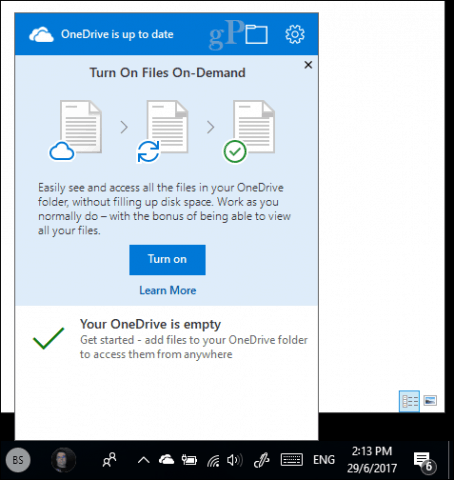
1 – OneDrive On-Demand Files
If you have Windows 10 running on a limited capacity device, you probably are looking for the most affordable option to recover some space. Starting with Windows 10 1709, Microsoft reintroduced OneDrive Files on Demand. This nifty functionality lets you keep all your files on OneDrive and only download the ones you need. Our recent article covers all the details of how to set it up and configure it.
2 – Disk Cleanup and Storage Sense
Windows 10 is notorious for creating archived files you don’t need. Two features in Windows 10 that can help you with that are Disk Clean up and Storage Sense.
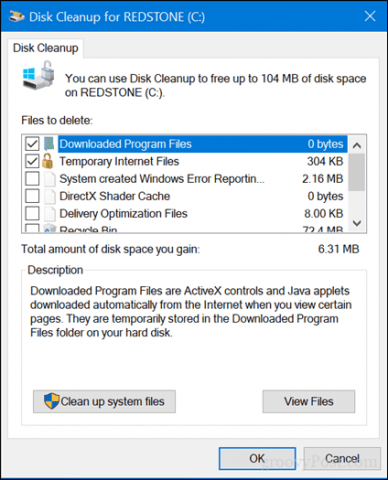
Open Start, type: disk cleanup then hit Enter.
Once Disk Cleanup opens, select the drive where Windows is installed if it’s not already. Windows will scan your hard disk for files it can clean up.

After Disk Cleanup completes its scan, click the button Clean up system files.
This will perform another quick scan, including every file that can be removed. Browse through the list, then check off what you don’t need. Pretty much everything in Disk Cleanup can be safely removed. If you keep files in Recycle Bin for safekeeping, you probably should remove them.
Storage Sense helps automate storage management by automatically deleting temporary files and content in your Recycle Bin. Starting with Windows 10 1709, you can delete files in your Downloads folder that hasn’t changed in 30 days. Storage sense can also be set to run automatically when you’re low on disk space.
To set it up, open Start > Settings > System > Storage. Click Change how we free up space.

Enable and modify the settings you would like to be applied when you are running low on space.

Within the Storage interface in Settings, you can get a bird’s eye view of what’s stored on your drive and what might be using up a lot of space. Under Local Drive, click your Local drive where Windows 10 is currently installed.

There you will see a list of locations and the amount of space being used by each. As you can see, Temporary files are using about 7 GBs of space, installed apps and games 6 GBs, and Documents 2 GBs. If you click on one of the locations listed, you are not given many options except viewing the contents of the location and manually removing files you might no longer need.

3 – Delete Data Stored by Apps and Games
Going back to apps and games, sometimes data no longer in use is kept by the app. If you have exhausted all the options previously mentioned, maybe it’s time to see how much data is being stored by each app installed from the Store.
Open Start > Settings > Apps > Apps & features. Select an app then click Advanced options.

Click Reset, which will delete all the data stored by the app.

4 – Delete Your Recovery Partition
The recovery partition used to reinstall Windows 10 can eat up a significant amount of disk space. It’s used rarely, if ever, so there is no need to keep it. If that makes you nervous, you can back up your recovery partition to a USB thumb drive, which you can use to reinstall Windows 10 when you need to.
To do that, open Start, type: create the recovery drive, and hit Enter.
Connect a USB thumb drive with enough space—16 GB should do—then click Next. At the end of the wizard, you will be asked if you would like to delete the recovery partition. Proceed to do so.

5 – Use Treesize to Find Hidden Large Files (Free)
We previously reviewed Jamsoft’s TreeSize and found it handy for finding large files not readily visible in Windows 10. The program is simple and easy to set up. Our previous article covers the details for scanning your drive and looking in the right places. Jamsoft provides a portable version of Treesize, so you can run it from a thumb drive and scan your system without using up disk space for the program itself.

6 – Archive Large Files to an External Hard Disk
Storing large files on your local drive that you are not using doesn’t really make much sense these days. Moving infrequently used multimedia, like photos and videos, to an external drive can free up significant amounts of disk space. Because of my Internet limitations, I still need to keep my music locally, which means my iTunes library probably consumes the most space on my Surface Pro.
Archiving files to an external drive is easy. Before you do that, though, you need to invest in an external drive. It’s fairly easy to find one that is really cheap with lots of space. Once you have one, I recommend you check out our guide on how to partition a hard drive for macOS Time Machine and Windows 10 Backups.
You can use several backup methods, but I always go with the manual method, which involves copying files from your personal folder to a backup folder on your external drive. Select the files or folders, then performing a drag and drop action using the right mouse button to your external drive. When the context menu appears, click Move here.

Repeat this step for other folders where you keep large files.
7 – Install an SD Card for Apps.
Windows 10 lets you move large apps and games from the main drive for devices with an SD card slot. These days, you can get an SD card with as much as 256 GB of space. This is more than perfect for a system with limited onboard space.
Note: This only works with Microsoft Store apps. Classic desktop apps and those that come built into Windows 10 cannot be moved.

In Windows 10 open Start > Settings > Apps > Apps & features. Select an app or game downloaded from the Windows Store, then click Move.

Click on the Select a drive to move this app to: list box, choose the drive representing your SD card, then click Move.

Conclusion
Cramming a full-featured Windows experience into a diminutive tablet will always be a little bit of a trick. For many users with these devices, Windows 10 remains a constant struggle, especially when installing newer versions of the operating system.
With so much going to the cloud, users will likely need to rethink what it truly means to use devices like these. That means cloud storage platforms like Google Backup and Sync, Spotify, YouTube, Netflix should become your go-to means of using the device. Sure, a $99 tablet running Windows 10 might sound like a killer deal, but don’t expect it to be a do it all, flexible machine you are looking for.
Hopefully, this guides you in the right direction when managing or augmenting the limited storage in your device. Let us know what you think.


George
November 8, 2017 at 1:03 am
I never knew that you can actually delete that data of an app. Thanks for the information.
BIII
November 8, 2017 at 6:22 pm
Thanks for that. I wish Microsoft would provide the option of a recycle bin for an SD card!
Allan King
November 14, 2017 at 11:55 am
Directory Report is another useful app to find huge files