Windows 10 Tip: Install and Troubleshoot .NET Framework

While using Windows 10, some programs won’t install or run correctly because they require older versions of .NET Framework. Here’s how to fix the problem.
The Microsoft .NET Framework is a software environment for building a variety of applications for Windows. Many popular applications use it to function, and some apps require a specific version of the .NET Framework runtime to work. Windows 10 includes support for version 2 .0 and later above. Here we’ll take a look at how to enable and troubleshoot the installation.
Sometimes older applications won’t install or run correctly because they require the older .NET runtime versions. However, Windows 10 doesn’t have them enabled by default, which is a problem you might have. Here we’ll take a look at how to enable and troubleshoot the installation.
Enable the .NET Framework in Windows 10
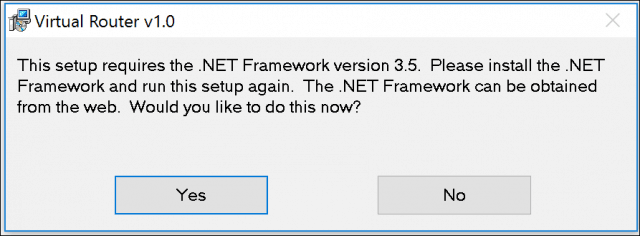
If the .NET Framework version a program needs is not installed, you’ll get an error message like the one shown below. The application error message will usually detail the version that’s required. The .NET 3.5 included with Windows 10 includes the full installation package, which includes the full runtime installation packages for .NET 2.0 and 3.0 for previous versions of Windows. So there is no need to download an older version if your application requires it.
First, press Windows key + R and type: optionalfeatures.exe and hit Enter. The Turn Windows Features On or Off dialog will come up. Expand .NET Framework 3.5 (includes .NET 2.0 and 3.0). Check off both Windows Communication Foundation HTTP Activation and Windows Communication Foundation Non-HTTP Activation. Click OK to begin the installation.

Next, click Download files from Windows Update and wait while the files are downloaded and installed.

When the install is complete, close out of the installation and restart your PC. That’s it. Now you can start using the programs that require the old versions of the .NET Framework.
Troubleshooting .NET Framework Installation
Sometimes installing .NET Framework can prove difficult because of various factors such as damaged system files or no active Internet connection. So let’s start with the first option, which is to repair the appropriate files used to facilitate the installation of the .NET Framework.
The first thing you’ll need is access to your Windows 10 install media. If you don’t have it, check out our article on how to download the ISO file. Then, proceed to insert your Windows 10 disc or mount the Windows ISO file. For more on using ISO files in Windows 10, please read our article: How to Mount and Burn ISO Files in Windows 10.
Press Windows key + X to bring up the hidden power user menu and select Command Prompt (Admin).

Now you need to enter the following command:
DISM /Online /Enable-Feature /FeatureName:NetFx3 /Source:d:\sources\sxs /All /LimitAccess

Restart your computer, then try enabling .NET Framework again. If the problem persists, the next option you can attempt is a PC repair upgrade using Advanced startup. Using the Windows 10 ISO or install disc, launch setup and follow the on-screen instructions. A repair upgrade is similar to an in-place upgrade; you are replacing damaged system files with fresh ones from the install media.


Salah
May 26, 2016 at 2:10 pm
hi
Ido the above steps but after that the following message appear on the black screen
Error: 0x800f081f
The source files could not be found.
Use the “Source” option to specify the location of the files that are required to restore the feature. For more information on specifying a source location, see http://go.microsoft.com/fwlink/?LinkId=243077.
The DISM log file can be found at C:\WINDOWS\Logs\DISM\dism.log
C:\WINDOWS\system32>
Omer Jalal
March 9, 2017 at 1:37 am
worked for me, just changed sourced drive letter in the command d: to e: which is my windows usb.
SAK
April 5, 2017 at 6:57 pm
Use cd:\windows\sysnative
Arthur
May 31, 2017 at 5:14 am
Deployment Image Servicing and Management tool
Version: 10.0.16193.1001
Image Version: 10.0.16193.1001
Enabling feature(s)
[==========================100.0%==========================]
Error: 0x800f081f
The source files could not be found.
Use the “Source” option to specify the location of the files that are required to restore the feature. For more information on specifying a source location, see http://go.microsoft.com/fwlink/?LinkId=243077.
The DISM log file can be found at C:\WINDOWS\Logs\DISM\dism.log
arslan
January 18, 2018 at 6:03 am
Deployment Image Servicing and Management tool
Version: 10.0.16299.15
Image Version: 10.0.16299.15
Enabling feature(s)
[==========================100.0%==========================]
Error: 50
The operation is complete but NetFx3 feature was not enabled.
The DISM log file can be found at C:\Windows\Logs\DISM\dism.log
every time windows restarts netframe work notification pops up instead of installed framework
Ali Abbas
January 23, 2018 at 6:13 am
I tried but this happens :(
Deployment Image Servicing and Management tool
Version: 10.0.10240.16384
Error: 193
An error occurred while attempting to start the servicing process for the image located at C:\.
For more information, review the log file.
The DISM log file can be found at C:\Windows\Logs\DISM\dism.log
Adam G
June 26, 2018 at 8:58 am
Try downloading offline MS.net framework 3.5, once the file is downloaded, unzip it and run the install application, this should install MS .Net Framework. Then try running/installing the program that needs it.