Add ‘My Dropbox’ To The Windows Start Menu

A Start Menu slot for Dropbox allows me to quickly jump to my files located in My Dropbox folder. Here’s how to add it on Windows 7.


The process takes just a few steps, and if you follow the step-by-step tutorial below you should be up and running with Dropbox in your Start Menu in no time. If you run into a snag, drop a note below in the comments.
How To Put My Dropbox In The Windows 7 Start Menu List
Step 1
Right-click the Windows Start Menu Orb and select Properties.


Step 2
Click the Start Menu tab and then click the Customize button.


Step 3
In the Customize Start Menu window that appears, scroll down to Recorded TV.* Of the three bullets for Recorded TV, select the one that says Display as a link. Now click OK to save and exit the window.
* You could indeed use a different shortcut, but since most people don’t use Recorded TV on their computer, this is an excellent way to make use of it.


Step 4
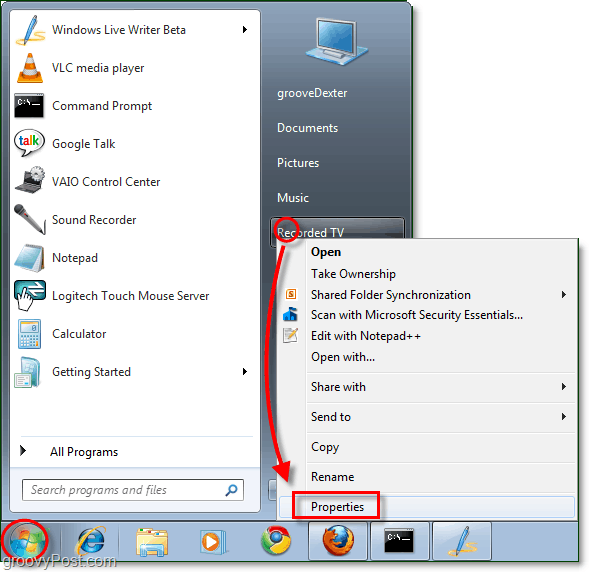
Open up the Start Menu and right-click Recorded TV. Then from the context menu, select Properties.


Step 5
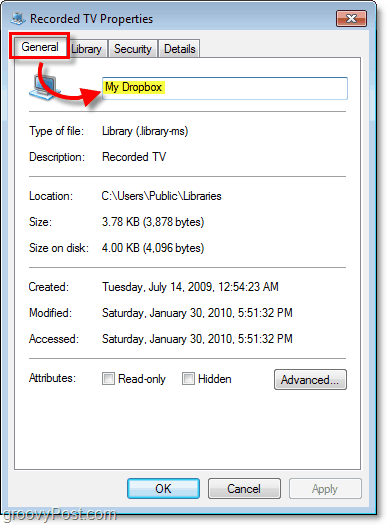
The properties window should show up. Click the General Tab and then type in the new name of “My Dropbox,” overwriting where it says Recorded TV.


Step 6
In the same window, click the Library tab and then click Public Recorded TV (C:Users…). Then select Remove to get rid of it. Once you’ve done away with the original location, click Include a folder to add a new one.


Step 7
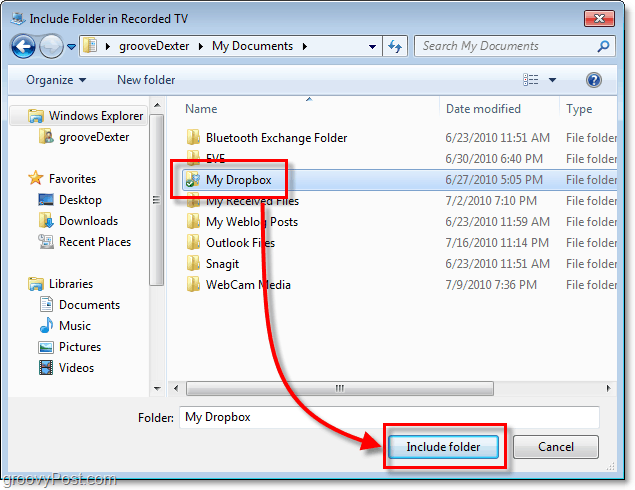
A dialog box should appear. Select My Dropbox folder and then click Include Folder.


Step 8
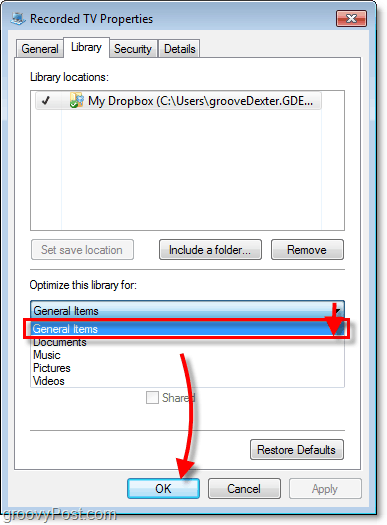
My Dropbox should now appear in Library locations. Under ‘Optimize this library for,’ select General Items from the drop-down menu. Once finished, click OK to save and exit.


Step 9
Now for changes to take effect, you need to restart your computer or just quickly restart Explorer. It won’t work until you restart, so don’t freak out if it shows up errors before doing so.
Done!
Now your “My Dropbox” folder is conveniently nested on the sidebar of your start menu.


5 Comments
Leave a Reply
Leave a Reply


MrGroove
July 21, 2010 at 10:41 am
More dropbox love. Nice write-up.
Jordan Austin
July 26, 2010 at 9:10 pm
Very cool. That could be useful.
Keep up the good how-to articles.
Cinzia
July 30, 2010 at 10:15 am
What if you don’t have Recorder TV in your Start Menu?
grooveDexter
July 30, 2010 at 11:05 am
I “think” that Recorded TV is linked to Windows Media Center, so you may need to update it for that link to show up on the start menu customize dialog. You can do that by following this article:
https://www.groovypost.com/howto/microsoft/setup-windows-update-receive-updates-new-features/
Worst case scenario you can just Right-Click Documents or Favorites and adjust the properties of them as shown in the how-to above to get it set up.
Martin
February 28, 2011 at 2:01 am
But is it possible in Vista?