How to Work with Page Numbers in Microsoft Word

In this guide you’ll learn all of the tips and tricks you need to handle page numbers in Microsoft Word like a pro.
Working with page numbers in Microsoft Word is something you’d think would be simple and straightforward. If you’re going for a standard numbering scheme, it actually is.
But if you’re hoping to do something a little different, like alternative numbering or skipping pages, things can get tricky.
In this guide, you’ll learn all of the tips and tricks you need to handle page numbers in Microsoft Word like a pro.
Adding Page Numbers in Microsoft Word
There are a few ways you can add numbers to your Word document. The standard way is to use the Insert menu.
Select the Insert menu, then select Page Number in the Header & Footer section of the ribbon. You’ll see a drop-down menu with different options. Under each of these options are additional selections to choose from to define exactly where on the page the numbers will go.

Let’s explore each of these options in detail.
Select Top of Page from the list.
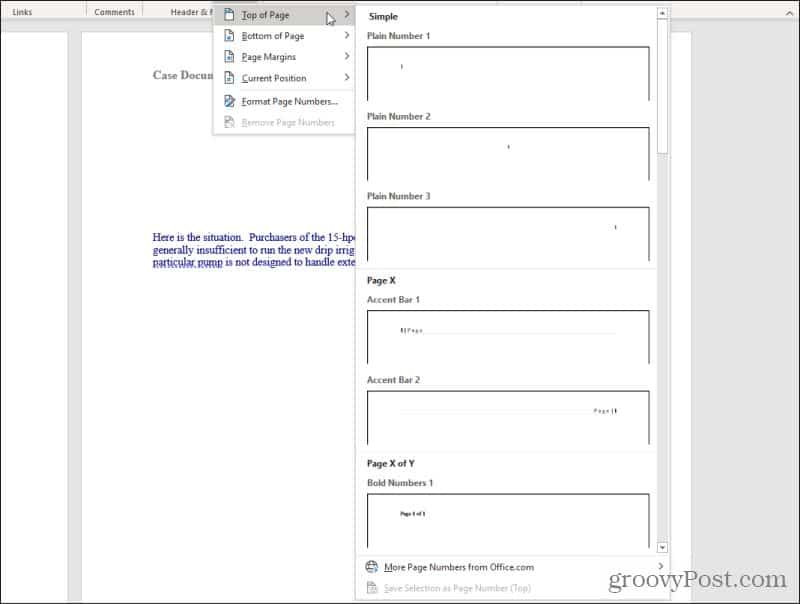
In this list you have all of the following options (all at the left, center, or right of the top margin):
- Plain Number: Insert plain page number “1”
- Accent Bar: “|Page” or “Page|” on the left or right
- Bold Numbers: “Page x of y” with x the current page number
- Brackets: Page numbers between brackets
- Dots: Three dots above the centered page number
- Large Italics and Roman: Styled page numbers in italics or roman
- Tildes: Page number with tildes on each side “~1~”
- Vertical Line: Page number to the left of a vertical line
- Vertical Outline: Page number with a horizontal line above it on the right or left
- Very Large: Oversized number on the right
- Circle: Centered page numbers inside a circle
- Rounded Rectangle: Page numbers inside a rectangle
You can select all of these same options when you select Bottom of Page (in the footer), Page Margins (in the page margins), or Current Position (where the current cursor is located).
Select any of the options listed and Word will number every page in the document using whatever style you chose.
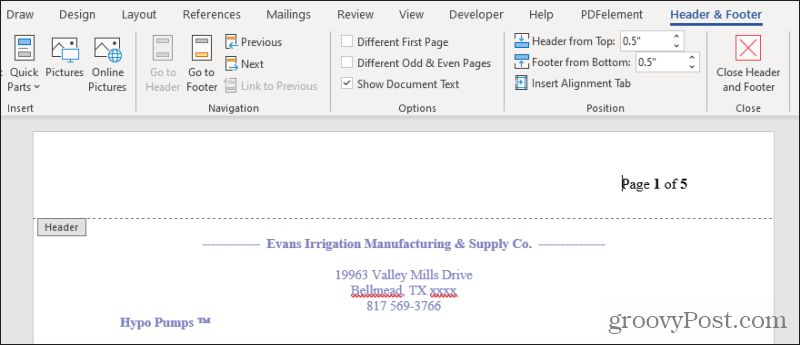
This will open the header or footer where you placed the numbering, along with the Header & Footer menu.
Varying Page Numbers in Word
The Header & Footer menu is where you can vary page numbering throughout your document.
One common thing people need to do is avoid numbering on the title page of the document. You can have Word skip printing a page number on the first page by selecting the Different First Page checkbox in the Header & Footer menu, on the Options section of the ribbon.
This will make the first-page blank, but you’ll see numbering continues on the second page of the document.

If you actually want to make the second page start on page number 1, you’ll need to make the first page a different section. Page numbering always starts at 1 at the beginning of the next section.
We’ll cover creating sections later in this article.
You can also make page numbering alternate (in style) on odd and even pages. This is commonly used when printing pages of a printed book or pamphlet so that the page number always appears at the upper outside corner of each page as you’re flipping through the book.
To do this, select the Different Odd & Even Pages check box in the Header & Footer menu, on the Options section of the ribbon.
You’ll see that the first page keeps the page numbering format you originally selected, but if you scroll down to the second page, it’s blank.
With your cursor in this header, you can repeat the process in the first section of this article to insert page numbers on the opposite side of the page (or any alternative style you prefer).
Use Sections to Lay Out Page Numbering
While you could use the approaches above to let Word automatically handle numbering your pages, there’s another approach. If you want more control over where page numbering in sections of your document starts and stops, you can create Sections in your document to do that.
To do this, after you’ve created numbering for your document, scroll down to the page where you want numbering to restart at 1. Place your cursor anywhere on that page.
Select the Layout menu, and select Breaks from the Page Setup group in the ribbon. Select Next Page under Section Breaks in the drop-down menu.

This creates a new section starting on the next page.
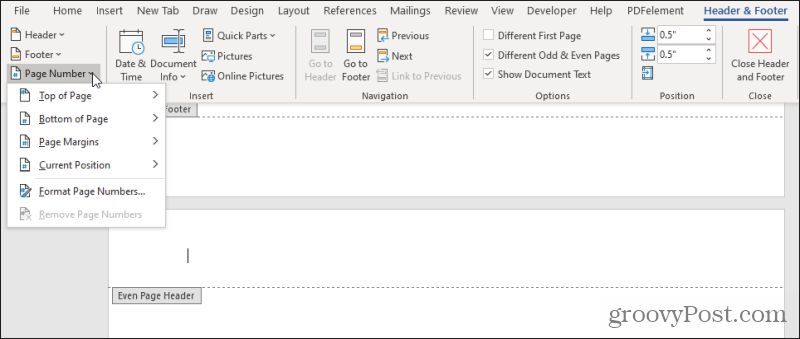
Now you’ll want to restart numbering in this new section. To do this, select the Insert menu, select Page Number, and select Format Page Numbers from the drop-down menu.

In the Page Number Format window, select Start at: under the Page numbering section, and set the field to whatever number you’d like to start numbering the new section at (usually “1”).
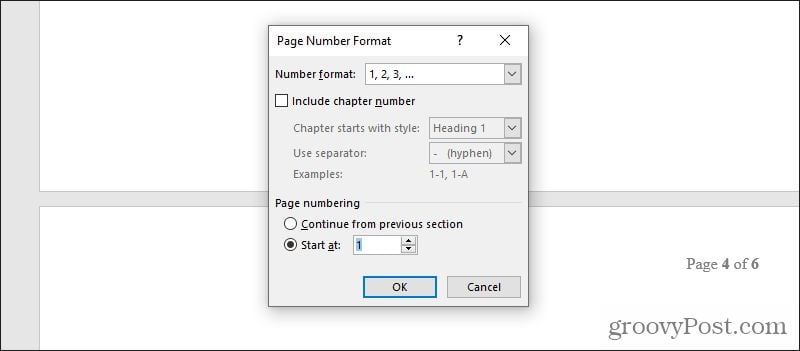
Select OK to initiate the new page numbering in your new section.
You can repeat this section approach as many times as you like throughout your document. Customize page numbering as often as you like, in as many sections as you need.
Using sections is also how you can do other formatting tricks like only making one page landscape format or rearranging pages in Word.
Fixing Page Numbers
If you’re noticing that the sections have messed up your page numbering, you can fix them by redoing those sections.
Select the Home menu, and select the show formatting symbols icon in the Paragraph section of the ribbon.
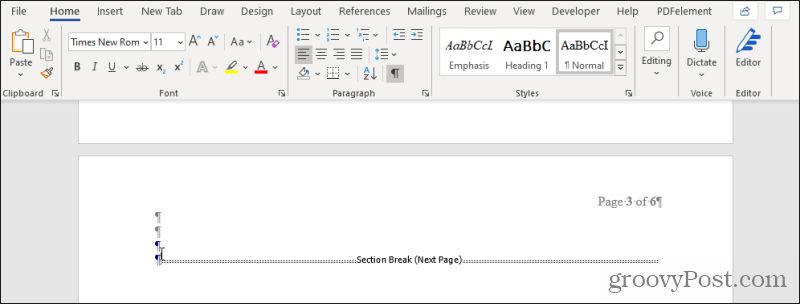
This will show you special formatting lines where you’ve inserted section breaks in your document. If you want to remove the restart of page numbering from the last section to the next one, just highlight that Section Break line and delete it.
You’ll notice after doing this that page numbers continue in series from the last page through the next, all the way to the next section break or the end of your document.
Number Pages Using Fields
What if you only want to number specific pages, but leave the rest of the pages untouched? You can do this in Microsoft Word using Fields.
You can do a lot of cool things with fields in Word. Fields are special “commands” you can insert into any document, and Word will fill those fields with the relevant information you’ve defined. “{PAGE]” is a special kind of field you don’t need to set up because it’s a pre-made field in Word.
To use it, just place the cursor anywhere on the page where you want to insert the current page number. Press Ctrl-F9 to enable the field. You’ll see curly brackets “{}” appear where your cursor is.

Inside the brackets, type the word “PAGE”. That’s all there is to it! Now, you just need to update the field so the correct information gets filled in. To do this, just right-click the text and select Update Field.

The page number will appear where you placed and updated the field. You can highlight the page number and format it in any way just like you would with any other text on the page.
As you can see, there are lots of different ways you can number pages in Microsoft Word and a variety of ways to format them. Just remember that whenever you need to change your numbering or number formatting from one section of the document to the next, creating a new section is always the best way to accomplish that.


