Make Windows 10 Create Automatic Restore Point when Windows Defender Scans

If something goes awry and your system is unstable, here’s a good way to make sure you have a current restore point to fall back on.
It’s always important to have a recent stable version of Windows 10 that you can roll back to in case something goes awry. Anything from a virus or bad software install can make your system unstable. To make sure you have an up-to-date restore point, you can set it to create one each time Windows Defender does a system scan.
Create Automatic Restore Points for Windows 10 Pro
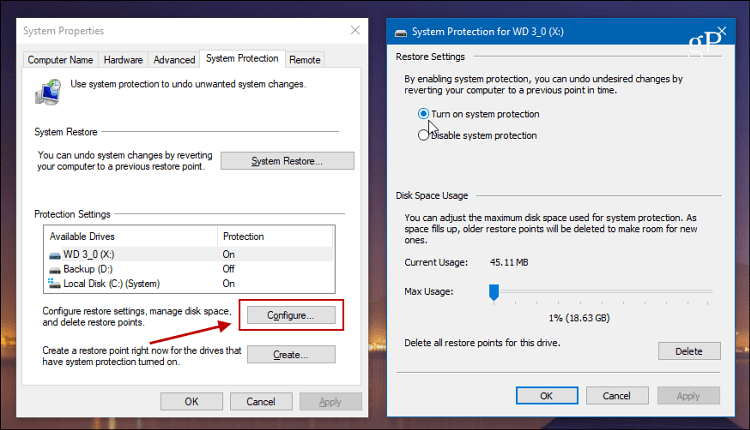
It’s usually not turned on by default, so the first thing you need to do is enable System Restore. Hit the Windows Key and type: restore point and hit Enter. Then click the Configure button and make sure System Protection is marked. There you can also set the amount of disk space used for the restore point backup.
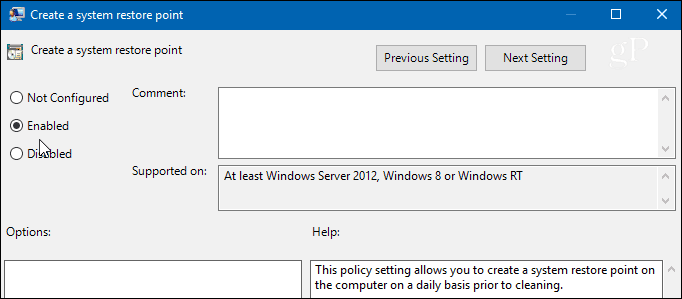
If you’re running Windows 10 Pro you can set this up using Group Policy. Hit Windows Key + R and type: gpedit.msc in the Run dialog and hit Enter.

Then navigate to the following path:
Computer Configuration > Administrative Templates > Windows Components > Windows Defender Antivirus > Scan
Then double-click on “Create a system restore point” in the Setting column on the right.

Set it to Enabled and click OK to close out of Group Policy Editor.
Create Automatic Restore Points for Windows 10 Home
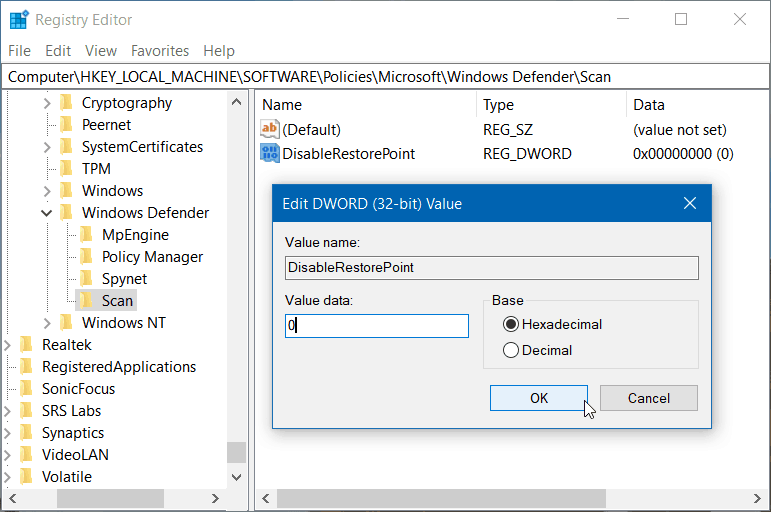
Group Policy isn’t available in Windows 10 Home, but you can set it to create an automatic Restore Point when Windows Defender does a system scan by tweaking the Registry.
To open the Registry, hit Windows Key + R and type: regedit and click OK or hit Enter.

Once it’s open, head to the following path:
HKEY_LOCAL_MACHINE\SOFTWARE\Policies\Microsoft\Windows Defender
Right-click on the Windows Defender key and select New > Key.

Name that new key Scan with a new DWORD (32-bit) Value of DisableRestorePoint with a data value of zero. After you’re done just close out of Registry Editor.
Whether it’s on Windows 10 Pro or Home, after setting it up, Windows will create a fresh Restore Point before Windows Defender kicks off a System Scan — which is daily unless you’ve gone in to change the schedule.
Windows automatically creates a restore point prior to installing Windows Updates. But having a fresh stable point to roll back to is important if something unexpected happens and you didn’t think to create a restore point.
If you’re new to Windows 10 and would like even more guides and tips, make sure to check out all articles in our Windows 10 archive. Also, for specific issues, join our free Windows 10 Forums and post your questions and thoughts about Microsoft products and services.


Jim Shunamon
December 14, 2017 at 12:36 pm
On Win 10 Home when I right-click Windows Defender and select New > Key I get the message that I do not have the requisite permissions to create a new key under windows defender. :–( Any suggestions?
George
December 27, 2017 at 10:54 am
Maybe your account doesn’t have administrator privileges?
Ziggy
December 14, 2017 at 5:45 pm
There’s a handy little tool that can do this and stacks of other stuff – it’s called Restore Point Creator. Look it up and give it a try.
Brian Burgess
December 14, 2017 at 6:30 pm
Ah, thanks for the suggestion Ziggy we’ll take a look.
Ziggy
December 14, 2017 at 10:33 pm
Brian, this program has been around for a long time and is constantly developed by the owner. You’ll find it at Majorgeeks and, as always, check your download with VirusTotal. Never had a problem with the installer for any virus or the like from said site. Let us know what you think of it when you come to trying it.
DbleT
December 17, 2017 at 1:59 pm
I followed all the steps mentioned and then when I went into the registry the scan key had already been created with the new DWORD (32-bit) Value of DisableRestorePoint with a data value of zero, just like you said to create. I bought this refurbished computer with Win7 and have since upgraded it to Win10. What is the chance of this happening?