How to Unprotect a Microsoft Excel Sheet

If you’ve lost your protected worksheet password, you’ll need a way to unprotect that Excel sheet and get access again. Here’s how to recover that protected Excel sheet.
When people create an Excel spreadsheet they don’t want people to change, they’ll often protect individual sheets. Protecting an Excel worksheet involves creating a password that you need to enter to make changes to the sheet.
There are several ways to unprotect an Excel sheet like this. The first is obviously typing the password and unprotecting the sheet. But if you’ve forgotten the password or the person who locked it didn’t give the password to you, you aren’t out of luck. There are two other ways to unprotect that sheet.
Unprotect an Excel Sheet with the Password
The easiest way to unprotect an Excel sheet is if you know the password.
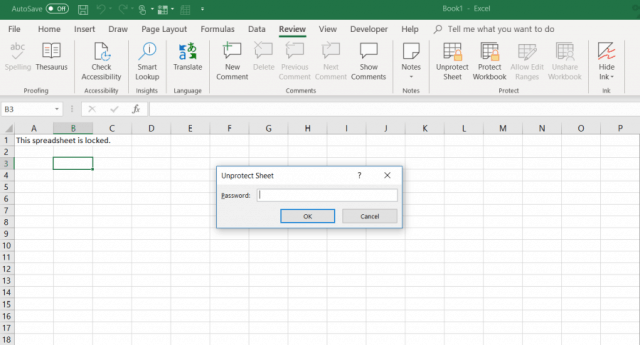
- Click on the Review tab.
- Select “Unprotect Sheet” in the Protect section of the menu.
- Type the password in the Unprotect Sheet dialogue window.
Unprotect an Excel Sheet with Google Sheets
Forgetting or losing the password on a protected Excel worksheet can be scary. Your first thought may be that you’ve completely lost all the data in the sheet.
The good news is that there’s a creative workaround that allows you to unprotect an Excel sheet. You’ll need a Google Drive account to do this.
- Open your Google Drive account, select New and select Google Sheet to open a new sheet.
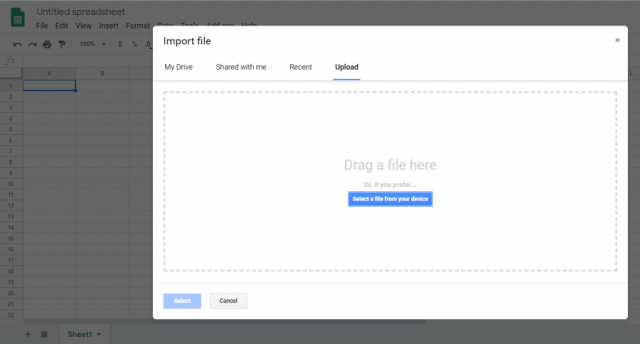
- In the sheet, select File and select Import.
- In the Import file dialogue box, select Upload from the menu.
- Click Select a file from your device.
- Browse the Excel spreadsheet on your computer. Select it, and click Open.
- In the Import file window, select Replace spreadsheet and select Import Data.
This will import the protected Excel worksheet into your Google Sheets worksheet. Except, now you’ll notice that the sheet is no longer protected. You can edit it all you like.
Now that it’s unprotected, you can export the sheet back to Excel format again.
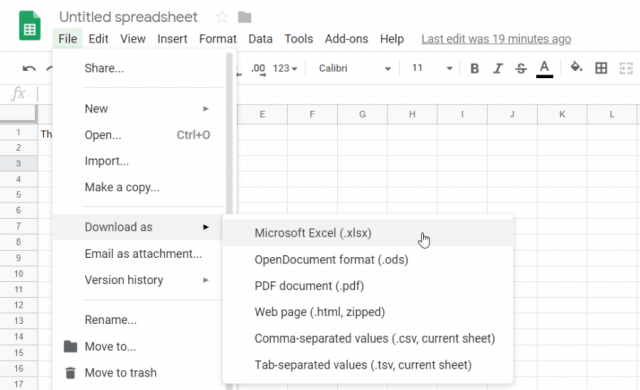
- In the now unprotected Google Sheet, select File and Download as
- Select Microsoft Excel (.xlsx)
- Select Save As.
- Give the file a name and select Save.
Now you have the same Excel sheet, but the protection is removed.
Unprotect an Excel Sheet with VBA
If you don’t have a Google Drive account, or you’re looking for another approach to unprotect an Excel sheet from inside Excel, VBA is a great way to do it.
The idea is to introduce a VBA module that will crack the password one character at a time. Depending on how complex the password is, the script can take from 10 minutes up to hours to run.
Step 1: Save as Older Excel File
The only limit to this method is that it only works on Excel worksheets in Excel 2010 or older. This isn’t a problem, so long as you save the protected worksheet to an older version.
Just click File and Save As. For the format dropdown, select Excel 97-2003 (*.xls).

It’s a pain to have to save to an older format, but the benefit is that once the VBA script is done, the password is cracked, and you have access to the unlocked sheet.
Step 2: Create and Run VBA Code
Here’s how to set up that VBA module.
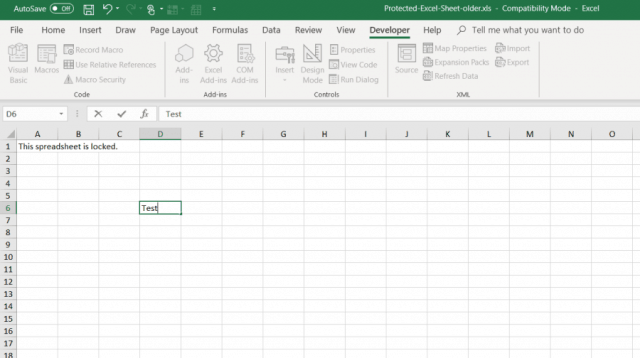
- Select the Developer menu item in your ribbon. If it’s not there, click File > Options > Customize Ribbon, switch Choose commands from to All Commands, and move Developer from the left menu to the right one. Click OK when you’re done.
- In the Developer menu, select View Code from the Controls section of the ribbon.
- Rick-click on Microsoft Excel Objects, select Insert, and select Module.
A well-known VBA script has been around for years that will break the password and unprotect any worksheet.
Copy the code below and paste it into the module:
Sub PasswordBreaker()
    Dim i As Integer, j As Integer, k As Integer
    Dim l As Integer, m As Integer, n As Integer
    Dim i1 As Integer, i2 As Integer, i3 As Integer
    Dim i4 As Integer, i5 As Integer, i6 As Integer
    On Error Resume Next
    For i = 65 To 66: For j = 65 To 66: For k = 65 To 66
    For l = 65 To 66: For m = 65 To 66: For i1 = 65 To 66
    For i2 = 65 To 66: For i3 = 65 To 66: For i4 = 65 To 66
    For i5 = 65 To 66: For i6 = 65 To 66: For n = 32 To 126
         ActiveSheet.Unprotect Chr(i) & Chr(j) & Chr(k) & _
            Chr(l) & Chr(m) & Chr(i1) & Chr(i2) & Chr(i3) & _
            Chr(i4) & Chr(i5) & Chr(i6) & Chr(n)
         If ActiveSheet.ProtectContents = False Then
            MsgBox "Password is " & Chr(i) & Chr(j) & _
                Chr(k) & Chr(l) & Chr(m) & Chr(i1) & Chr(i2) & _
                Chr(i3) & Chr(i4) & Chr(i5) & Chr(i6) & Chr(n)
                Exit Sub
         End If
    Next: Next: Next: Next: Next: Next
    Next: Next: Next: Next: Next: Next
End Sub
Next, press the Run button (green right arrow) to run the script.
This will run the new module you’ve created. It will attempt to crack the sheet protect password one character at a time. The script took seconds to crack the password during a test with just three simple characters (“ABC”).
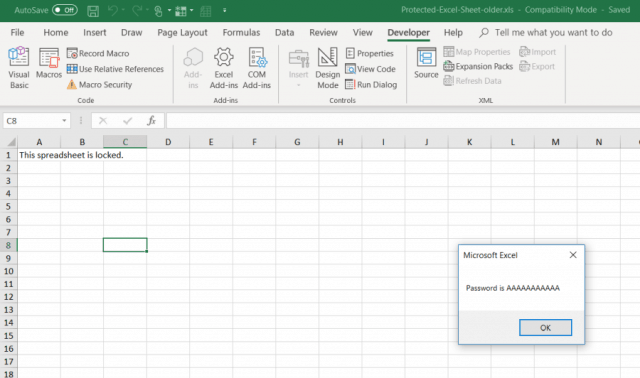
The password displayed will be arbitrary. Just press OK, and your Excel spreadsheet is now unprotected again. Test typing into a cell to confirm.
Since a simple password takes a few seconds, a password that’s longer and more complex may take up to a minute or two. Just leave it running in the background until the message box comes up.
Once your worksheet is unprotected, you can resave it to the previous format you were using before you saved it.
Choosing Your Unprotect Method
All three of these methods will work fine, but it’s best to start with the simplest and work your way down the list. Ideally, you’ll know the password, and you can unprotect the sheet just by typing it in.
But forgetting a protection password is very common, so hopefully, the last two methods listed above will help get you out of a jam and let you edit your worksheet again.


