Sharp photos with tons of detail – everybody loves them. Truth is, great sharpness and quality comes at a “great” price too. If you don’t have a ton of money to invest in really sharp lenses, this neat trick will help you out. Let’s dive in.
What is DOF bracketing and how will it make my photos sharper?
DOF Bracketing (or Depth-of-Field bracketing) is a legacy camera setting that take the same photo multiple times, but with a different aperture setting. Using DOF bracketing can help make your photos sharper, because any lens stopped down typically increases its sharpness. You can visit various online websites to check at which aperture your lens performs with the best sharpness. Additionally, you can just Google your lens model, followed by “studio sharpness test”.
Upsides of this method (+)
- Very sharp images even with lenses that are generally softer wide open
- Easy to learn, easy to try
- Edits are hard to notice and images still look natural
Downsides of this method (-)
- Only works for still life subjects
- Requires a tripod
- Isn’t always a substitute for getting a better lens
Before Starting
For this tutorial, I’ll be using my 50mm f/1.4. It’s rather soft wide open, but it produces great bokeh. Here is an example shot I took at f/1.4:

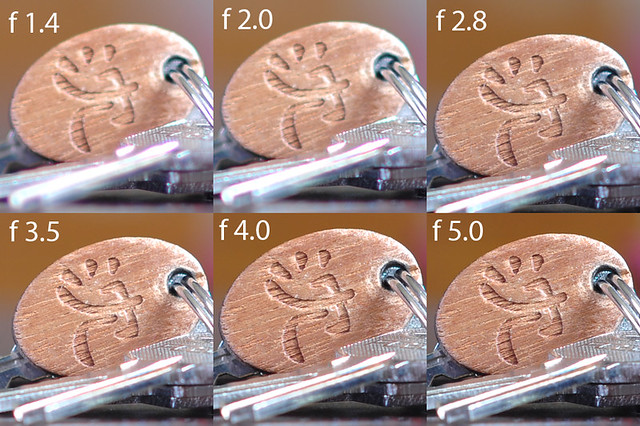
Don’t you just love that background? The problem is, even if you slightly zoom in to see the flower I focused on, you’ll find it isn’t vary sharp. To achieve maximum sharpness, I need to stop my lens down to f/6.3, according to this chart:

But how can I get a blurry background and a sharp image? This is where our neat little DOF bracketing trick comes in.
Setup Camera Equipment
Lock your camera into a stable tripod and point it at whatever you’re shooting. Make sure that after you compose, you tighten all of your tripod’s handles and screws. This will minimize unwanted camera movement and will make the two images as identical as possible.

The Photos
First, I’ll focus on my subject and shoot the first photo at f/1.4 (or other lowest aperture, depending on the lens).

Then, switching to manual focus to avoid missing, I’ll stop my lens down to f/6.3 (according to the lens sharpness chart) and I’ll take the shot again.

If you look at the yellow peg in the first and the second photo, you’ll find it’s much more pleasantly blurred in the first one. The red peg, however, which we want as sharp as possible, is optimally sharp only in the second photo.
Merging in Photoshop
Open up Photoshop and import the two photos, keeping the sharper photo at the bottom.

Do a Right Click on each layer and pick Rasterize. This will make the layers editable.

Select the top layer and lower its Opacity to anywhere from 20% to 50%.
Now use the move tool to make sure the two images are stacked accordingly (your spider senses will start tingling when you get the images perfectly aligned) ![]() .
.

Using the Opacity slider for the top layer again and bring it back to 100%.

Here’s where the fun starts: create a new layer mask for the top layer with the button on the layers panel.
To begin editing the layer mask, left click on it once.

You’ll know you’ve selected it if your Photoshop tab says “layer mask”.
Grab a Rectangular Marquee Tool, press Ctrl+A, and then do a Right Click > Fill > Black, 100% Opacity.
Upon pressing OK, the bottom layer image will appear. Before we start painting over the red peg, let’s press Ctrl+D to deselect.

Now, keeping the Layer Mask selected, grab a Brush Tool…

…and set your foreground color to black.

Right click on the image to tweak your brush size according to the image and to make it as soft as possible. 
Now begin to paint over the areas you want to sharpen with the brush. Here’s what it should look like:

Keep on brushing until you sharpen up the areas you want to. After you’re finished, add effects and filters by your taste (pro tip – you can also try the Sharpness tool and Filter > Sharpen, but don’t overuse them).
Final Result
Click the photo to view it in full size and see the dramatic sharpness difference!


Jack
July 27, 2013 at 1:27 pm
I’d like to know how to do the opposite: compile a series of low DOF images into one that is sharp throughout. Especially for ultra close up shots.
Stefan
July 27, 2013 at 2:40 pm
Hey Jack,
This method is called Focus Stacking and it can also be achieved through photoshop. I might wrtie a tutorial about using this method in the future.
Jack
July 27, 2013 at 4:16 pm
Look forward to it. Keep the great posts coming!
Stefan
August 20, 2013 at 10:46 pm
Alright! Here it is:
https://www.groovypost.com/howto/photoshop-depth-of-field-dof-expand-with-focus-stacking/
Enjoy! :)
Claude
May 13, 2015 at 1:42 am
This tutorial is a masterpiece and an example of clear explanation and step by step guide…
Many website could take it as en example !
Hope to see more like this one!
Best regards,