How To Install Homebrew On Your MacOS Computer

The MacOS Terminal window isn’t just for geeks. With the Homebrew package manager, anyone can easily install software using just the Terminal window and your keyboard.
You know instantly when a computer user is a geek when they bring up the Command Line (or the Terminal if you’re on a Mac). This may be a tired over-used stereotype, but geeks are normally depicted in movies and TV shows as the ones who effortlessly type complicated commands into a command window.

Many other computer users (a.k.a. my mother) may look at this and think, “how difficult!” But it doesn’t have to be. Using the Terminal window on your Mac can be easy, useful, and save lots of time. One example is using Homebrew to install the software.
What is Homebrew & Why Should I Care?
Quite simply, Homebrew is a computer script (based on the Python programming language). You can install it on your Mac and then use it to install software using only the Terminal window and a keyboard.
Why should you care about it? Well, if you like saving time and doing everything with your keyboard, then Homebrew is ideal for you. Instead of going to the Chrome website to install the Chrome browser, you can just use a Homebrew command to do it for you.
Also, it just looks cool and will impress the heck out of people who will think you’re some kind of computer genius.
Finally, if you don’t like it, you can easily uninstall it. We will show you how in this article.
Installing Homebrew In Less Than Thirty Seconds
Open up a Terminal window on your screen by going to your Finder and then Applications–>Utilities. Now copy and paste the following into the Terminal window and press the Enter button.
/usr/bin/ruby -e "$(curl -fsSL https://raw.githubusercontent.com/Homebrew/install/master/install)"

This kicks off the installation process. It will first show you what folders it will create on your computer. These folders are necessary for Homebrew to work. Press your keyboard’s Enter/Return key to move the installation along.

It will now ask you for your macOS login password. This will be the administrator password.

Once you have put in your password, the required files and folders are rapidly installed.

When it says “Installation successful!“ then you’re finished.

Using Homebrew
So let’s say you want to install the Opera browser on your computer. Normally you would go to the Opera website and download the installation file. But to paraphrase Back To The Future, now that you’ve got Homebrew, who needs websites?
Just open up a Terminal window and type :
brew install opera

However, in the case of Opera, it has thrown back an error message. There are several possible Opera programs to choose from. So choose which one you want, and it shows you the command you need to install it.

So I chose the regular Opera browser, and off it went. It was installed in less than 15 seconds.

When it’s done, it will automatically move the newly installed program into the Applications folder.
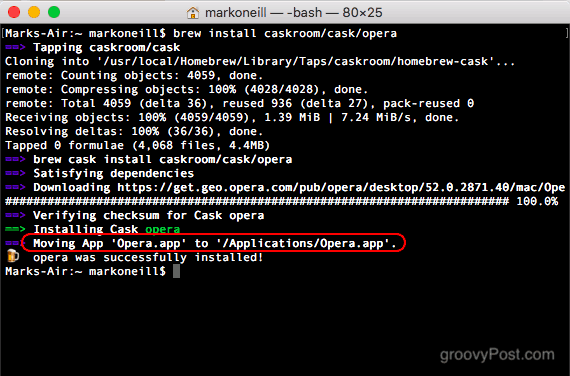
You will see the newly installed Opera browser if you check your Applications folder.

Uninstalling Homebrew
If, for some reason, you decide Homebrew is not for you, uninstalling it is simple.
Open up a Terminal window again, and copy & paste the following command.
ruby -e "$(curl -fsSL https://raw.githubusercontent.com/Homebrew/install/master/uninstall)"

It will ask you if you are sure you want to uninstall it. If so, press Y on your keyboard. If you’ve had a change of heart, press N to cancel.

It will then begin the uninstallation process by deleting some empty folders. But it will stop at some point and ask for your macOS password to confirm the deletion of the rest.
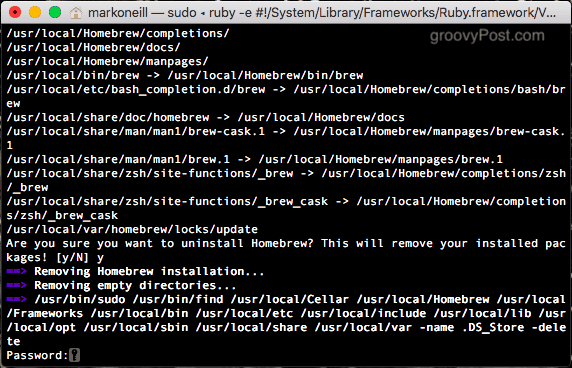
Once the rest has been uninstalled, it will give you a list of folders it was unable to delete. You will need to go into your Finder area and delete them manually.

Conclusion
Homebrew may not seem worth it but trust me, once you have it on your computer, you will use it time and time again. It is so productive and useful to be able to install software using just a script and a keyboard.
Do you use the Terminal on your Mac? Tell us how in the comments.


Sally King
April 28, 2018 at 7:30 am
Please explain in layman’s terms what is Home Brew and how would I use it? I would like to learn more about using my computer and all the extra’s but I’ve just found out a few months ago that what one used to call a “program” is now called an “app”.
Kerry
April 26, 2019 at 2:39 pm
Homebrew is ruby, not python. It is to an extant self-explanatory. Searching “homebrew mac” will return it pretty near the top. It, like all package managers imports a lot of stuff with each new application you install. But, that can be helpful if you want to just find out what libraries, like GUI, database, code is used in the application. Like all package managers though one only has so much control over version, one doesn’t learn anything about hacking code and there is the inherent fragility, (in the sense that installing things with homebrewmay create annoying conflicts). It’s very safe to use to install things. I doubt it offers a high degree of security, though. I think Homebrew is getting a lot of attention lately because, some folks think not using admin privileges is easier or more secure, “sudo” admin login is used with Macports. For what it’s worth I think OOP and IDE’s are ridiculous and add nothing but, waste time and money; anything remotely connected to Microsoft is pretty evil. Redhat is a corporate pirate in the world of Free Open Source as well, they started hiding kernel code back in the ’90s and they’ve made a mess of Gnome, freedesktop.org and most recently invested a lot in that mess called systemd, that no one wanted or needs. So, stay on the less irresponsible Apple until you can get OpenBSD working well enough for you.