How to Setup a Reply-To Address for Gmail, Hotmail and Outlook

Here’s a look at how to setup up a Reply-To address for Gmail, Hotmail, and Outlook email services.
Have you ever received an email at work, then when you reply, the “reply” goes to someone else other than the person who sent you the email? This mix-up happened to me recently. I replied to my manager’s email, and it was sent to his administrative assistant instead. It turns out this is a prevalent practice in many workplaces using Microsoft Exchange Server, but you can do it at home too. Let’s look at how to polish our egos and set up our “secretary-like” reply-to email addresses using the most standard email apps out there.
Set Up Reply To Addresses
In case you haven’t seen this before, here’s what this does. When you set up a reply-to email address, it will still look like all emails are coming from the original sender. The trick is that when people click Reply, instead of sending the message back to the originator, it goes to a different designated address.

Within the infrastructure of an Exchange server, this functionality is much greater, but we can still cover the basics without one. Below, we’ll look at how to set this up using Gmail, Live/Hotmail, and Outlook. Let’s get started.
Change The Reply-To Email For Your Gmail And Google Apps Account
1. Log in to your Gmail or Google Apps account and click Settings.

2. Click Accounts and Import and then click edit info.

3. In the pop-up window, click Specify a different “reply-to” address. Then in the box that appears, type in the email address where you would like replies to go automatically. Click Save Changes when done.

That’s all there is to it for Google mail.
Change Your Reply-To Address For Microsoft Live and Hotmail
1. Log in to your Hotmail or Windows Live account and click Options and then select More options.

2. Under Customize your mail, click Reply-to address.

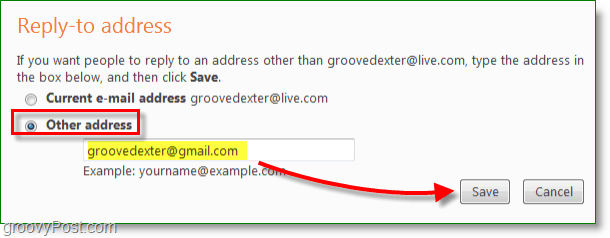
3. Check Other address, and type in the different email address where you want replies automatically sent. Don’t forget to click Save!
That covers Microsoft mail.
Change The Reply-To Address In Microsoft Outlook 2010 and 2007
1. In Microsoft Outlook, create a New Email and click Options, Direct Replies To.

2. Check the box Have replies sent to: and type in the Reply-To Address and click Close.

Unfortunately, only Outlook 2007 & 2010 allow you to set up the Reply-To address on a case-by-case basis but, it’s still a good trick no matter which email client/service you use.


alex
February 14, 2010 at 10:00 pm
excellent, clear instructions :)
dan
April 12, 2010 at 1:27 pm
this is exactly what i needed, but the question is how to make Reply-To address change permanent? thanks
Ravish
August 16, 2010 at 7:50 am
Not having global reply-to on outlook is such an annoyance. I could not believe it at first and kept looking until I found this post :(
R
MrGroove
September 27, 2010 at 10:42 am
It is possible for POP and iMAP email accounts through Outlook but I don’t think it’s possible if you have Microsoft Exchange running as your email server.
Not to say it cannot be done with Microsoft exchange. Check with your Exchange Corp. Admin and the 2 of you can probably fix it up. What is the use case? Why are you trying to do it? That will help me give you a solution.
Kevin Landreneau
September 26, 2010 at 2:41 pm
There is, indeed a global “reply-to” setting in Outlook 2010. By using this setting the specified “reply-to” address will persist.
Screenshot: http://sunuser.us/pub/replyto/screencap.png
>Account Settings
>Double click the account
>expand ‘advanced’, it’s on the bottom line
>it is also available during manual setup of any account
MrGroove
September 26, 2010 at 10:25 pm
Great FYI Kevin. Thnx for the tip and Step-by-step. I believe this method works for Hotmail accounts.
If your running with IMAP the process would be a little different:
1 – Click File Tab in Outlook 2010 Ribbon
2 – Click Info, Account Settings
3 – Double Click IMAP email account
4 – Click More Settings
5 – Click General Tab
6 – Fill in Reply E-Mail.
business account
December 26, 2011 at 6:57 pm
Simply wish to say your article is as amazing. The clarity on your post is just spectacular and i can suppose you are knowledgeable on this subject. Well with your permission allow me to seize your feed to stay up to date with forthcoming post. Thanks one million and please continue the enjoyable work.
John
January 16, 2016 at 8:47 pm
Simply works with Thunderbird and a Gmail email account.
How can this be done using Thunderbird and a Hotmail email address?
Thank you
Podiatrist Ottawa
May 20, 2020 at 3:19 pm
Love the content, we shared it with our Facebook page too.
Do you have anything else that goes this in deatail about How-To Setup a Different Reply-To Address for Gmail, Hotmail and Outlook ?
Roy Edwards
January 22, 2021 at 10:02 am
I do not have “Accounts” listed there or “Accounts and imports”, so I can get no further than that – this is a common occurrence when trying to resolve similar issues.
Coen Brink
February 2, 2022 at 1:26 am
Austin, this was awesome! Thank you for this very clear and easy to follow assistance. Loved the Screenshots!!
dave
September 24, 2023 at 1:53 pm
On Mozilla Thunderbird, two clicks and it’s done. Easy Peasy.