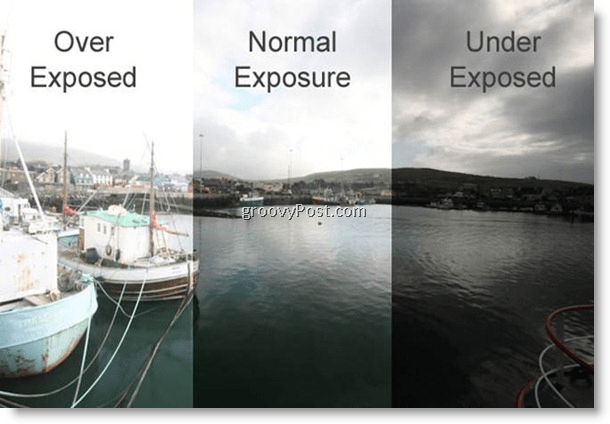
Take Amazing Photographs Using HDR Photography
Most people like to bring a camera on vacation so they can capture the amazing trip for later enjoyment with friends and family back home. However, have you ever found yourself looking at the photos at home, getting ready to upload them to your favorite photo-sharing site, and thought, “Man, these pictures don’t look anything like what I saw on vacation!” Yeah, it’s happened to all of us. Why is that?
The human eye can see nearly 24 stops of dynamic range of light and contrast. What does that mean for photography? The problem comes in when a camera (either digital or film) can only capture about 10 to 12 stops of dynamic range. That’s why those clouds in your favorite picture look flat and dull and don’t look like what you remembered.


Enter HDR Photography. HDR is the process of taking multiple pictures with a camera at different exposure levels and then combining them back into one picture with the full level of dynamic tonal range. Huh???? Ok, it’s not as difficult as it sounds. Let’s take a look at the process.
How To Take Amazing Photographs Using HDR Photography
Note: These steps are for a digital single-lens reflex camera (DSLR), but some point-and-shoot cameras also have manual modes. My personal favorites are the Canon G11 and the Lumix DMC-LX3.


The Basic Steps:
- Find something and take a picture. Your choice.
- Set ISO to your lowest setting. Something like 100 or 200.
- Set dial mode to Aperture Priority (AV.) This setting will keep the aperture the same and change the shutter time to get different exposures.
- Set your camera to AEB (Auto Exposure Bracketing.) This setting will set the camera to take three or more pictures in sequence with different exposure values.
- If your camera does three bracketed shots, set them to be +/- 2 stops either way. If your camera can do five bracketed shots, set each shot to be +/- 1 stop apart.
- Use a tripod! Each exposure needs to be the same to blend without added blur. You can do it without a tripod, but brace yourself against a solid object to prevent movement. Image stabilization (IS) also helps.
- Use a cable release. These are cheap and worth every penny as they keep any movement away from your camera. Even a simple shutter release button press can add some shake.
- Take the picture.
- Open the images in a program such as Photomatix and blend them together. Photomatix (my favorite) is a rather easy program to use.
- Amaze your friends with your photographs.


Of course, you can do more than this, but those are the necessary steps in the HDR process. Each person will come out with different results for their photographs. That’s the great thing about creativity. These are your pictures to interpret however you want.
Do you have a favorite photo editing tool or a photography tip? Would love to hear from you in the comments!
About the Author:
Although the usual hangout for sharing his photography is www.brickmonkey.com, you will also find brickmonkey as an occasional groovyContributor here @ groovyPost.com for photography tips and tricks.
9 Comments
Leave a Reply
Leave a Reply


MrGroove
March 22, 2010 at 1:40 pm
First post from our newest contributor BrickMonkey! Congrats and welcome to the team!
BrickMonkey
March 22, 2010 at 2:03 pm
Why thanks! I hope people find these contributions useful. I think this is the beginning of a beautiful friendship.
tone6060
March 23, 2010 at 11:09 pm
Well keep it coming. I’ll take any tip or trick I can get. that last shot was amazing.
shockersh
March 22, 2010 at 11:27 pm
Great read brickmonkey! I’m a photography junkie (with no idea how to use my SLR) so very cool to see ya on board here at gp. Will you be focusing on more photography stuff or all kinds of general stuff???
Welcome again!
BrickMokey
March 23, 2010 at 7:24 pm
I will primarily focus on all things photography. It’s what I know and love.
shockersh
March 22, 2010 at 11:28 pm
Hey – quick question – I see Photomatix isn’t free. Do you know of any free software that can merge the exposures together?
Yeah I know… I’m cheap!
BrickMonkey
March 23, 2010 at 7:27 pm
Here is a link to a list of free HDR software. I have tried a few of them and they do indeed work, but Photomatix is worth every penny.
http://www.techsupportalert.com/best-free-high-dynamic-range-hdr-software.htm
MrGroove
March 23, 2010 at 10:39 pm
Hey Shocker,
I have to agree with BrickMonkey on this one. You get what you pay for and with Photography, if something doesn’t look right it will really detract from the photo immediately.
grooveDexter
March 23, 2010 at 3:15 am
Love this HDR tutorial! Thanks BrickMonkey!
It really makes me want to go out and take a bunch of pics.