Manage Windows 7 Power Saver Settings [How-to]
With all of the recent jazz about going green, I recently received a question from a groovy reader asking:
“How can I save power on my new Windows 7 PC?”
The answer is, Windows 7 has a built-in power saver feature that you can easily configure! Whether you are environmentally aware or just trying to save a few bucks on your electricity bill, this article will explain the basics to get you on your way.
How To Setup and Manage A Windows 7 Power Saver Plan
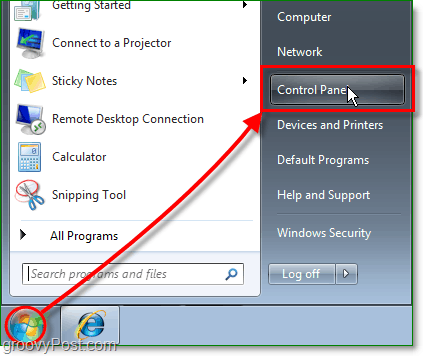
1. Click the Windows Start Orb, and then Click the Control Panel
2. In the Control Panel, you may need to Change the View by: to Small icons. Once you’ve made it visible, Click the Power Options control panel link.

3. In the Power Options control panel, the simple way to do things is to Select a Power Plan that matches your needs. Once you’ve decided on a plan Click Change Plan Settings to set the basic power save times.
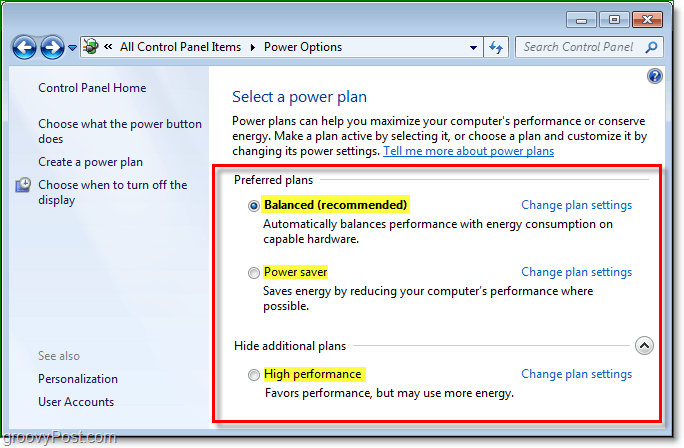
3b. Optionally, you can create a custom power plan and choose a default plan as a start template to tweak

4. Once you clicked Change Plan Settings, you go to the settings window. Set your primary options to what you would like them to be. You can also adjust the advanced power settings by Clicking the Change advanced power settings link.

5. First off Click Change settings that are currently unavailable. To do so, you’ll need to have administrator privileges. Now you can Customize each setting to match your needs. See the list below for suggested settings.

Recommended Advanced Power Saver Settings for Windows 7
- Hard Disk
-Turn off hard disk after
–At least 1 minute before the computer is set to sleep. - Sleep
-Sleep after
–This pertains to the computer. Make it at least 1 minute after Hard disk and Display turns off. - Sleep
-Allow hybrid sleep
–Turn On. - Sleep
-Hibernate after
–Make it at least 1 minute before the computer goes to sleep, and at least 1 minute after the above ‘Sleep after’ is set. - Power buttons and lid
-Start menu power button
–Go to Sleep. - Display
-Turn off display after
–Make it at least 1 minute before the computer is set to sleep. Usually, you would make this the same as the Hard disk Turn off time. - Multimedia settings
-When sharing media
–Make it Allow the computer to sleep to prevent it from waking up the computer.
6. Lastly, choose what you would like the power button on your computer to do, then Click Save Changes to finish.


Windows 7 Power Setting
November 14, 2011 at 11:25 pm
An insightful post.. These settings can be configured to suit you different needs such as to conserve energy or battery life, to run at all time etc.. you can also try http://www.windows7supportnow.com/2011/windows-7-support-to-change-the-power-settings/ for even more updates..