How to Customize the Toolbar on Outlook for Mac

You’re not stuck using the Office ribbon in the new Outlook for Mac. We’ll show you how you can customize the toolbar in Outlook.
One of the greatest features of the “new Outlook” for Mac is a customizable toolbar. Instead of static ribbon-like other Office applications on macOS, you can decide which buttons to display based on what you use most.
If you’re still contemplating switching to the new Outlook or have done so recently, we’ll show you how to customize the toolbar. This includes your main Outlook screen and the email, calendar, and contacts sections.
Customize the Toolbar in Outlook on Mac
You’ll follow the same steps for each spot where you can customize the toolbar in Outlook on Mac. The difference you’ll see is the options available for the toolbar in each spot.
Click See More Items (three dots) in the toolbar and choose Customize Toolbar.


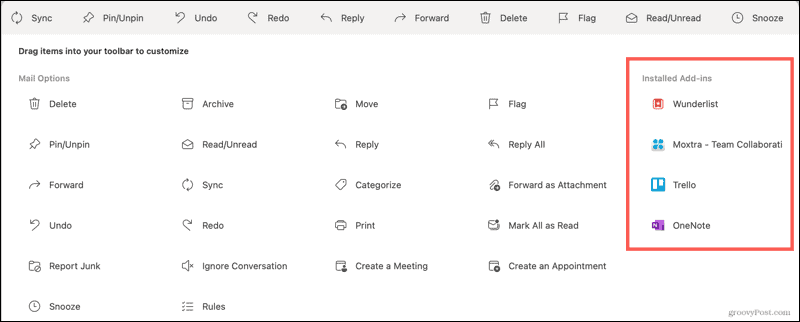
In the window that pops open, you’ll see available buttons display at the bottom and a darker gray area at the top, which is the current toolbar.
Drag the buttons you want to use from the bottom to the top. For buttons currently in the toolbar that you don’t want to use, drag them from the top to the bottom.


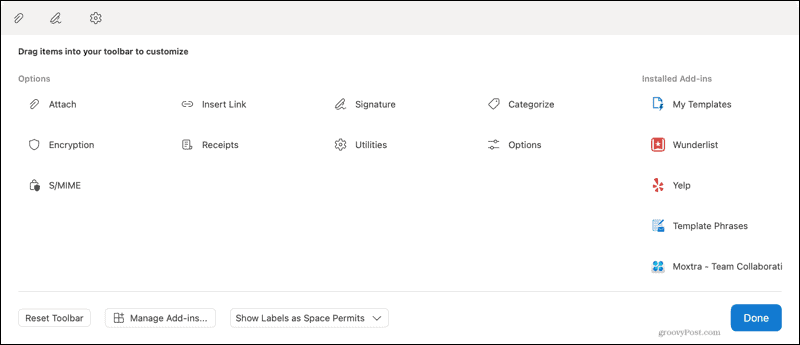
If you have add-ins installed, you’ll see these along the right side. You can drag these into the toolbar as well.


You can also rearrange the items in the toolbar. Select a button and drag it left or right to the spot where you want it.


At the bottom of the toolbar customization window, you’ll see a few additional options.
- Reset toolbar: Return the toolbar to the default settings.
- Manage add-ins: Open the Add-ins screen to manage current add-ins or look for more.
- Button labels: Choose always to show labels, show them as space permits, or hide the labels.


When you finish arranging your toolbar the way you want it, click Done at the bottom.
Customize the Mailbox Toolbar in Outlook
The toolbar for your Outlook mailbox and folders has the most actions available. You have over 30 options. Consider what you do most in your mailbox or a folder with a message selected. Whether you use the pin messages feature, reply or forward, or snooze emails regularly, save space for those types of items by removing buttons you never use.


Customize the Email Toolbar
You have a different toolbar with your Outlook mailbox toolbar when you reply to, forward, or create a new message. And if you put the email in a separate window by clicking the arrow on the top right of the message, that window has a matching toolbar.


So you can customize each of these areas to use the actions most important to you.


Customize the Calendar Event Toolbar
While the Calendar in the new Outlook on Mac doesn’t have a toolbar at the top, events do. You’ll see your customizable toolbar at the top for creating a new event or opening one on your calendar.


This lets you display buttons for things like the Scheduling Assistant or Attendee Options for new events. Or you can include your Status or Category for existing events.
Customize the Contacts Toolbar in Outlook
One more section that’s handy for the actions you need is the Contacts area. You can customize the toolbar for the Contacts section and when selecting a current contact or creating a new one.


This is convenient for contacts who you regularly chat with, set up a meeting, or want to call.
Make Your Toolbar More Useful in Outlook on Mac
Taking a few minutes to customize the toolbar in Outlook on Mac can save you time in the long run. You’ll have the necessary actions and use the most right at the top.
For more, check out how to set up and use signatures in Outlook on Mac. If you also use Office on Windows, take a look at how to customize the Quick Access toolbar.
Leave a Reply
Leave a Reply


