Create a Windows 10 System Restore Point from a Desktop Shortcut

Save time by creating a system restore shortcut on your Windows 10 desktop that allows you to make one with a simple double-click.
Whenever you make a major change to your Windows 10 system, like doing a registry hack or installing a major software suite, it’s important to create a system restore point. If something goes awry, it allows you to revert to a previous state when your system was working. Normally, you can create a restore point manually. But if you make frequent changes to your system, being able to quickly create and roll back to a known good configuration can come in handy. So, here’s how to make a new restore point with just a double-click of a shortcut icon.
Create a Desktop Shortcut for System Restore
The first thing you need to do is make sure the System Restore feature is turned on in System Properties. If you haven’t turned it on yet, read our full article on how to enable and create a System Restore point on Windows 10.
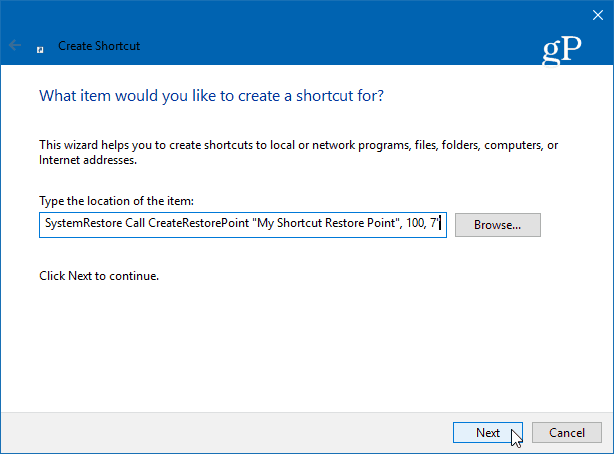
Right-click on the desktop and choose New > Shortcut to kick off the shortcut wizard. For the location of the item, type in the following path:
cmd.exe /k "wmic.exe /Namespace:\\root\default Path SystemRestore Call CreateRestorePoint "My Shortcut Restore Point", 100, 7"
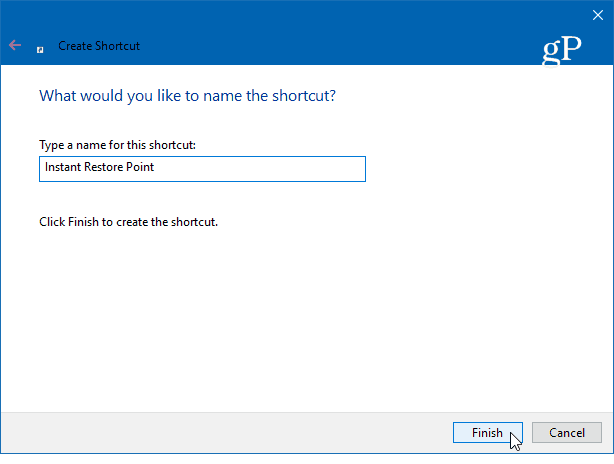
Next, type in a memorable description for the shortcut like “Instant Restore Point” or whatever you want and then click Finish.
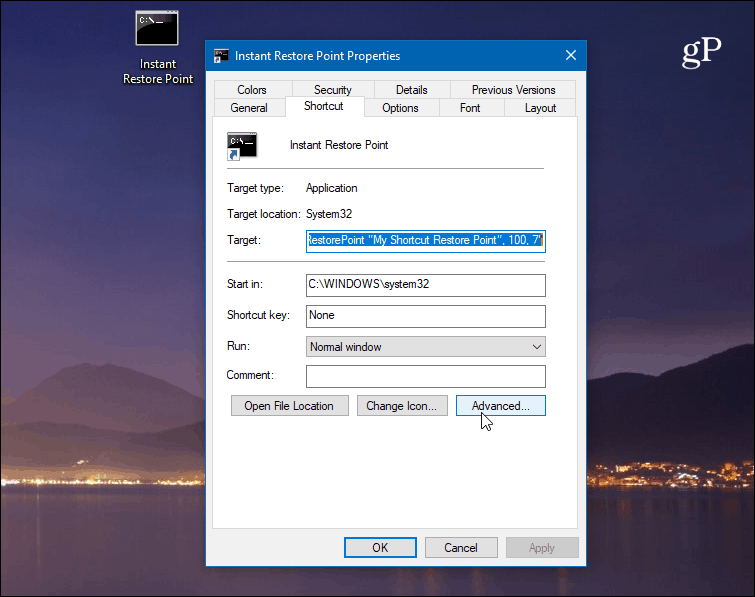
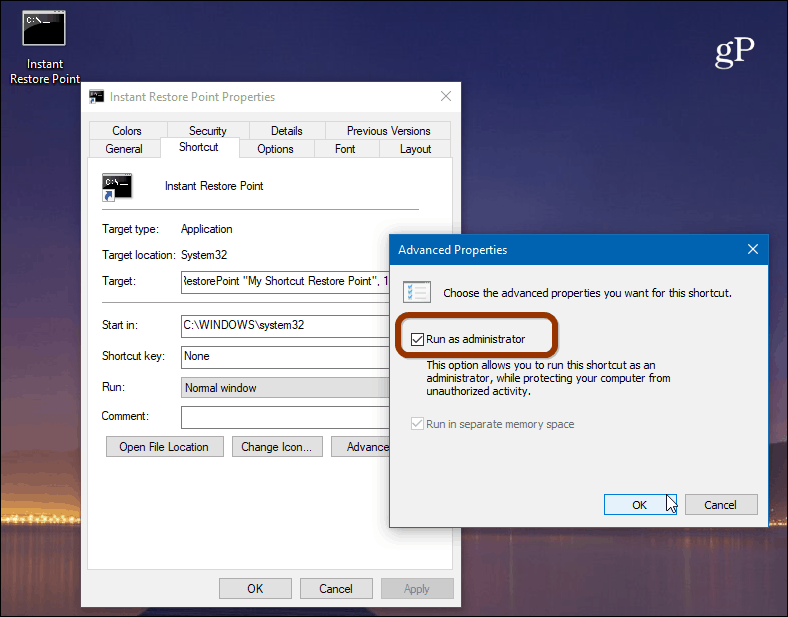
Once your shortcut is created, there are a couple more things to do. Right-click the icon and select Properties. In the screen that opens, click the Advanced button and then check the “Run as administrator” box and click OK. This is an important step. If you don’t have it set to run as admin, it won’t work, and you’ll get an “access denied” message.
Here you can also change the shortcut icon if you want. To do that, click the Change Icon button and type: C:\Windows\System32\imageres.dll as the path to find other included Windows 10 icons, or browse to the location of the one you want to use.
![]()
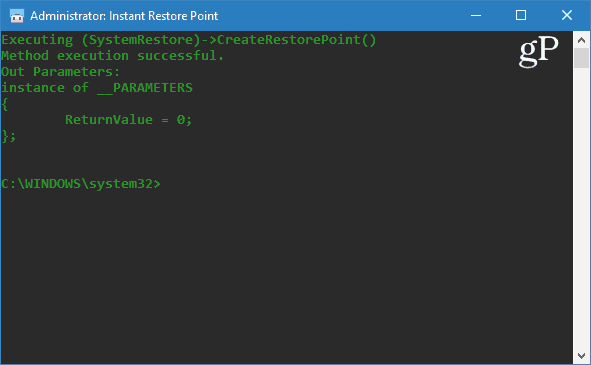
To make sure it works, double-click your icon and you should see the following command prompt which tells you a new point was created successfully.
It’s worth mentioning that Windows 10 creates an automatic restore point before it automatically installs feature or cumulative updates. In addition to creating manual restore points, you can also make Windows 10 create automatic restore points when Windows Defender runs. So, if you have manual and automatic restore points being made, you can always be sure that you have a stable system to revert to.
Also, keep in mind that restore points can take up a good chunk of drive space. If you’re running low on room, check out our article on how to delete old restore points to reclaim drive space. At the same time, you might want to make System Restore use less drive space.
How often do you create system restore points? Share your thoughts in the comments below.


Luc Schots
February 15, 2018 at 6:35 am
is it possible to have Windows 10 create its restore points on a drive other than C: ?
Mike
February 15, 2018 at 8:28 am
Many times tried to use “restore points” to restore the system and almost every time got a message, that system could not be restored for some reasons.
Is anyone knows the real reasons and how to deal with this issue?
Thank you
Steven Werfel
September 25, 2018 at 2:27 pm
I’ve had very bad luck with restore points until I started running them in SAFE MODE. They work better there.
Laura
February 15, 2018 at 8:57 am
Thank you for a most timely article. I needed to do a restore yesterday and spent hours online trying to find out how to find my restore points. It was easy in Windows 7 but if Microsoft can make things more difficult, they seem to do it. I did finally find out to use the control panel and I hope Microsoft never gets rid of this wonderful old tool.
I really like the idea of a shortcut. Thanks!
Bob
February 15, 2018 at 2:18 pm
Hi I have tried this several times and each time I get “Invalid Format”. The window is headed Administrator: Instant Restore Point. Where am I going wrong?
Mike
February 18, 2018 at 11:28 am
Try to make exact copy of the required path. Pay attention to the distances between different parts of the path.
Bob
February 19, 2018 at 6:46 am
Thanks Mike. I’m a bit red faced writing this as after I sent off my comment, I had another go at setting up the shortcut and realised that I had missed off the end of the path. Entered the correct path and all works fine now.
Thank you again for your help.
Bob
Ziggy
February 17, 2018 at 7:17 pm
Thanks Brian – all good; worked a treat. For those that aren’t aware ccleaner gives you the option to see all of your restore points and delete (except for the last one) those that you no longer require. Another tool is “Restore Point Creator”, which is under constant development (maybe too much!) and can be downloaded from sites such as MajorGeeks.
Dennis Lew
July 6, 2020 at 6:22 pm
Bob I got the exact Command Prompt as I should have but it didn’t create a new restore point. Please advise.
Rob Ward
October 28, 2020 at 6:09 am
Hi, I get the cmd window in 10 as you do but where is the restore point file? I look in restore points and nothing has Been created to restore.. Just asking
Donald Damore
February 11, 2022 at 3:28 pm
This is so typical of Microsoft. Whenever I upgrade to a new operating system I have to relearn what I already know. Would take me all of 60 seconds to create a System Restore shortcut in Windows 7. I’ve spent 3 hours trying to figure how to do it in Windows 10. How is this better? How does this qualify as an upgrade because it is definitely not an improvement.