How to Create a Data Entry Form in Excel

Excel provides a pre-made form you can use to quickly enter data in seconds rather than minutes. Here’s how to create a data entry form in Excel and increase your spreadsheet productivity.
If you have sheets in Excel where you need to enter a lot of data, you know how tedious it can get. But if you know how to create a data entry form in Excel, it’ll make you far more productive.
When most people think of forms in Excel, they think about crafting a VBA form from scratch. But Excel actually provides a pre-made form you can use to quickly enter data in seconds rather than minutes. Of all the Excel tips you may learn, this one will save you the most time.
Follow this tutorial to make use of this feature and increase your spreadsheet productivity.
Preparing to Create a Data Entry Form in Excel
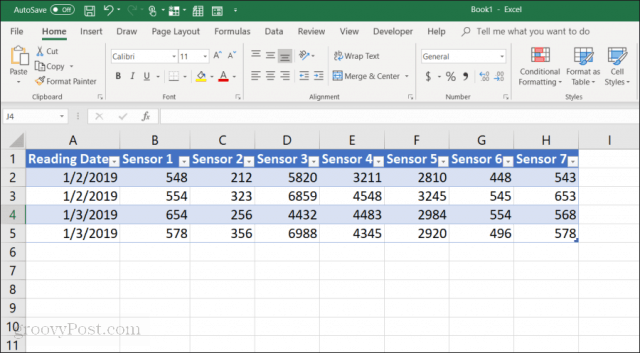
Before you can create a data entry form, you’ll need a spreadsheet that you’re entering data into (obviously), and you’ll need to add Excel’s data entry form feature to the Quick Access Toolbar. Let’s take an example spreadsheet in Excel that looks like the one below.
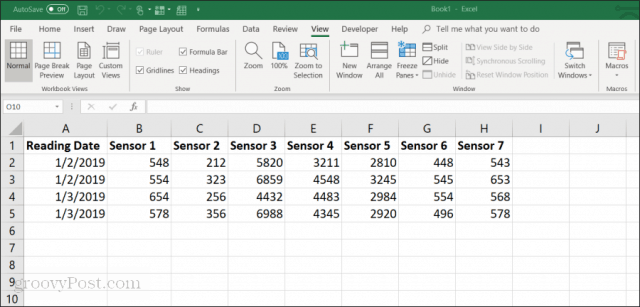
This is an example of what a spreadsheet might look like in a company where employees manually collect sensor data from equipment. Manually entering this data is:
- Tedious and time-consuming
- Prone to human error
- Potential for accidentally changing previous entries
You can improve this process by creating a data entry form. But first, you’ll need to make the data entry form show up in the Quick Access Toolbar.
Adding the Data Entry Form in the Quick Access Toolbar
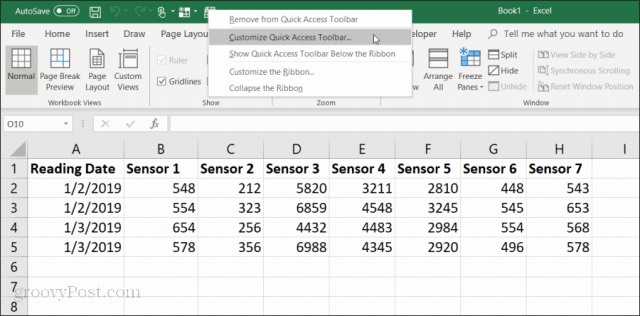
You won’t see the Data Entry Form in Excel’s standard toolbar. It’s actually a hidden feature you’ll need to enable. To do this, right-click anywhere on the Quick Access Toolbar and select Customize Quick Access Toolbar.
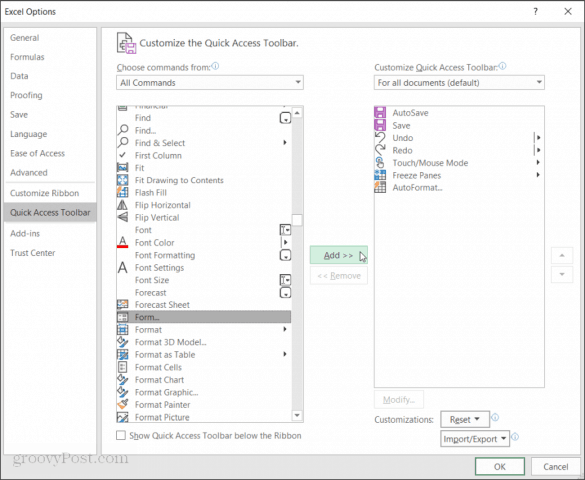
In the Excel Options window, click the Choose commands from the toolbar and choose All Commands.

Scroll down the list of commands and select Form. Then, select the “Add>>” button to add “Form” to the Quick Access Toolbar.
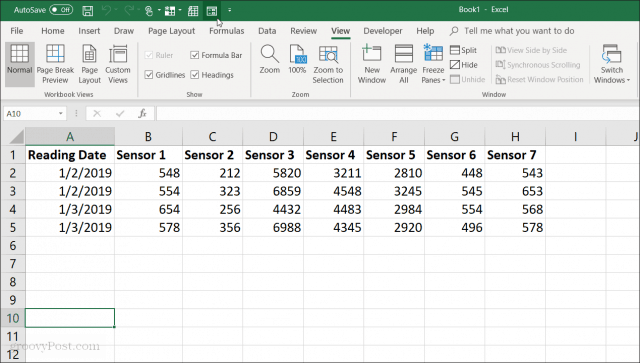
Click OK, and you’ll now see the data entry form in the Quick Access Toolbar. And now you’re ready to start using the Excel Data Entry Form on your Excel spreadsheet.
Create a Data Entry Form in Excel
Before you can use the Data Entry form in Excel, you’ll need to convert your spreadsheet into a table.
You can do this by pressing Cntrl + T. You’ll see the data in your spreadsheet convert to your default table formatting.
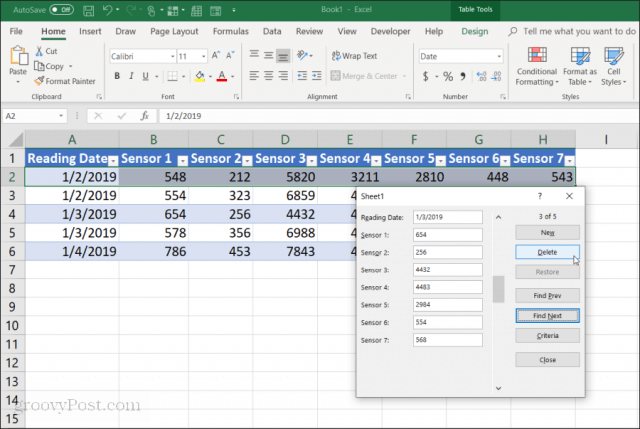
Now that you’ve converted your sheet to a table select the Form icon in the Quick Access Toolbar to open your data entry form.

If you’ve ever used a data entry form in Access, you’ll notice many similarities. The form offers a very controlled method of entering data into your spreadsheet. There’s no need to click on a different row when you’re ready to enter data there. The buttons on the form let you focus on the current row and navigate through the sheet using the form navigation buttons.
How the data entry form buttons work:
- New: Adds a new, blank row to the existing table.
- Delete: Deletes the current row you’re editing.
- Restore: Restores (resets) the field of data you’re editing to its original values.
- Find Prev: Moves the record you’re editing to the previous row.
- Find Next: Moves the record you’re editing to the next row.
- Criteria: Lets you search for specific records in the table.
- Close: Closes the data entry form.
Using the Data Entry Form is very intuitive. Once you start using it to manage your spreadsheets, you’ll wonder how you ever got along without it.
Next, we’ll explore how you use each feature of the form to manage your spreadsheet data.
Adding and Deleting Records
The New and Delete buttons on the data entry form will work exactly as you’d expect.
The New button will append a new record to the end of the table. In the data entry form, you’ll see blank fields to enter data by typing entries and pressing the tab key to move to the next field.

When you’ve field out all of the fields, select the New button again, and you’ll see the new row appended to your table. The form clears so that you can continue typing data for another new row if you want to.

The advantage of this is:
- You can quickly fly through adding records just by pressing the tab key.
- There’s much less chance of accidentally changing other records.
- You never have to use the mouse as you’re quickly entering records.
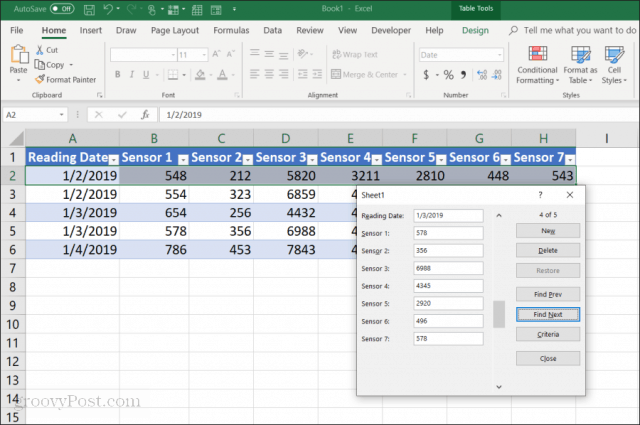
Deleting records from a table is just as easy. Just click your mouse on one of the records that you’d like to delete.
Just use the Find Prev or Find Next buttons to navigate to the record you’d like to delete. These buttons are similar to the up/down buttons in Excel’s developer tools. Press the Delete button to remove that record.
You’ll see a warning pop-up that the record is going to be permanently deleted. Select OK to confirm.

Note: This warning isn’t actually true. If you do find that you need to undelete the record, you can close the data entry form and press Cntrl+Z to undo the last change. This will bring the deleted row back into the table.
Searching Records
If you’re working with a vast dataset, the previous and next buttons aren’t going to make much sense. Instead of working through thousands of records this way, you can press the Criteria button to only browse through the records you want.
In this example, if you want to only browse through the entries from 1/3/2019, you would first press the Criteria button. This will change the data entry form into a filtered form. Enter “1/3/2019” into the “Reading Date” field.
Now, when you select Find Prev or Find Next, the form will only browse through the entries that match the criteria you’ve specified in the “Reading Date” field. In this case, that’s only the records where the Reading Date is 1/3/2019.
You can also use logical operators like > or < to trim data ranges. For example, if you want to view all records older than 1/4/2019, you would type “<1/4/2019” in the “Reading Date” field. You can also use * as a wildcard. For example, if you want to see all Sensor 1 records that end in “54”, you would enter “*54” into the “Sensor 1” field.
Using Excel Data Entry Forms
As you can see, enabling the Data Entry Form in Excel makes it much easier and more streamlined to perform data entry tasks.
You can reduce the number of errors made in entering data into spreadsheets and also make entering data much more enjoyable since you’re clicking less and keeping your hands on the keyboard.


