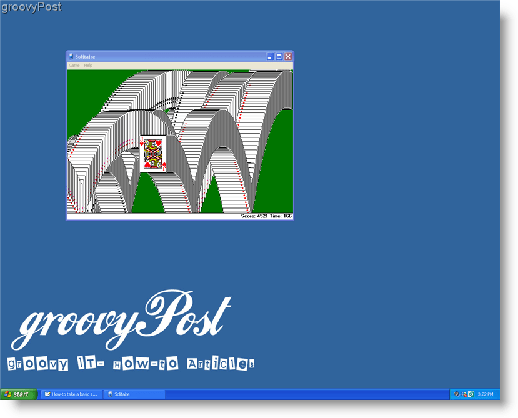
Take a ScreenShot or Screen Capture in Windows XP

Important Update: Microsoft ended support for XP years ago. The company no longer supports Windows 7, either. You should not be using either version on your PC. You should be running Windows 10 or higher. For more on that, check out how to take screenshots on Windows 10.
Windows XP is No Longer Supported or Secure
Unlike Windows Vista, Windows XP doesn’t have a great screen snipping tool. That being the case, it’s still possible to take Screen Shots, Screen Capture, or Screen Snip in Windows XP; it’s just not as easy OR sexy.
Using the process below, I’ll demonstrate a few ways to capture virtually any image you see on your screen, whether you want to snip your entire screen or just a single window. Windows XP is all you need, no additional tools or applications are required (however in the next article I will demonstrate the process from a few of my Favorite Screen Shot/Snipping Tools. Some free, some not free).
1. The first step is to know what it is that you want to capture, in this case, let’s capture our Solitaire score.
Now that you have a picture of something on your screen that you want to save, locate your keyboard button labeled Print Screen (also sometimes called Prnt Scrn.) Look for this button on the top-right corner of your keyboard.
2. Press Print Screen and your computer will save an image copy of your entire screen to what is called the Clipboard.*
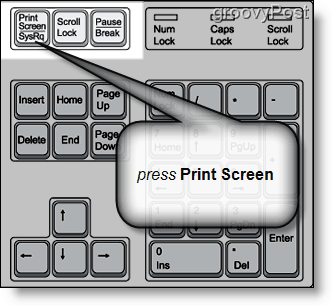
2.a – If you DON’T want to capture the full screen, select the window you wish to capture and Hold Down the ALT key while simultaneously pressing the Print Screen button. This action will capture ONLY the selected Window.
*Unless you have a custom program installed, the Clipboard will only hold one copied item at a time.
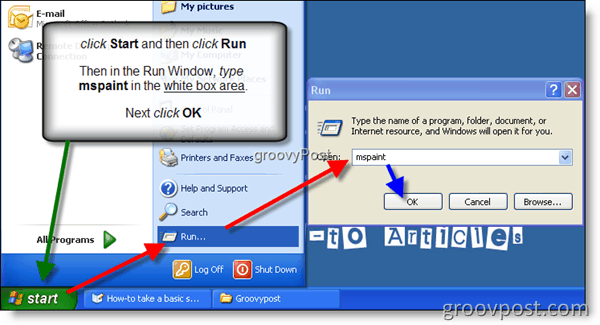
The next thing to do is to save the image to your hard drive. The most common and most simple way of doing this is using MSpaint.* Typically there is a shortcut in your start menu called “Paint” and clicking on it will open the program. On the other hand, a sure way of doing this is following step #3
3. Click Start and then click Run. Once the Run window is open, type mspaint in the open text box.
*There are many other programs capable of this action, however, they must be purchased and installed separately (Microsoft Outlook, Microsoft Word, etc…). MSpaint is included and installed with Windows for free.
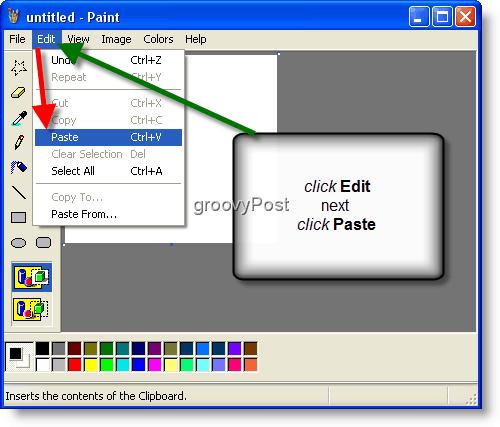
4. Click Edit in the menu tab, then click Paste
Keyboard TIP: You can also use a keyboard shortcut by pressing holding the Ctrl key and simultaneously pressing the V key on your keyboard to paste the image into MSPaint
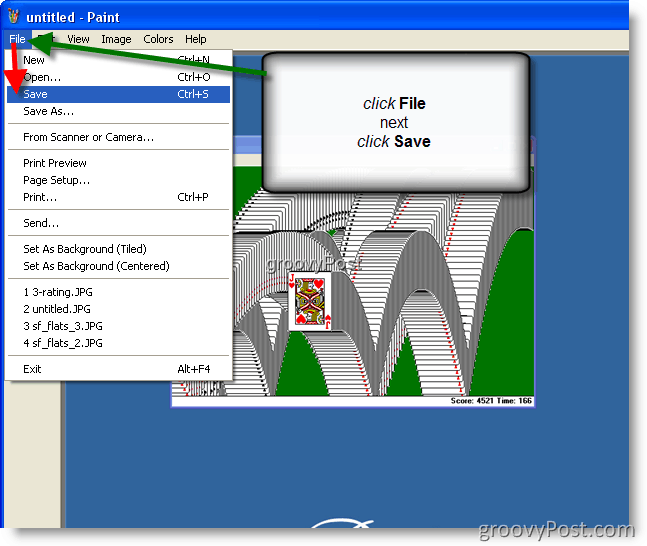
5. Click the File menu tab, then click Save.
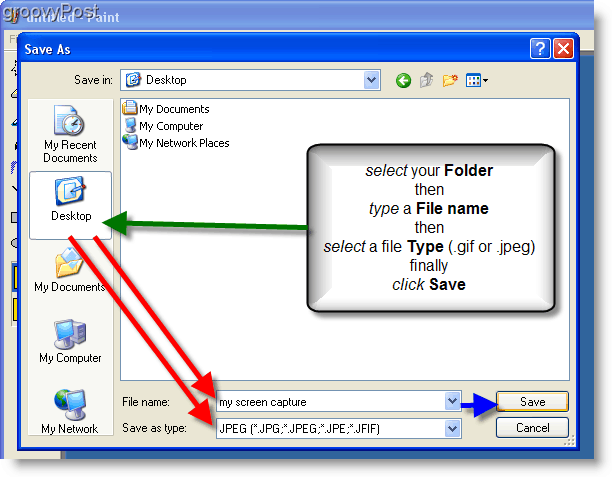
6. Select a File Name and File Type, (I highly recommend choosing .jpeg/.jpg for file size purposes) and Click Save
TIP: In this example, I clicked on the Desktop Icon to save the file to a familiar location on my computer. You can, however, choose to save the file anywhere you desire.
All done!


XPMACLINUX
June 3, 2008 at 2:01 am
I am not sure whether the key to be pressed is CTRL or ALT. As far as my knowledge is concerned, ALT is the key to be pressed when we want to capture a window instead of entire screen.
MrGroove
June 3, 2008 at 10:54 am
@XpMacLinux – Thanks for the feedback. I think I must have been on crack when I wrote the article. Thanks for catching that.
Article has been updated!
TaoPhoenix
September 4, 2008 at 9:29 am
I think I prefer using a Screen Capture program to grab one window and pass it straight to a file so it doesn’t hit the clipboard, and also automatically creates the first half of the file. Then Alt-PrintScreen can grab something else so that you can do a mashup easily.
MrGroove
September 4, 2008 at 10:37 am
@TaoPhoenix – The great thing about Windows is there are MANY MANY different ways to do the same thing :)
Personally, I couldn’t make it through the day without SNAGIT. Granted, it’s not free but it’s worth a few bucks.
justveil
October 14, 2008 at 9:46 am
thanks a lot! your info really helped me out.
Carl
March 20, 2009 at 2:52 am
http://www.sofotex.com/Polenta-ScreenShot-download_L22006.html
I use the Polenta screen shot. Very easy and allows you to select part or the whole screen. Saves it as a j.peg.
MrGroove
March 20, 2009 at 8:43 am
@Carl, And it looks like the product is free. Nice Tip.
How you tried it with Vista? Looks like it’s not been updated for a few years.
Loe Smith
May 12, 2009 at 3:05 am
PROBLEM:
When I press Prt Scr , it directly goes to the printer & nothing is saved on clip board…my o.s is windows xp…pl. help
neither does alt + Prt Scr helps.
grooveDexter
May 15, 2009 at 7:19 pm
@Loe Smith, sounds like you have a 3rd party software installed, most likely one that came with your printer. There is most likely a setting on that software to disable that, another option is to get a screen capture program like Snagit -> http://www.techsmith.com/screen-capture.asp
Also an possibly un-related fact, in older versions of windows they required you to do ctrl+printscreen.
SQB
July 27, 2009 at 9:36 pm
Thanks a lot! i was badly needed a screen shot and do not know how to take it! with your (Prnt scrn) tip has really solved my problem.Really thanks.
MrGroove
July 29, 2009 at 1:13 pm
@SQB,
Excellent!
Vijayamanikandan Prabakaran
March 11, 2010 at 2:59 am
Hi Guys,
Here is one another way to screen print without any tool!!!
Press ‘windows’ button+s and drag the mouse to copy the needed portion.
‘Prntscreen’ captures all the displayed in screen.
Try this!!!
sadaf
March 13, 2012 at 3:27 pm
ty for telling an alternative
David
April 20, 2017 at 3:18 am
Many thanks, Vijayamanikandan Prabakaran. It worked excellently.
Vijayamanikandan Prabakaran
March 11, 2010 at 3:01 am
Forget to inform,,,
This requires MS oneNotes
MrGroove
March 11, 2010 at 5:14 pm
@Vijay – No worries. OneNote is a great app (one of my favorite) and yes, I use it’s screen shot tool ALL THE TIME. Office 2010 actually includes screenshot import with all it’s office apps (word 2010, outlook 2010) and of course onenote 2010.
Still, great tip on the screenshot side! Thnx!
Matt
October 18, 2010 at 8:37 am
Please do not use JPEG for desktop screenshots. PNG will always provide superior image quality with only a small increase in file size. JPEG is optimized for photographic content and will look grainy or fuzzy with desktop screenshots.
Akshay Chaturvedi
April 19, 2011 at 6:50 am
Hi,
I badly want to take screenshots…but I am unable to! None of the above is working for me. I have Windows XP. And mine is an HP laptop. The print scrn and insert button is common! Please help !!!
grooveDexter
April 19, 2011 at 8:16 am
When all else fails, try a screenshot program.
Jing is a great free one, review and download link here: https://www.groovypost.com/howto/review/jing-free-screenshot-sharing-tool-windows-7-vista-mac/
parth
June 4, 2011 at 5:25 am
thank u …. so much
with the help of ur trick i had found the of taking a screen shot.. and hence i can now take a print of the screen that i want… whether it is a GAME or WEB.PAGE…………thank u
SWATI
June 14, 2011 at 5:02 am
it was really very helpful to me
Kathleen
July 16, 2011 at 2:18 pm
All steps are exactly as you map out, but there is not a “paste” but a “paste from” whre do I go from here
JB
December 23, 2011 at 8:37 am
Kathleen I have exactly the same thing.
In the “paste from” option list there is no clip board.
The “paste” option does not highlight.
akhil
October 29, 2011 at 10:15 am
thanx bro. for getting this site, helping me a lot
Tim
November 18, 2011 at 4:26 pm
Thanks
a handy blog that i shall bookmark
qobees al khalwie
February 13, 2012 at 5:32 pm
thank you !!
Mister G
July 24, 2012 at 7:24 am
It Works. Thanks Dear
Steve Krause
July 24, 2012 at 11:55 am
Old tip but still a good one!
Michael Hazell
August 11, 2012 at 1:48 pm
Wish MS would release a Snipping tool for Windows XP via a power toy. I use the same method above, but for taking area shots, I use Promethean ActivInspire.
Melissa White
February 25, 2013 at 8:48 am
Thank you so much!!! You have the best instructions for this process. I have been trying to learn how to do this. Very nice!!
John Bryant
June 13, 2013 at 5:21 pm
Thanks!
raj
July 21, 2013 at 12:19 pm
really useful…thanks
Jane
August 8, 2013 at 10:52 am
Chrome now has web-based browser extension for taking selections as well as windows and entire screen shots and saves them to google drive or diigo, alternatively you are save it locally, save it to clipboard or print it. It also allows you to annotate it. There are many extensions like this. Have fun: https://chrome.google.com/webstore/detail/awesome-screenshot-captur/alelhddbbhepgpmgidjdcjakblofbmce/related?hl=en
Zahid
December 18, 2014 at 12:42 pm
thanks man its easy and simple way thanks again
Kefayatr wazir
January 4, 2016 at 11:47 am
My dear i have old version of windows 2007 xp & using it for the Ms Office purposes because it needed that so when ever i try to capture screen shot of the entire screen e.g Prnt Scrn then Ctrl+v & when I’m trying to saved it into the paint box there nothing saving ?? What is the reason of this problem is there has a snipping toll in the current window someone help please…
Thanks
jeffcard
September 13, 2016 at 1:04 am
Thank you for the guide, Windows 10 has a free feature to record screen now, but it’s not available on windows XP. For XP user, I’d recommend acethinker screen grabber online, free and easy to use, no need to download and install anything.