How To Install or Enable the Windows Vista Snipping Tool

 Once Installed / Enabled the Vista Snipping Tool
 ![]() is a great free application bundled with Windows Vista and Windows 7. It’s easy to install and enable. The Snipping Tool is great for taking screenshots or “snips” and then annotate, save, or share the image or snapshots of your screen. Just follow these simple steps to enable it:
is a great free application bundled with Windows Vista and Windows 7. It’s easy to install and enable. The Snipping Tool is great for taking screenshots or “snips” and then annotate, save, or share the image or snapshots of your screen. Just follow these simple steps to enable it:
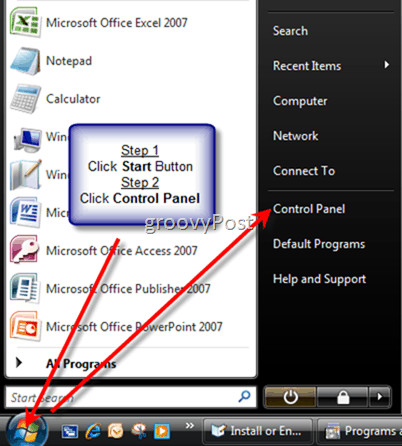
Step 1: Click the Windows Start Button and click Control Panel
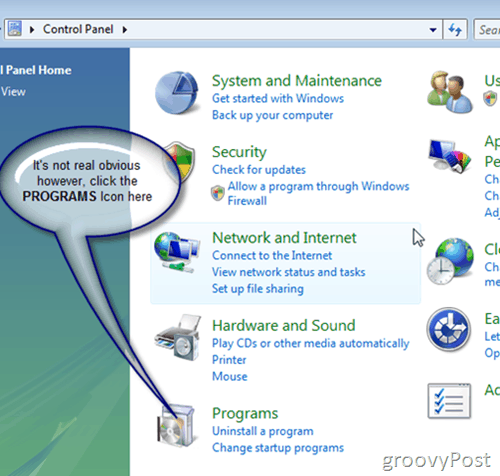
Step 2: Click Programs icon

Step 3: Click Turn Windows features on or off as highlighted above
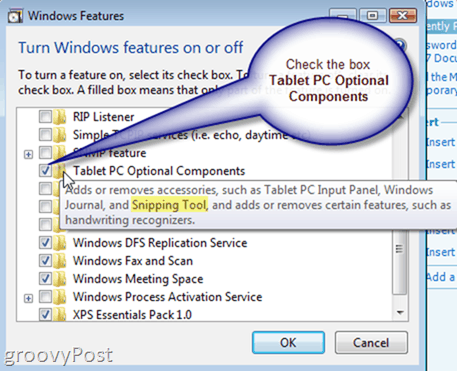
Step 4 (Final step): Check the box Tablet PC Optional Components.
All done! The Snipping Tool should now be installed in your Accessories Folder:
- Windows Start Button
- All Programs
- Accessories
 Snipping Tool
Note: Windows 7 comes with the Snipping tool enabled, so the How-To above does not apply as you cannot disable it using the Windows Feature Menu/Options. That being said, the Windows 7 Snipping tool is only available in the Home Premium, Professional, and Ultimate/Enterprise editions of Windows 7. It’s funny how Microsoft didn’t include it with all versions as I feel it’s just as important as the Calculator or Notepad but whatever…
Disclaimer – All captures with the exception of the “SnagIt” capture below made using: SnagIt V8.2.3……… :)


RJ
August 21, 2007 at 11:43 am
I struggled looking for this so you saved me a bunch of time! Love the step by step. Very easy to follow. Thanks for the write-up!
RJ
MrGroove
August 22, 2007 at 10:15 pm
Awesome! Thanks for the feedback!
OscarJJ
September 12, 2007 at 11:28 am
Keep em coming. Thnx!
MrGroove
September 14, 2007 at 11:36 pm
Thanks Oscar! And welcome to the site!
Ashley
May 27, 2009 at 3:37 pm
i cant find it on my computer:( HELP!
JPT
July 4, 2010 at 8:38 pm
no matter how many times i re-install the vista os, i always forget where this most versatile of apps is hidden. thanks, man.
MrGroove
July 5, 2010 at 12:25 pm
Anytime JPT! I think the process is the same for Windows 7 also…??? Might need to do that write-up also I think?.?.?. Either way, your welcome!
Nikky
July 13, 2011 at 6:12 pm
haha wish you had of put “Note: Windows 7 comes with the Snipping tool enabled” at the begining. I should have read the article first before going off and trying to enable it when it was already enabled. Good thing its extremly easy and quick then to check out.
MrGroove
July 14, 2011 at 7:08 am
Hi Nikky… sorry about that :) You know what is weird tho, at work it was DISABLED by default on my PC and everyone around me. I think IT did that to freak us all out. who knows.
Good feedback however. I’ll update the article to say (FYI – go test it first, might already be on).
Dai
July 26, 2012 at 2:52 am
Hi Steve, I have windows vista & tried to install ‘snipping tool’. I followed your step by step instructions. Upto ‘Turn windows features on or off’ it was perfect. I haven’t got ‘tablet pc optional components’. So, I am stuck. Thanks for your help and support. What can I do next??
Steve Krause
July 26, 2012 at 11:38 am
Hi @dai — So you don’t have the box to check in Step 3?
Are you running the latest Vista service-pack?
Dai
July 28, 2012 at 5:15 pm
Hi Steve
Thanks for your quick reply.
I installed Vista in 2008 June. I know it is not the latest. I am trying to do some ‘printscreen’ shots for my shots. Students recommended the ‘snipping tool’. Any help is appreciated.
Thanks & regards
Dai
Bruski
August 12, 2012 at 5:41 pm
Not available on windows 7 starter? correct?
Brian Burgess
August 12, 2012 at 5:48 pm
I did some digging and it looks like Windows 7 Starter doesn’t have the Snipping Tool. I guess that is why it is “Starter Edition” a lot of little features like that are left out.
But there are third party apps you can use. Some people told me they use a tool called Snippy — but it hasn’t been updated in a long time.
Steve Krause
August 13, 2012 at 11:18 am
You might also try JING. It’s free and works quite well.
tess
February 23, 2013 at 6:23 am
I’m struggling to find this on my computer. I have “Windows 7 Starter.” Is it not on my computer? Your tutorial is awesome but I don’t have a folder for “tablet PC Option Components.”
Jackie
November 11, 2013 at 9:00 am
I don’t have the ‘tablet PC option Components ” please help
Art Ford
March 5, 2015 at 8:01 am
Steve, this didn’t work for me. I had disabled snipping tool but not by unchecking Tablets option.
Do you have any other re-enabling method?
Patrick Dreier
May 15, 2015 at 3:32 am
Hello!
It is not usable The Windows 7 Startmenu. The Windows XP Startmenu are usable.
What is for Snipping Tool in Windows XP?
With king regards!
nico
January 7, 2016 at 2:41 am
hey I cant find Tablet PC Optional Components.
Patricck Dreier
January 7, 2016 at 11:30 am
Hello!
Please insert Tablet PC Optional Compontents for Windows XP.
tammy
March 20, 2016 at 3:29 pm
Can you leave some simple instructions on how to use snip it. I am just learning and can’t figure it out. Thanks
Anonymous
March 21, 2016 at 11:34 pm
The new version for snagit dosn’t existing in free version.
Patrick Dreier
November 13, 2020 at 1:04 am
Dear Woman and Man!
How to have Snipping Tool in Windows XP?
With kind greetings!