Since early March, there has been an increase in complaints about the Get Windows 10 app in Windows 7 and 8.1 automatically upgrading systems to Windows 10. A few third-party solutions have been developed to block GWX and associated updates that facilitate the installation of Windows 10. We previously looked at the most popular options, GWX Control Panel. The latest solution to the cat and mouse game is Never 10 by renowned security expert Steve Gibson.
Block Get Windows 10 Using Never 10
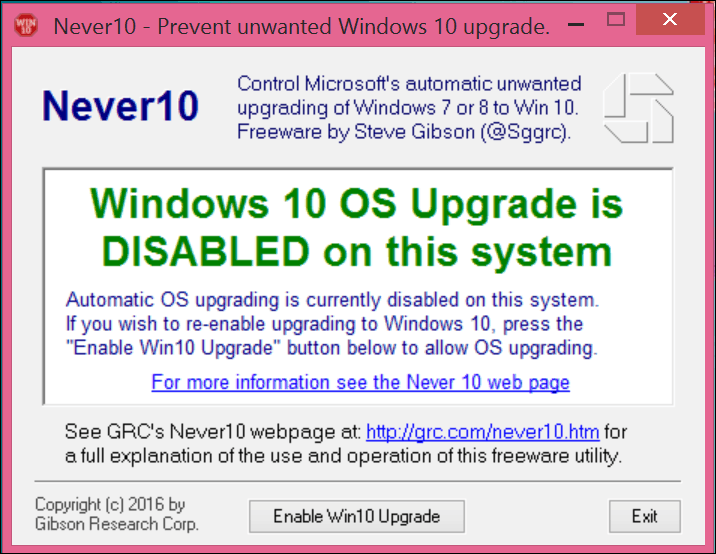
Never 10 is a small, easy to use app that’s portable, so no installer is required. The utility works on Windows 7 and Windows 8. After downloading it, double-click never10.exe and then select the Disable Win10 Upgrade button.

When it’s enabled, it will display a green notification, “Windows 10 OS Upgrade is DISABLED on this system.” On the other hand, enabling it is just as simple. Click Enable Win10 Upgrade. The Windows 10 Upgrade will once again be available.
Does it Work?
I tried it out on a couple of computers, and I’m not so sure it is full proof. After enabling Never 10 on another computer, and then launching Get Windows 10; there was still a countdown timer indicating Windows 10 would be installed in 60 minutes. I also noticed that it does not hide the annoying GWX icon on the taskbar.

If you don’t want the Windows 10 upgrade, give Never 10 a try and let us know how your experience with it goes in the comment section below.
Disable Windows 10 Upgrade using Get Windows 10 App
I was able to use the Get Windows 10 app itself to disable the Windows 10 upgrade with no further notifications. When doing this, you’ll need to make sure to select the appropriate buttons and links. On some of the screens, it’s not always obvious what to choose.
Launch the Get Windows 10 App, if you don’t see it, press Windows key + R they type: gwx.exe then hit Enter. This will launch the Get Windows 10 app, if you see the message shown below, click I need more time below the timer.

And then click the Reschedule link underneath the timer.

On the next screen click Cancel scheduled upgrade.
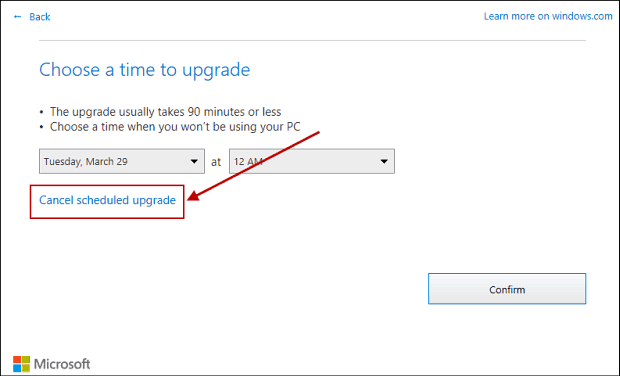
Next, click the Cancel scheduled upgrade button.

You won’t be bothered or automatically updated to the new OS. You can also manually block the Windows 10 upgrade through the Windows Registry, check out our previous article for instructions.
At least this second method works for now. There’s always a possibility that Microsoft will push another update that will make it harder to use the GWX app to stop Windows 10.


James Clark
April 12, 2016 at 10:47 pm
I am a senior citizen, but learned how to stop my Win7 and Win8 from downloading the 6GB file for Win10. When you are on metered data, you learn a few tricks on how to stop wasted data. Here is what I did.
Just go to windows update and disable the update that tells Windows 7 and Windows 8.1 to upgrade to Windows 10. The update is KB 3035583. Here is what Windows has to say about this:
How to Remove an update
To help enhance the security and performance of your computer, we do not recommend removing updates.
Click to open Installed Updates.
Click the update that you want to remove, and then click Uninstall. Administrator permission required If you’re prompted for an administrator password or confirmation, type the password or provide confirmation.
If you want, you can reinstall the update later by going to Windows Update in Control Panel and checking again for updates. To stop Windows from installing or notifying you about an update, see Troubleshoot problems with removing updates.
Note
If you can’t remove an update, your computer might be connected to a network where updates are managed by Group Policy. In other cases, you might not be able to remove an update because it applies to a security-related area of the operating system. If you think an update that you can’t remove is causing problems, contact your system administrator or your organization’s technical support group, or see Troubleshoot problems with removing updates.
So here are the steps I recommend:
click control panel, then windows update
next click “view update history”
next go to top of page and click “installed updates”
now be prepared to wait a while. You may have as many as 500 installed updates.
once installed updates has loaded, select KB 3035583
right click, click “uninstall”
my PC running windows 7 has not hiccupped once after uninstalling this update.
One word of caution:
Most people will simply re-install it the next time windows update shows an important update.
You must write down that number on a post it note, stick it to your screen, and never select it again. It will come up EVERY time you request a windows update.
Oh, by the way, you must deselect automatic updates. select “check for updates but let me choose whether to download and install them.”, and never install that update again, ever.
hope this helps.
Bill R
June 1, 2016 at 9:06 am
Great! Thank you very much for posting this. I had automatic updates selected in my settings like a lot of people do and couldn’t cancel the update after it had initiated.
Ann
May 29, 2016 at 4:47 am
I forced to download Win10 install files from MS website using Media Tool Creation, created USB disk for clean install, and GWX notifications are gone.
Ann
May 29, 2016 at 4:48 am
I forgot – I haven’t installed Win10, just downloaded files. Still running Win 8.1:)