How to Set Custom DNS Servers on iPhone and iPad

One way to get all of your iPad/iPhone mobile web browsers to run a little bit better is to change the DNS server. Here’s how to set it up on iOS 7 Devices.
An often overlooked but critical component to networking and surfing the internet, in general, is DNS. It’s a required component for every and all devices, including Computers, iPhones, Android devices, and anything else that has an IP address. Essentially, it’s what converts a name like groovyPost.com into an address your device understands. It’s like a phonebook for the internet—and if that address lookup is slow or not working, everything comes to a screeching halt.
In most cases, you can ignore DNS. Your Wi-Fi will assign it when you connect, and life is good. However, if you’re a little geeky and want to optimize your speed and security, DNS is a great place to start—yes, even on an iPhone or iPad.
In a few different tutorials, we’ve talked about changing your Domain Name Service (DNS) server on your router or Windows machine. Today, we’re going to focus on your iOS devices. The process is the same on an iPhone or iPad, but my screenshots will be taken from my iPhone 15 Pro.
Before we begin, you should choose an alternate DNS server. Here are a few:
- CloudFlare – Free – Provides Free DNS resolver and advanced settings to block Malware and Adult Content.
- 1.1.1.1 – Free DNS resolver
- 1.0.0.1 – Free DNS secondary
- 1.1.1.2 – Block Malware
- 1.1.1.3 – Block Malware and Adult Content
- OpenDNS – Free – Provides free DNS resolver and detailed stats for usage and content filtering for Malware and Adult Content.
- 208.67.222.222
- 208.67.220.220
- Google Public DNS – Free, won’t redirect to ads, faster, and more reliable than many ISP DNS servers.
- 8.8.8.8
- 8.8.4.4
- DynDNS – Phishing protection, faster content filtering.
- 216.146.35.35
- 216.146.36.36
Pick one or two that you like. You can set up a primary and secondary DNS for your iPhone or iPad.
Changing DNS Settings on the iPhone
Before updating your iPhone or iPad, iCloud+ subscribers will want to disable Private Relay on the network/Wi-Fi connection you’re configuring the Custom DNS settings on.
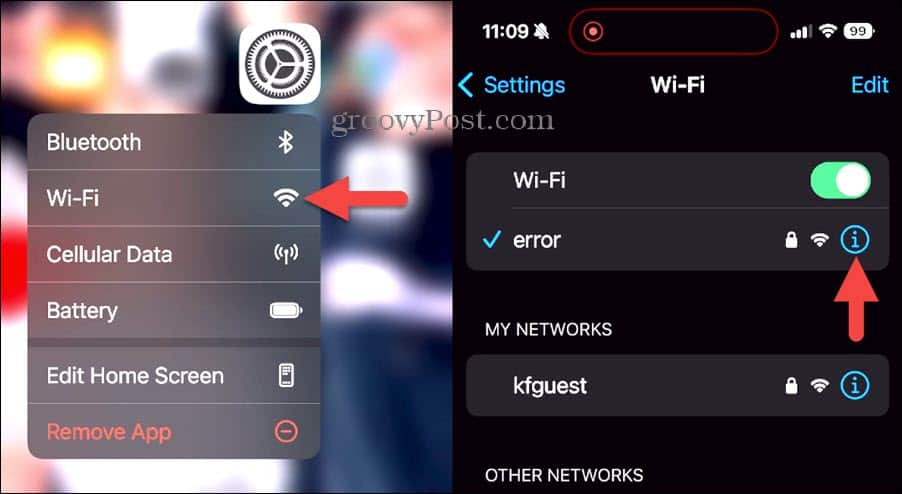
- Tap and Hold the Settings Icon, then Tap Wi-Fi. Tap the info icon to the right of the network you want to configure.

- Scroll down to DNS and tap Configure DNS.

- Tap Manual, Add Server, and Enter an IP of a Public DNS Server. Tap Save when done.


Don’t forget to delete the old DNS server IP address. This is the DNS server added by your DHCP or default Wi-Fi settings. Although I didn’t show it in my example above, you should also use a secondary DNS server. For Cloudflare (the example I used above), that would mean adding two servers:
- 1.1.1.1
- 1.0.0.1
By adding two DNS servers, if one of them is offline, your device will automatically try the secondary.
Test your Custom DNS Settings
If you remember to disable Private Relay, you can test your new DNS servers by simply surfing the internet or using an internet-based messaging client like my favorite app, Signal. If you can connect, it’s most likely working. However, some DNS providers like OpenDNS and Cloudflare have sites you can hit to test them also. For example, if you use the free Malware blocking DNS servers from Cloudflare (1.1.1.2 and 1.0.0.2,) you can visit the Cloudflare testing page to validate malware is being blocked.
What About Changing DNS Servers on 4G/5G?
There is no quick and easy way to change the DNS servers (or practically any other settings) for your cellular data connection. You can jailbreak or use the iPhone Configuration Utility. But that’s not something the average user is able to do. It’s best just to use the DNS servers from your mobile carrier or get a VPN, which will route all traffic, including DNS, through a secure VPN tunnel or enable Apple Private Relay, although this will only protect Safari browser traffic.
Conclusion
Configuring your iPhone to use a custom DNS server actually makes a lot of sense. By default, most devices connected to Wi-Fi will use unintelligent DNS servers provided by their ISP. By configuring your device to use a custom DNS provider like Cloudflare or OpenDNS, you can enjoy free value-added services like Malware and Adult content filtering.
Did we miss anything? Do you have a favorite DNS provider we didn’t talk about? Leave a comment below and tell us all about it.


Francesco
October 2, 2013 at 1:08 am
Hi Jack,
would you please tell me how to use Iphone Utility Configuration in order to change the DNS server for cellular data connection?
Thank you
Jason Michael Fillman
February 23, 2015 at 10:51 am
Was there ever a post or did anyone figure out how to use the Configuration Utility to set the DNS server for cellular connections? I would really prefer this approach to Jailbreaking.
Vladimir
June 5, 2014 at 9:28 am
Hi Jack,
would you please tell me how to change the DNS server for cellular data connection?
Thank you
Eduardo
August 9, 2014 at 8:30 am
Thank you so much!!!!
joseph mandaza
November 27, 2014 at 6:09 am
how can i use my cellular opera mini bundles on my computer by using hotspot you see i cant find opera mini for pc
Fred Arne odegaard
December 14, 2014 at 12:11 am
Hallo,
My problem, om a news iPad is that It will not accept the new DNS address. It immediately goes back to the old one. However, it works well on other IPAs that I have.
Settings?
ss
December 18, 2014 at 1:43 am
thank you so much!!!!!!!!!!!
Pawel
February 13, 2016 at 6:16 am
There are a lot of great DNS providers such as Google DNS or OpenDNS (opendns.com). Beside increasing speed, OpenDNS is able to block malware and protect you from unwanted content.
There is also an easy way to change DNS on iPhone and iPad. Please check DNS Override app made by QRMedia (https://itunes.apple.com/us/app/dns-override/id1060830093?mt=8). You can either change DNS manually using included instruction or use great DNS Override feature to set selected DNS for all cellular and Wi-Fi networks.
App also includes list of recommended DNS providers with easy to understand list of features.
astor-rotsa
February 14, 2016 at 2:00 am
Nice find! Love the app <3