The Beginner’s Guide to Google Sheets, The Online Rival To Excel

If you are looking for an online, stripped down, easy to understand version of Microsoft Excel, then Google Sheets is the place to go to. Here’s what a beginner needs to know.
Last time we looked at Google Docs and how to get started with it if you are a beginner. Today we are going to look at the other major part of Google’s cloud-based productivity apps – Google Sheets.
Sheets is Google’s answer to Microsoft Excel. There are two big things that set Sheets apart from Excel: Sheets is completely web browser-based, and it’s absolutely free to use. It also shares a lot of the collaborative and sharing functions that Docs has.
Assuming you know nothing about Sheets already, let’s take a look under the hood at how it all works.
Google Sheets – The Free Alternative to Microsoft Excel
![]()
If you already have a good understanding of how Microsoft Excel works, then you will have absolutely no problem with Google Sheets. But let’s assume you know nothing about how Excel works, either.
Like Docs, Sheets has the following things going for it:
- Everything is totally online, so your spreadsheets are accessible from any Internet-connected computer or mobile device.
- Everything is saved automatically, so you never have to worry about losing any vital work.
- You can invite collaborators to your spreadsheets and watch them edit the documents in real-time.
- You can chat with your collaborators inside the spreadsheet in real-time.
- You can view revision history and roll back a spreadsheet to a previous version.
Getting To Google Sheets
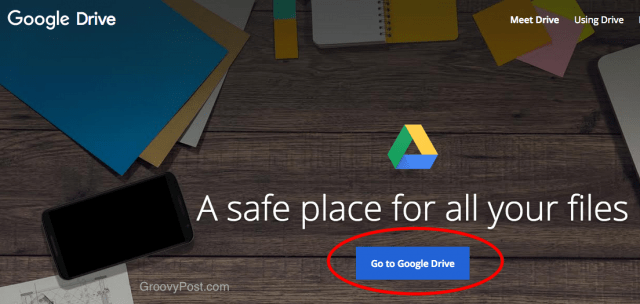
Getting to Google Sheets is simple. You can point your browser directly at https://docs.google.com/spreadsheets/u/0/, which will bring you here:

Or you can access the site through Google Drive.
Starting a New Spreadsheet
After clicking the blue button and being taken to the next page, click the blue NEW button, then Google Sheets. You can now choose a blank spreadsheet or start from a template.

Starting a Blank Spreadsheet
If you choose a blank spreadsheet, simply give it a title, then start filling in the cells with data.

Starting a Template Spreadsheet
If you select the template option, you will see quite a nice selection to choose from.

All the usual suspects are there – schedules, to-do lists, budgets, calendars, expense reports, invoices, and lots of different trackers.
Uploading and Converting Excel Spreadsheets to Google Sheets
The third option for starting a spreadsheet is to take an already existing Microsoft Excel spreadsheet and upload it to Google Sheets format. You would need to do this via the Drive URL, though, as the File upload option is not on the Spreadsheet page.

Here is a sales data Excel spreadsheet that I have on my laptop. I uploaded it to Google Sheets for easier access and editing. Assuming the file is not too big, uploading normally takes seconds. A small notification box in the bottom right of the screen will tell you when it’s uploaded.

But it hasn’t been converted to Google Sheets yet. It has merely uploaded the Excel sheet so far. To convert it, right-click on the document and choose Open with–>Google Sheets.

That will then make a new copy of the document in Sheets format. You can then delete the Excel version of the document.
Working with Google Sheets – The Basics
Now that you have a sheet open and ready to go, let’s take a look at some basic features.
Inserting Rows & Columns
Now that we have our document full of data, let’s say we want to move that data upwards, downwards, or sideways to make space for new data.
This is very easy. Let’s start with making a new column. First, simply highlight what needs to get moved. If you only want one new column, then highlight the column next to it. If you want three new columns, highlight the three next to them.

With this document, I only have one column. So I highlighted it because I want to move this column to the B column and empty the A column for other data.
With the A column highlighted, now go to Insert–>Column left.

The A column will now be in the B column, and the A column will now be empty, ready for new data.

Remember, every change you make is reversible. Either through the version tracking or through Edit–>Undo.
Inserting rows is even easier. Highlight the row you want to move to add the new row. Then go to Insert–>Row above or Insert–>Row below.

And it shall be done. Oh yes.

Deleting Rows & Columns
Deleting rows and columns is also easy. Highlight the row or column, then go to the Edit menu. You will see an option to delete the row, and when chosen, the row will disappear, and everything will move up to fill the space.

There is also an option in the Edit menu to delete the column.
Add or Delete Zeros From Your Totals
Sometimes with numbers, if you add any zeros after the decimal point, they are automatically stripped out when you click out of the cell. Fortunately, it is very easy to put the zeros back in.
Highlight the cell, then click the zeros button above it.

Align the Data Properly
You will want everything to line up properly if you are a bit of a neat freak or OCD. Sometimes some cells align to the left and some to the right.

To get them all lined up straight as soldiers, just highlight the column (in this case, column A), click the alignment button and choose which one you want.

Now watch those babies shuffle into a straight line.
Format Numbers as Currency, Percentage, and More
Typing numbers is one thing, but if you are recording financial transactions, it makes sense to have a currency, decimal points, and commas. That way, you can easily read the figures. Or there are other ways the numbers can be formatted.
So here are the numbers as they were typed in.
But if you highlight one or more of the cells, then click the 123 button (next to the font menu), then you get options.

Choosing Currency turns the figure into properly formatted currency. Or you can have a percentage, dates, time, and more. Each option has beside it what the number would look like if selected.
If you want a different currency, click More Formats at the bottom. Then More currencies…

Then just choose your currency.

Make a Table
Making a table is absolutely easy. Simply highlight the area you would want to make a table for. Then click the button on the menu bar that looks like four squares stacked on top of each other.

Choose the one you would want. For a table, it would be the first one on the top row. Clicking that will make the cells have black lines around them, giving you your table.
Color the Cells & Data
If you want to have different colored rows, it is just a case of highlighting the row in question. Then, click the fill color button (next to the font color button).

Pick a color, and the cells will turn that color. Remember, though, that if you have a dark color, you will need a lighter font for it to show up.
Add Clickable Links & Comments
To create a clickable hyperlink, simply type a valid URL into the cell. Once you press the return key or click out of the cell, the link immediately becomes active and clickable.
Leaving comments (if someone has sent you a Google spreadsheet) is slightly different than Google Docs. In Google Docs, when you leave a comment, it sits there openly.

But in Google Sheets, when you leave a comment, it is indicated by a small yellow triangle in the corner of the box. To see the comment, you need to mouse over it.

Sorting Data By Columns
If you have a spreadsheet with, say, a list of names, you may want to have it in alphabetical order. Or reverse alphabetical order.
To do so, highlight the columns, then go to the Data menu. There you can sort the entire column or just the highlighted cells in that column.

Inviting Collaborators
Inviting collaborators is just the same as in Google Docs. Anyone who needs to be invited to a Google document needs a Google account. This can either be a standard free Gmail account or a paid Google Apps account.

Now click on the blue SHARE button in the top-right-hand corner of the Docs screen, and a box will jump up.
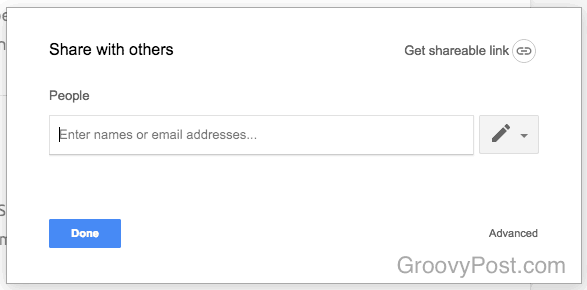
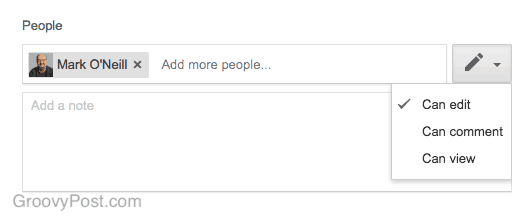
If you click on Get shareable link, you have the option to make a link where anybody can access the document, provided they have the link. You can also edit their viewing permissions, such as their ability to edit your work or merely read it.

Or, if you would prefer to invite a specific person, you can copy their email into the People section, along with what they are allowed to do in the document. Attach a note as well if there is anything you want to tell them.
If you have people inside your contacts book for that email address, and one of them is the person you wish to invite, the email field will automatically auto-populate, saving you a bit of time.
When the person accepts your invitation, you will see them at the top of the screen, next to the SHARE button.

Downloading the Spreadsheet in Another File Format
When your spreadsheet is finally done, you may want to export it as a different file format.

The options are slightly different than the ones for Google Docs. After all, you are dealing with a spreadsheet here, which is a slightly different beast than an ordinary document.
Third-Party Add-Ons
As with Google Docs, Sheets also has third-party add-ons which are designed to make your work easier. Go to Add-Ons–>Get Add-Ons at the top menu bar to access the menu.

Here are some of the best ones.
Google Analytics

Attach your Google Analytics account to your Google Sheets and have analytics reports regularly generated in Sheets.
Template Gallery

Expand your choice of templates even more with Template Gallery.
More Fonts

As the title implies, get more fonts for your spreadsheets.
Conclusion
There are a lot of people (myself included) who hate Microsoft Excel with a passion. It’s bloated and, therefore, hard to use. But Google has simplified spreadsheets by giving you just the things you need and no more. It is a great service to use and works brilliantly when collaboration is needed.


David
April 9, 2018 at 12:52 am
Thanks for this – I didn’t even know it existed and will give it a try. Hope it works well within windows 10 as I miss the older OS versions with the older excel versions which had more user friendly design (to me, anyway).