What is VeraCrypt & How to Use It to Encrypt Your Secrets

Mosy people hear the word “encryption,” and run for the hills thinking it is extremely complicated. But Veracrypt makes it simple. Here’s how to use it.
If you ask Mr. Bloggs in the street whether or not he uses encryption online, you would probably see the panic building in his eyes. The “deer in the headlights” look. Despite everyone needing to use it for their online activities, the very idea of “encryption” conjures up images of geeks and long, complicated lines of code. But it is not like that at all, and VeraCrypt is a prime example of how easy it can be.
Veracrypt is the descendent of Grandpa TrueCrypt, which was suddenly declared obsolete and unsafe, to the shock of many (it was rumored the FBI had managed to crack it finally). Grandpa TrueCrypt was then unceremoniously shuffled off to the encryption home in the sky. But no sooner had the crypto-geeks picked themselves off the floor than it was announced that a new version was coming out. This was VeraCrypt.
Let’s take a look at what Veracrypt is and how you can set up an encrypted “volume” (sort of like a folder).
What Is VeraCrypt?

VeraCrypt is an encryption program that performs several different functions.
Your Simple, Straightforward Encrypted Volume
The most basic VeraCrypt implementation uses encrypted volumes, which are just folders with unbreakable passwords. These folders are only accessible by mounting them as a “virtual encrypted disk,” which mounts like a real disk. Stay with me, people.
Encrypted Volumes Within Volumes
In terms of difficulty, the next level up is the volumes within volumes. You place the susceptible stuff in a VeraCrypt volume, encrypted, and placed inside another encrypted VeraCrypt volume. The one with the sensitive stuff is hidden from view, so if necessary, you can give up the password to the outer volume, and nobody will see the one you’re really trying to hide.
This is called “plausible deniability.” You can also use this concept to encrypt and hide an entire operating system (outside the scope of this article).
Encrypt a Whole Hard Drive Partition Or Storage Device
If you really want to go all encryption gangbusters, then the one to go for is to encrypt an entire partition of your hard drive. Alternatively, encrypt a storage device such as an external hard drive or a USB stick. This is not something I have experimented with a whole lot (although I intend to soon, and I will write it up when I do).
Start With The Basics
As always, with a new program, you need to start with the easiest part to get a feel for how it works. And obviously, don’t put anything important inside the encrypted volume for the moment if you mess up.
VeraCrypt is available for Windows, macOS, and Linux. I will be using it today on my trusty Macbook. The software is also open-source if you fancy poking around in the source code.
Download & Install

Go to the download page and install the version for your operating system. In macOS, you also need to download and install a small (7.5MB) companion software app called OSXFUSE. The link is on the VeraCrypt page.
One thing worth mentioning here. Never install VeraCrypt from another website. Always install the version that is on the VeraCrypt website. Taking one from another site could mean installing a compromised copy of the program or an obsolete copy.
When the software is installed, click on it in your software folder (in the case of macOS, “Applications”).

Create a New Volume
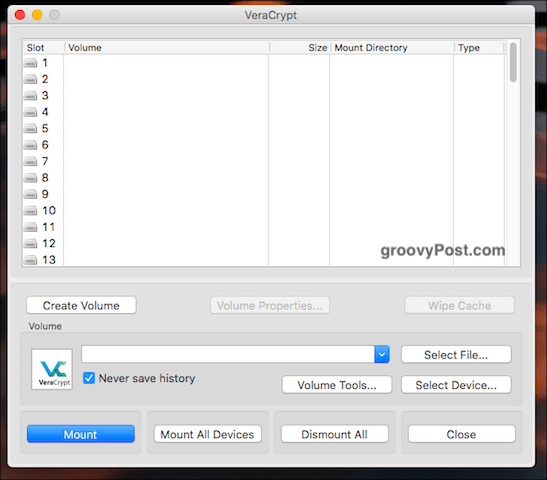
When you open it up, you will see a button that says “Create a New Volume.” Click on that.
Create An Encrypted File Container
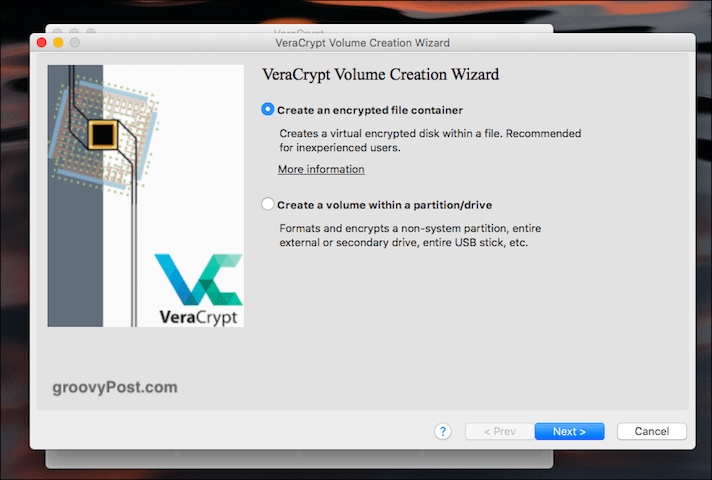
We’re doing the first option today so click on that.
Standard Or Hidden?
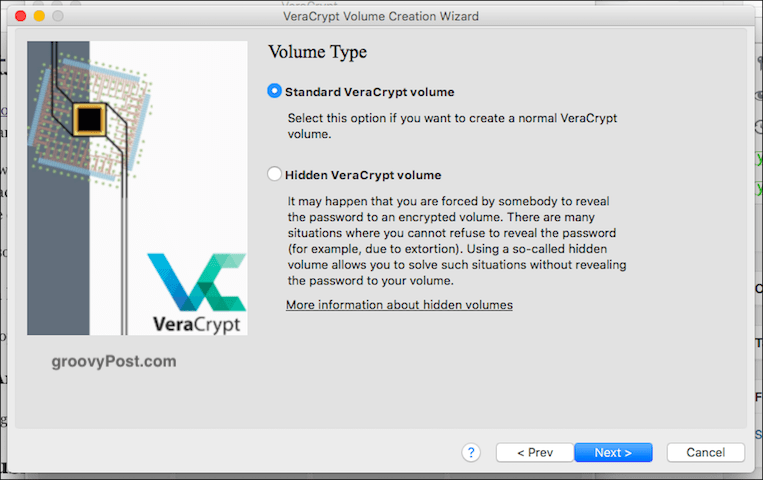
The next option is whether you want your standard volume or the hidden one (as I mentioned above). We’re doing easy today, so standard, please.
Select File?

It is now asking you to “select file.” Wait, what? Well, the “file” is the encrypted volume, but obviously, you haven’t made it yet. So you can’t select what doesn’t exist.
So click the button and go to the area of your computer where you want to make the encrypted volume. This volume can be moved anywhere you want later, so don’t worry. It won’t be tied to wherever you choose during the setup process. Just use your desktop. Give the volume a name (this can be changed later).

Encryption Options

OK, now you have to decide which encryption strength you are going with. If you drop down the menu, you will see various options, but the industry standard is AES. VeraCrypt automatically defaults to, and as it says, it is used by the US Government to protect Top Secret classified information. So I guess that makes it good enough for your home recipes.
Leave the “Hash Algorithm” as it is and click “Next.”
Volume Size

This is an important one. You have to decide how big the encrypted volume needs to be. This has to be done right at the start because you can’t change it later. If you decide later the volume needs to be bigger or smaller, you need to delete the volume and start over.
Think about what you would be using the volume for. Video? Files? Images? Audio? Then decide how much you need. Obviously, you would need the space on your hard drive to accommodate the file as well.
As a test, I just chose 5GB.

Set The Password For The Volume

Another vitally important one. There’s no point building a high wall around your sensitive files if someone can just come along and kick the wall down. So it would help if you had a strong password. This is where a password manager such as KeePass comes into play. Choose a password of 25-30 characters and really nail that sucker.
Don’t worry about PIM (a bit too technical for beginners) or keyfiles (ditto). As for display password, use that when choosing your password to ensure there are no typos. Then uncheck it again.
Large Files

This one was a mystery to me, so I had to look it up. It seems it has to do with what file system you can use with your new encrypted volume afterward. Generally, it is recommended to say you will be using files bigger than 4GB (even if you’re not).
In the next step, you will be asked what file system you want to use. Unless you have a strong preference otherwise (and you know what you’re doing), stick with the one that VeraCrypt defaults to. In this case, Mac OS Extended.
Cross-Platform Support
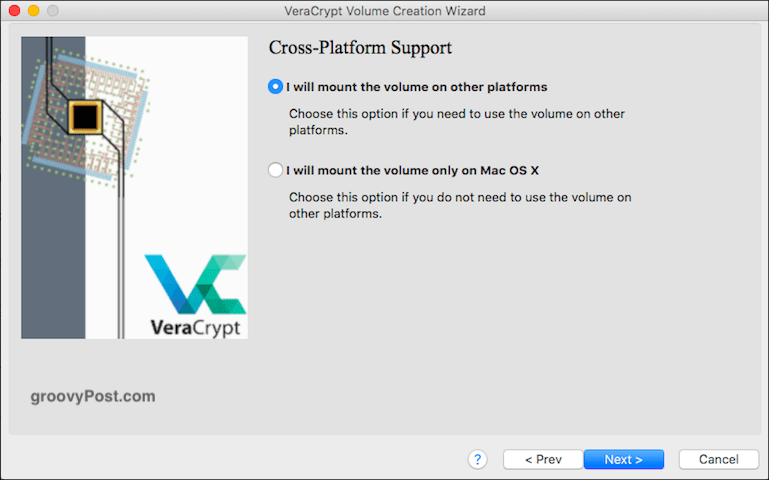
Many people these days use more than one operating system. So, if you plan on using it on your Windows PC and your macOS, check the box. Otherwise, leave it as it is.
However, those other systems may require you to install programs and drivers to make the VeraCrypt container compatible, so ask yourself if cross-compatibility is really something you need. Otherwise, it might end up being an unnecessary hassle.
Generate Encryption Keys

We’re nearly there. Now you have to generate your encryption keys. As VeraCrypt says, you have to move your mouse around the window rapidly and randomly. The more you do that, the stronger the keys will be.

Keep doing it until the blue bar reaches the end. Then click “Format.” You will now see a second blue bar showing the progress of the formatting. When it is done, click “Exit.”
Opening Your VeraCrypt Volume
Now it’s time to open up our new creation.
Choose a Drive Number

First, choose a drive number from the VeraCrypt interface. It doesn’t matter which one, but if you use a Windows computer, don’t choose a partition letter already being used (such as the C drive).
Find & Select The Volume

Now click “Select File” and navigate to the location on your computer where the new volume is located. Click on it. You will now see the volume’s path in the VeraCrypt window.

Now click the “Mount“ button. You’re basically saying, “let me in.”
Enter The Password

You will now be prompted for the password. Please enter it.
Assuming you got it right, you will now see your open volume in the VeraCrypt user interface.

Go To Your Hard Drive / Finder

Either go to your hard drive (or Finder in the case of macOS) or double-click the volume in VeraCrypt. Either way, you get to the same destination. You will now see your volume (which is obviously empty because it is brand new).
Adding & Removing Files

Adding and removing files is dead simple. You can either drag them with your mouse or trackpad from another folder. Or copy from the other folder to the VeraCrypt folder, and choose “Paste” from your right-click menu.
To remove them, drag them out with your mouse or trackpad. Or delete the file in question.
Closing Your VeraCrypt Volume Again

To close your VeraCrypt volume again, click the “Dismount“ or (if you have more than one volume open at the same time) “Dismount All.” The folder will then close and encrypt itself again.
Conclusion
Once the volume has been made, you can move it about onto USB sticks, various other folders, removable hard drives, or cloud storage. Although from a security point of view, cloud storage may not be your best option.
If you have old TrueCrypt volumes, VeraCrypt is compatible with them, so you can open those old volumes and get your files out.
This was just a taster to show you the basics of VeraCrypt. I will cover encrypting removable drives in a future article, and I may get all adventurous and encrypt a hidden hard drive. After a stiff drink for courage first.


Robert
August 11, 2021 at 10:09 am
Great post, thank you. You say from a security point of view, cloud storage may not be your best option. But if the volume is encrypted with VeraCrypt, why not move it to cloud storage?