How to Use Different Aliases in Gmail

Creating an email alias can help you to keep spam out of your inbox or protect your privacy. Learn how to use different aliases in Gmail in this guide.
The ability to instantly send a message to somebody is something that we take for granted in the 21st century. However, it also has its issues. A quick glance in your spam folder shows just how many unwanted emails you receive every day.
Sometimes, it feels like it would be nice if you could disguise your email address to protect your privacy and keep spam at bay. Well, if you’re a Gmail user, you can do just that.
If you want to know how to use different aliases in Gmail, follow the steps below.
What is an Alias in Gmail?
Put simply, an alias in Gmail is a second email address that you can set up in your Gmail account. You can choose to send mail from this second address, allowing you to hide your primary email address. Any emails sent to this alias will be forwarded directly to your primary Gmail inbox.
There are a number of reasons why you may want to use an alias. If your email address contains your name, you may wish to use an alias to protect your privacy. You might also want to use an alias to sign up for online accounts so that you can automatically route any emails from that account to a different folder.
It should be noted that emails sent from another Gmail alias account will include your primary email address in the email header. This is the log of an email’s technical details, such as information about the sender and recipient, as well as the content of the message. It is unlikely that many people will check this, however, and you can’t see this information in an email client without actively seeking it out.
Emails sent through an alias may also be treated as spam by the recipient’s inbox.
How to Quickly Create an Alias in Gmail
If you want a quick and easy way to use a different email address in Gmail, and you’re not worried about it looking very similar to your primary address, you can add some special characters to your current email address.
If you use the right characters, these will be ignored by email clients but allow you to filter any emails that are sent to the altered address into a different folder. This a particularly useful trick when you’re signing up to websites that force you to provide your email address, and you don’t really want all of their marketing emails clogging up your inbox.
To quickly create an alias in Gmail:
- When asked to enter your email address for a mailing list or, in other situations, add a plus (+) symbol followed by any text to your current email address. For example, if your email address is adam@gmail.com, you could use adam+mailinglist@gmail.com or adam+spam@gmail.com.
- You can then set up a filter in Gmail to send any emails sent to your amended email address to a different folder.
- You can also add periods to your email address to quickly create an alias, as Gmail will ignore these in an email address. For example, you could use am@gmail.com or a.d.a.m@gmail.com.
- You can test these addresses yourself by sending an email from yourself to the alias you intend to use and ensuring that you receive it.
How to Set Up a Permanent Alias in Gmail
An obvious issue with the method above is that it’s still very obvious who the email is from, and simple for anyone to ascertain your genuine email address from your alias. If you would prefer to use a completely different email address as your alias, you can set one up in Gmail that you can use whenever you want to.
To set up a different email address as an alias in Gmail:
- Open Gmail on a computer.
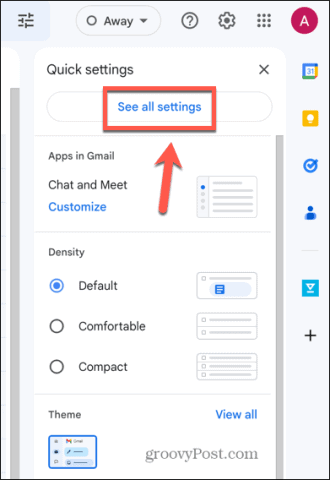
- Click the Settings icon.

- Select See All Settings.

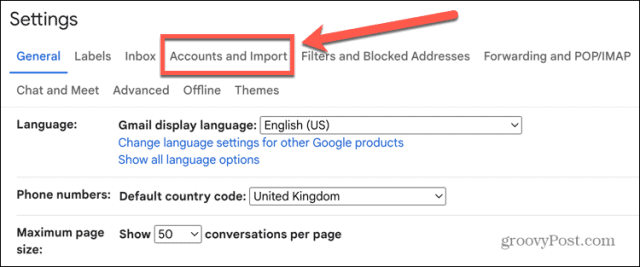
- Click Accounts & Import.

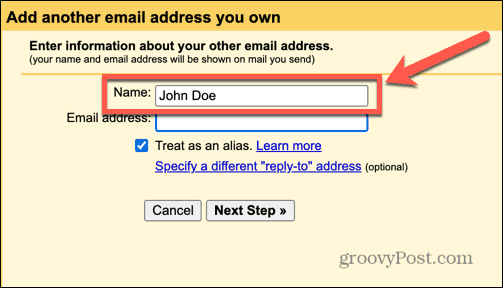
- In the Send Mail As section, click Add Another Email Address.

- Enter a name for your alias.

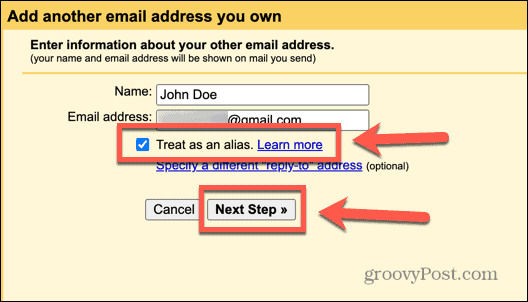
- Enter an email address that you already own.

- You can also specify a different address for replies by clicking Specify a Different Reply-To Address.
- Ensure that Treat As An Alias is checked and click Next Step.
- If you entered another Gmail address, you’ll be prompted to send a verification email to your alias address. Click Send Verification to do so.

- If you’ve entered a different email account, such as Outlook, then you’ll need to enter your account details and SMTP server details. You should be able to find the SMTP server details for your type of account by searching online.

- Once your account details have been confirmed, you’ll be prompted to send a verification email to your alias address.
- An email will be sent to the alias address asking you to confirm you want to use it with your Gmail account. Open the link and click Confirm.

- Your alias account should now be set up.


How to Use Your Alias in Gmail
Once you’ve set up your alias, it’s simple to use it when creating a new email. You can use this email whenever you wish by selecting the From field when you’re composing an email.
To use an alias in Gmail:
- Open Gmail in your browser or on your phone.
- Click Compose.
- Click your email address in the From field.

- Select your alias from the drop-down.

- Fill out the rest of your email and send it as normal.
- When your recipient receives the email, it will appear to have come from your alias account.


How to Set Your Alias as the Default Email Address
If you want Gmail to always use your alias when sending emails, you can set it as the default email address.
This will save you time, as you won’t have to constantly select it when you’re composing a new email—you’ll have the address automatically selected for you.
To set your alias as the default Gmail email address:
- Open Gmail on a desktop or laptop.
- In the top-right of the screen, click the Settings icon.
- Select See All Settings.
- Select Accounts & Import.
- In the Send Mail As section, click Make Default next to your alias email address.

- Decide which email you want to use as the default for replies.

- Your alias will now be the default. If you want to use your primary email address, you can select in it the From field when composing a new email.


How to Delete an Alias in Gmail
If you decide that you no longer want to use an alias in Gmail, you can remove it from your account. If you do so, you’ll need to follow the steps above if you ever want to use it again.
To delete an alias in Gmail:
- Open Gmail on your computer.
- Click the Settings icon.
- Click See All Settings.
- Select Accounts & Import.
- In the Send Mail As section, click Delete next to your alias address.
- Your alias will no longer exist.

Managing Your Gmail Account
Learning how to use different aliases in Gmail allows you to protect your privacy and keep spam at bay. Keep in mind that recipients will be able to track down your original email address in the email header if you’re using another Gmail account as your alias.
There are plenty of other useful Gmail tricks that it’s worth knowing. You can learn how to disable Gmail suggested recipients if you don’t want them to appear when you’re composing an email. If you’re getting a lot of spam from the same website, you can learn how to block a domain in Gmail. And if your inbox is getting out of hand, there are some useful ways to organize your Gmail account.