How to Use Apple’s Reminders in iOS 13 and iPadOS

Prior to iOS 13, Apple’s Reminders app was subpar. But now it’s more robust and we’ll walk you through using its new features to help stay organized.
There are countless to-do apps available for the iPhone and iPad. Third-party solutions such as Things, Evernote, Microsoft To-Do, and many others, have long been offered better features than Apple’s native Reminders app. The latest version of Reminders is (finally) worth considering thanks to a fresh interface and new capabilities introduced in iOS 13 (and iPadOS 13).
Reminders App Refreshed
Before iOS 13, the Reminders app offered a basic, list-style view short on customization and features. Yes, it got the job done, but it was little more than adequate. The new version is more intuitive and flexible and lets you create reminders with subtasks and attachments. You can also set alerts based on time and location, incorporate Apple’s Siri Shortcuts, and more.
An Overview
The main Reminders screen now includes five main sections, Today, Scheduled, All, Flagged, and My Lists. The first four are built-in smart lists that populate automatically, depending on the criteria.
- Today shows all of your reminders that you mark as being due today. It also shows overdue reminders.
- Scheduled shows all of your reminders that have a due date—past, today, and in the future. Reminders due today will show up on both the Today and Scheduled list.
- Flagged shows all of your reminders that you assigned a flag to.
- All shows every reminder, organized by list.
Finally, My Lists is where you’ll find your customized Reminder lists. For example, you might create lists called “Shopping,” “Vacation”, “Urgent,” etc., depending on your needs.
Before You Begin …
To use the Reminders app effectively, iCloud must be activated on your device and make sure the Reminders app is turned on. In doing so, Reminders will sync across all of your Apple devices.
To setup Reminders on iCloud:
- On your iPhone or iPad, tap on the Settings app.
- At the top, tap [your name] > iCloud.
- Toggle Reminders to turn it on.
From now on, inside the Reminders app, you’ll see all of your reminders on all of your Apple devices that are signed in to the same Apple ID.
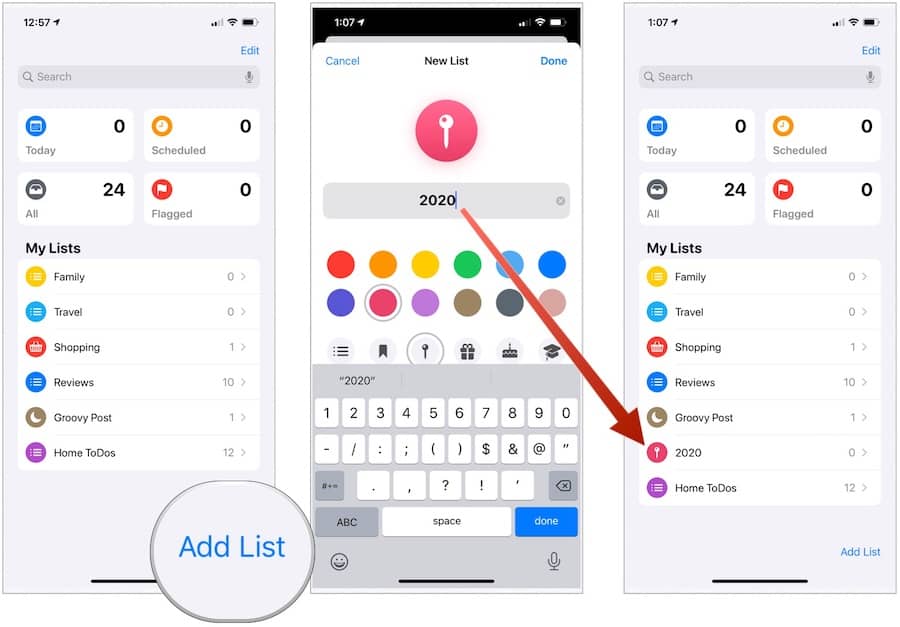
Creating a New Reminders List
The first thing you should do in the Reminders app is to create lists. Apple has already added some for you to get started; you can use these or delete them or add others at any time.
To create a new list in the App Reminders app:
- Tap on the Reminders app on your device’s Home screen.
- Choose Add List at the bottom right of the main Reminders app page.
- In the box, type in the name to use for the new list.
- Choose a color and an icon to customize the list.
- When finished, tap Done at the top right. Your new list shows up under the My List section on the Reminders app’s main screen.
Creating a New Reminder
Lists are only lists when they contain reminders, of course. To create a new reminder, perform the following steps:
- Tap the list you want under My Lists in the Reminders app.
- Choose New Reminder at the bottom left.
- Type the new reminder next to the activated oval.
- Tap return on your device’s keyboard to add another reminder or Done.

Customizing a Reminder
In the preceding example, a basic reminder was created that didn’t contain a due date or other information. To add further information on an existing reminder:
- Choose the reminder you wish to add information.
- Tap the “i” icon to the right of the reminder.
- On the Details page, you can add considerable information. None of the following are used by default, however:
- Notes: Anything you want can get added here.
- URL: If applicable.
- Remind me on a day toggle: When activated, you can set an alarm by date and day, and repeat, if necessary.
- Toggle Remind me at a location: When activated, you’ll receive a reminder whenever you approach a location with your device.
- Remind me when messaging toggle: When used, you’ll receive a reminder notice when you message a person of your choice.
- Flagged toggle: For whatever the reason, you can add flags to specific reminders.
- Priority: Choose from None, Low, Medium, and High.
- List: At any time, you can move the location of the current reminder to a new list.
- Subtasks: Tap here to add a task below the main one.
- Add Image: You can attach a photo or document to a reminder.
- Tap Done when finished added information to your reminder.
In the following example, a reminder called “Get party supples” now includes a reminder that’s activated when I’m getting into my car (at location), is flagged, and includes an image:

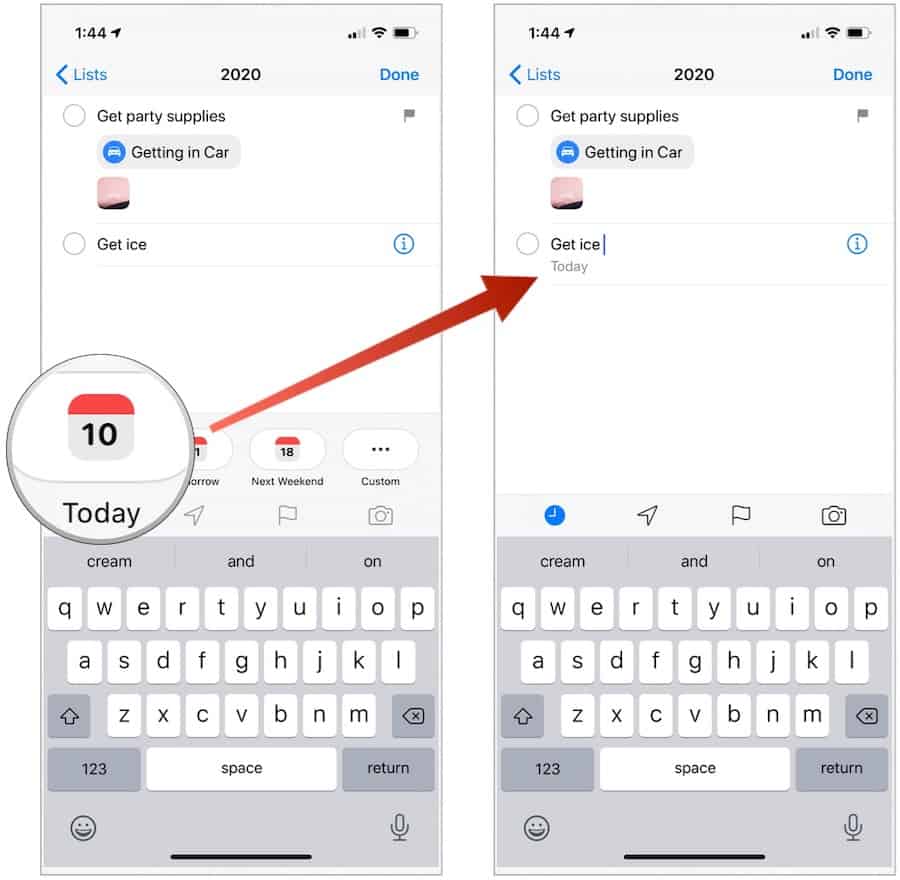
Quick Toolbar
When creating a new reminder, you can add time, location, flag, or image from your list’s main screen in the Reminders app:
- Tap the list you want under My Lists in the Reminders app.
- Choose New Reminder at the bottom left.
- Type the new reminder next to the activated oval.
- Choose one or more of the four icons in the quick toolbar above the keyboard and make your selection.
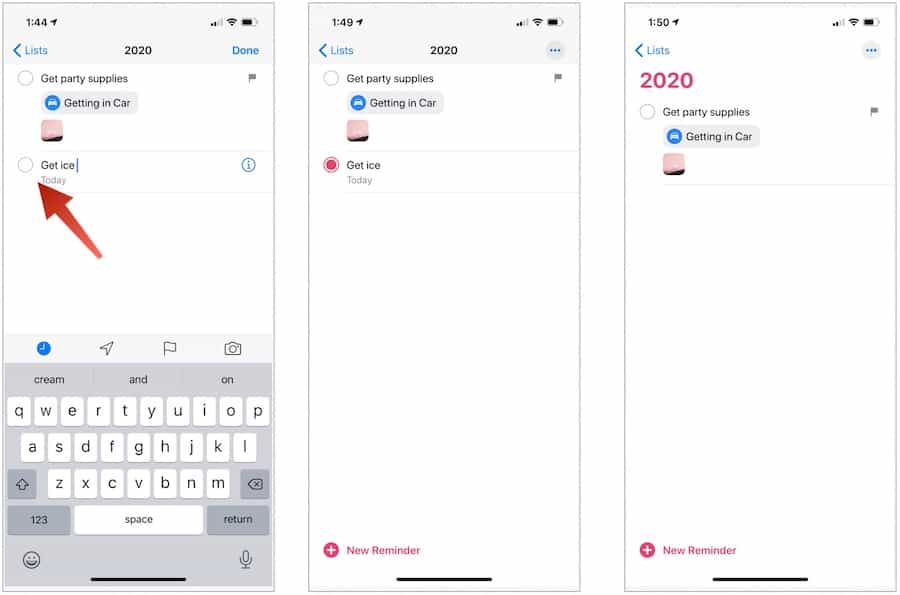
In this example, the reminder “Get ice” now includes a due date of today:
Completing a Reminder
When a task is completed, simply tap on the oval next to it. In doing so, the task will get deleted under the list. You can tap the “…” icon at the top right at any time to see the completed reminders.
Odds and Ends
There are additional things you can accomplish in the Apple Reminders app. First, you can change the order of reminders. To do so, tap and hold the reminder, then drag it with your finger to the new location. If you drag it onto an existing reminder (as opposed to before or after one), it becomes a subtask instead.
Apple’s voice assistant, Siri, works well with the Reminder app. Using only your voice, you can create new reminders. Sample commands include “Remind me when I get home to check Facebook,” or “Remind me when I leave here to stop by the grocery store,” or “Remind me tomorrow at 3:00 p.m. to call Alex.”
Finally, you can share a Reminders list with others by tapping on the “…” icon at the top right when inside a list. Choose Add People then make a selection on how you wish to invite someone to join the list.

The Reminders app in iOS 13 and iPadOS 13 is much better than previous versions and puts it ever-closer to competing with other to-do list apps on the market. It will be interesting to see where the free app goes from here in future iOS and iPadOS versions.
If you can’t find the Reminders app on your device’s Home screen, you can download it from the App Store.


