How to Share Pictures from OS X Photos App to OneDrive

Apple’s new Photos app provides seamless integration between OS X and Apple’s iCloud. But that’s not the case for other storage services like OneDrive.
Apple’s new Photos app provides seamless integration between OS X and Apple’s iCloud. If you use Apple devices, you can easily sync your files and photos between your Mac and iPhone or iPad. The thing about Photos, though, is you might feel locked into the service. It’s almost an all-or-nothing affair, but I like using other services like Microsoft’s OneDrive. Here’s we’ll look at how you can take pictures from the OS X Photos app and put them anywhere.
Apple’s Photos app was introduced in early 2015 with OS X Yosemite. The app was written from the ground up, replaces iPhoto, and focuses on simplicity and integration with Apple’s iCloud.
Export Pictures from OS X Photos App into OneDrive
The first you will need to have is the OneDrive client for Mac installed. You can download it from the Mac App Store for free.
Launch Photos from the Dock or press Command + Space key, then type: photos and hit Enter. Select any of your photos, and then click File > Export > Export Unmodified Original for Photos.

Leave the default and click Export.

Navigate to your OneDrive folder, then click Export originals.

Automate the Process Using OS X Automator
This would be a one-off operation; since I know that future photos taken on my iPhone would automatically import into Photos, I would have to do this every time manually. Of course, you have the option to have photos taken on iPhone automatically backup to OneDrive. But, suppose I had a point-and-shoot camera, which I also use to import pictures into OS X Photos? I would have to export them each time unless I automate the process manually.
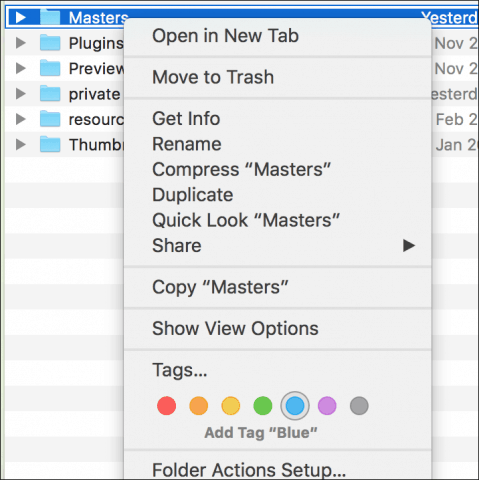
Launch the Finder, open your Pictures folder, right-click the Photos Library file, and click Show Package Contents. Right-click on the “Masters” folder, then tag the folder with a color.
Launch the Automator app; press Command key + space key, then type: Automator and press Enter. Under Library, select Files & Folders, then drag Find Finder Items into the Folder into the workflow window.
In the Search list box, choose Macintosh HD and then the following attributes as described in the screenshot below. Next, drag the action, Copy Finder Items into the workflow window. Click the “To:” list box and then select OneDrive.
Then specify to search for any of the color labels you had assigned; in this case, that will include the “Masters” folder. Then copy the files with a color label to OneDrive or any other folder you want.
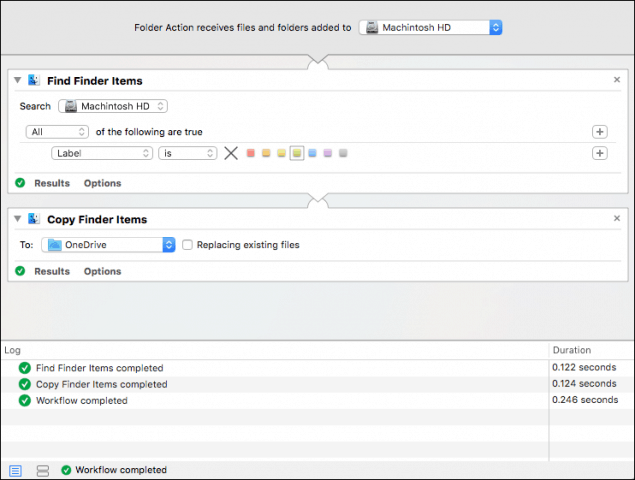
Click the Run button to start copying the entire “Masters” folder to OneDrive. Save the Workflow when you are done so you can use it again in the future.

The process certainly requires a little work, but you do get the best of both worlds. I don’t have a problem with iCloud Photos, but I like using OneDrive, too. Especially since I have more storage space than iCloud’s free 5 GB limit; plus, you can access your Photos Library from virtually any other device this way.


David J
July 17, 2016 at 2:37 pm
After we do all this, do the pictures stay on hard drive twice, since it is in Photos app and in OneDrive folder as well?
marc balentine
December 6, 2016 at 4:56 pm
“copy finder items was not supplied with the required data.”
i checked and double checked this setup.
kiwi
December 28, 2016 at 8:56 pm
same issue
Saurav
October 26, 2017 at 12:12 am
Hi,
I’m from PicBackMan team, we have our product named ‘PicBackMan’ which will allow you to upload your Apple Photos or iPhoto library to OneDrive.
You need to go through following steps:
1.Download & install PicBackMan into your Mac.
2).Once registration done, go to ‘Account’ tab of the application.
3).Connect your OneDrive account. (We use oAuth)
4).Go to ‘Photo’ tab, click on ‘Associate Apple Photos’ button.
5).Go to Apple Photos location and select/click on the icon of Apple Photos.
6).Check the checkbox corresponds to OneDrive. Hit ‘Upload’ button.
7).PicBackMan will pick up all your files and upload them to OneDrive automatically.
You need not to extract or export folders from Photos library. Just select the whole library.
Note: PicBackMan will create the same folder hierarchy on OneDrive according to your Photos library structure.
In case if you need any help or have any query feel free to write us at team@picbackman.com, we help you right away!