How to Mount NFS Drives in Linux

Wondering how to mount an NFS share on your Linux workstation? We’ve got the answer for you in this guide.
Setting up network storage can be a game-changer for both individual users and organizations, allowing seamless file sharing and data backups over a network. One of the most popular methods to achieve this is through Network File System (NFS), a protocol that enables users to mount remote directories on their machine as if they were local.
Every Linux distribution available can mount an NFS share—as long as the right software is installed. While NFS might sound daunting for newcomers to Linux, the process is more straightforward than it appears.
Keep reading as I demystify the steps involved in mounting an NFS drive in Linux, offering a detailed, step-by-step guide to get you up and running. Whether you’re a system administrator or a curious tinkerer, learn how to mount NFS drives in Linux below.
Installing NFS Client Software on Linux
For those of you comfortable on the command line, the easiest way to mount an NFS drive in Linux will probably be right there, in your terminal window. First, though, you’ll need to be sure the NFS client software is installed.
Installing NFS Client Software on Ubuntu and Debian
The NFS client package has different names on different Linux distributions. For Ubuntu, Debian, or any other distribution using the apt package manager, here’s how to install the right tools.
From the command line in your terminal, run these commands:
$ sudo apt update
$ sudo apt install nfs-common
Follow the on-screen instructions, and you’ll be ready to go in no time.
Preparing to Mount NFS Drives on CentOS and Fedora
On the other hand, distributions such as CentOS and Fedora use the yum package management system. Here’s how to install the NFS utilities under that repository:
From the command line in your terminal, run these commands:
$ sudo yum install nfs-utils
Again, just follow the directions on-screen. It’s a quick installation, so you should be set to move on to the next step quite quickly.
Mounting the NFS File System
Once the right software is installed, you can mount a remote NFS share just as you would any other file system. You just the mount command, which takes the following form:
mount [OPTION...] NFS_SERVER:EXPORTED_DIRECTORY MOUNT_POINT
As you can see, you specify the NFS server, the remote share on that server, and then where you want to mount the share.
Manually Mounting the NFS Share
Let’s go step by step mounting an NFS share called “backups.”
- First, create the directory where you want the remote NFS share to be mounted.
$ sudo mkdir /var/backups
- Next, mount the NFS share by running the following command as a user with sudo privileges.
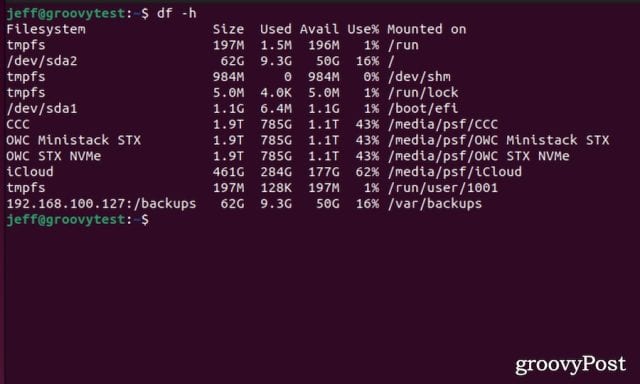
$ sudo mount -t nfs 192.168.100.127:/backups /var/backups
In this example, our NFS server has the IP address 192.168.100.127. The shared directory on the server is /backups and /var/backups is where we mount it locally. If you don’t get a message in response, the command should have completed successfully.
- To verify, you can type either the mount or df -h commands to see the mounted file systems.

It’s important to note, this is a temporary mount. It will only last until the next time the Linux computer is rebooted.
Automatically Mounting NFS File Systems
Linux does provide a way to remember these mounted file systems across reboots. This is done using the /etc/fstab file. This file is read on boot and contains a list of entries defining where, how, and what file systems Linux should mount when the system starts.
If you want your NFS remote share to mount automatically on system startup, just follow these steps.
- Set up the mount point for the remote NFS share. You can ignore this if you’ve already mounted the share temporarily.
$ sudo mkdir /var/backups
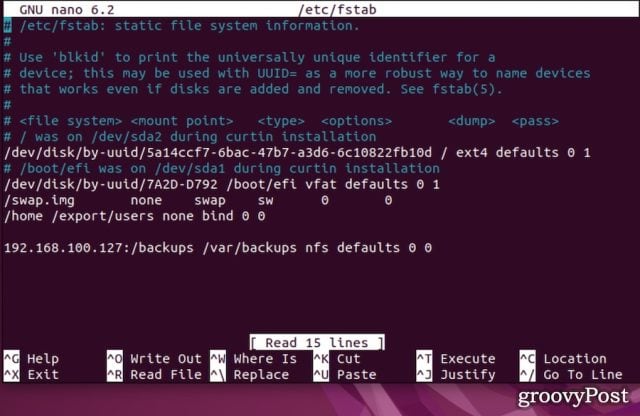
- Using your text editor of choice, open the /etc/fstab file:
$ sudo nano /etc/fstab
- Add the following line to the file, all on the same line:
192.168.100.127:/backups /var/backups nfs defaults 0 0
 Again, 192.168.100.127 is the IP address for the NFS server, /backups is the remote share, and /var/backups is where we want to mount the shared directory.
 - Save the file and run the mount command in one of these two forms:
$ mount /var/backups
$ mount 192.168.100.127/backups
 Again, 192.168.100.127 is the IP address for the NFS server, /backups is the remote share, and /var/backups is where we want to mount the shared directory.
After that command, your Linux computer will read the contents of the /etc/fstab file and mount the share. Going forward, Linux will automatically mount the NFS share whenever the computer starts up.
Unmounting an NFS Share on Linux
So, let’s say you don’t need to use that shared directory anymore. To gracefully unmount the NFS remote file system, you should use the umount command. You follow the command by either the directory where it’s mounted or the remote share.
Just issue one of these two commands to unmount the NFS share.
$ umount 192.168.100.127:/backups
$ umount /var/backups
If you previously inserted an entry for the NFS share in the fstab file, be sure to remove that line. Otherwise, Linux will continue trying to mount the file system on every reboot.
It’s important to understand that Linux won’t unmount a file system when it’s in use. This applies to NFS shares, too. So, if you get an error message upon trying to unmount the share, you need to find out what processes are accessing it.
This is done using the fuser command, as shown below:
$ fuser -m /var/backups
Just replace /var/backups with whatever the actual mount point is. As you identify processes accessing the file system, stop them using the kill command.
Using a Bigger Hammer
On rare occasions, even the fuser and kill command combo won’t help. When this happens, you’ll need to try a couple of other options.
First, you can try the umount command’s “lazy” option. This way, Linux remembers you want to unmount the file system and does so once it’s not busy anymore. Here’s the command for that:
$ umount -l /var/backups
As a last resort, and especially when an NFS system is unreachable, you can force an unmount. This isn’t generally a good idea, since it may corrupt the data on the file system. If, however, you absolutely have to, here’s how to force unmount the NFS share.
$ umount -f /var/backups
Can’t I Just Use the GUI For This?
Great question! While there isn’t an official desktop application to mount NFS shares using the GUI, there is at least one option. Available on GitHub, Simple NFS GUI might be what you’re looking for.
The package is small and lightweight, but it helps you set up either an NFS server, client, or both. It’s definitely worth checking out if you need the simplicity of a graphical interface for mounting NFS shares.
Managing Network Drives on Linux
Mounting an NFS drive in Linux is a robust and efficient way to share files and directories across a network. While the setup process may seem complicated at first glance, breaking it down into manageable steps makes it accessible even for those new to Linux administration.
With NFS, you can take advantage of centralized storage solutions, thereby streamlining your data management and backup routines. By mastering these skills, you’re not just adding another tool to your Linux skill set — you’re also enhancing your understanding of networked environments and distributed systems. Happy sharing!
The question is—how are you going to use NFS remote sharing? Maintaining access to centralized backups or sharing your library of music and video files through your home network?
Running Windows instead? Don’t forget that you can also map a network drive on your Windows PC.