Easily Make Your Own Free Ringtones Using Audacity [How-To]
 Cell phones come loaded with several default ringtones, but more than likely you’ve already become bored with them. As a result, your mobile carrier and several 3rd party companies will offer to sell you “new” ringtones at premium rates. Why pay for something you can do better for free and in just a couple of minutes? Using a free open-source program called Audacity, you can easily create your own ringtones in a few easy steps that we’ll walk-through below.
Say No To Expensive Ringtones
The first problem with buying ringtones is evident – you’re paying a decent chunk ($2.99 each if Verizon) of cash for a small portion of a song which is most likely also in a low quality format. In comparison you can quickly pick up an entire song from Amazon or LaLa for less than $1 and it will be in pristine album quality. See where this is going?
 The second problem with purchasing ringtones is it leaves you with no control over the content of the ringtone. Most commercial ringtones will only play a particular part of the chorus of each song, and if you like a different part of the song then you are out of luck!
Here is what you’ll need to make your own ringtones:
- A cell phone that supports MP3 playback as a ringtone (almost all phones do this)
- A song that you like enough to use as a ringtone, preferably in MP3 format
- Audacity, open-source, free sound edit software
True, you could just transfer the entire MP3 of your song straight to your phone without editing, but it wouldn’t work too well. Afterall, the phone only rings for about 20 seconds, and chances are, the first 20 seconds of your favorite song isn’t the part you want to hear every time someone calls you.
Now that we got the basics covered let’s get started with the How-To!
How To Create Free Customized Ringtones From Any MP3
1. Visit the Audacity web site and Download the latest version and Install it. The installer is easy to use, just Click Next a few times, and you got it.


2. Next, you’ll need to Download and Install the LAME encoder. This encoder will add support for MP3 files to Audacity.


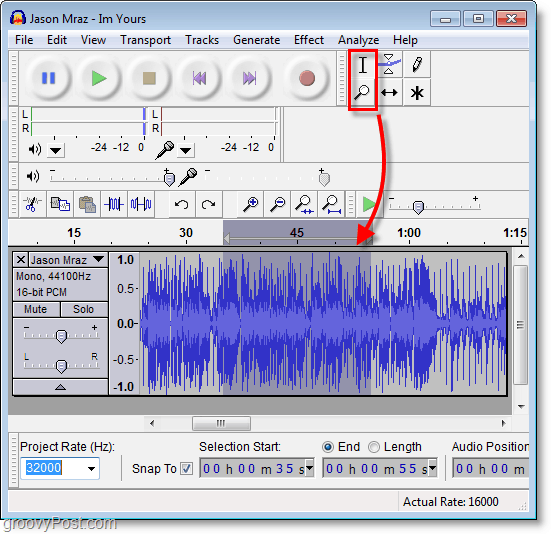
3. Once the installation finishes, then Start up Audacity. From the File menu, you can Open the MP3 file you want or Drag and Drop the MP3 right into Audacity. If you were successful, you will see the Importing MP3 files window appear.

Now it’s time to start editing; the first thing we need to do is switch the song from Stereo to Mono. Most cell phone speakers don’t support Stereo sound, so switching it to mono will actually make it sound better as a ringtone.
4. Click the Tracks menu and then Select Stereo Track to Mono. This will convert the entire song to mono sound.

5. Now your creativity comes into play. Use the Selection and Magnifying tool to zoom in and Select a 20-second segment of your song. Most phones won’t ring more than 20 seconds, so anything longer will likely just go to waste.
Note: You can make this segment as short as you like, cell phones auto-repeat ringtones, so shorter tones will just repeat themselves for the duration of the incoming call ring.
6. Once you have a good section of the song selected, make sure to Set the playback to Stop. Then Click the Edit menu and Select Trim. Next Use the Time Shift tool to slide your entire selection to the beginning of the track (0 seconds in).


Now you have your ringtone! It’s going to sound pretty raw at this point so let’s add a Fade In effect to smooth things out and keep you from jumping out of your seat with a full volume blasting ringtone every time you receive a call.
7. Select the first 2-6 seconds of your clip and then Click the Effects menu and Select Fade In. You can do the same thing to the end as well by using the Fade Out technique.

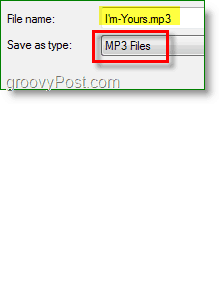
8. Once you’ve finished editing, Click the File menu and Select Export. Give your file whatever name you want it to show up as on your phone and be sure to Save it as an MP3 file type.

9. All done! Now you just need to transfer the ringtone to your phone. There are a few ways to do this.
- Use a USB cord or a Bluetooth connection to directly transfer the ringtone from your computer to your phone.
- Save the ringtone to a MicroSD card using an SD reader and adapter, and then put the MicroSD in your phone.*
- *Not all phones support MicroSD cards
- Send the ringtone as a file attachment in a text through email. Some carriers charge $0.25, check your plan.
- Note that some providers will require you to send media attachments to a @pix address.
- Example: TenDigitNumber@vzwpix.com for Verizon numbers.
- Note that some providers will require you to send media attachments to a @pix address.
With the ringtone on your phone, all you need to do now is configure which contacts to assign with it. The config process will vary depending on your phone; (that I obviously won’t cover in this article.)


Thomas Sestilio
January 16, 2010 at 5:59 am
Doesn’t work that easy with Verizon. There is an extra step involved.
Upon completing the process in audacity, go to funformobile.com and you can send yourself the message fo free with there verizon formatted SMS messaging. They do other cell carriers as well. Done it a million times. Works like a charm. One issue though, and this is on Verizon. If the tone isn’t less than twenty seconds, you will get a MAJOR loss in quality.
MrGroove
January 16, 2010 at 8:10 am
Great tip. Thnx for the FYI Thomas.
Animis
January 16, 2010 at 12:07 pm
I’ll stick the MP3 format, no loss in quality =)
Tomas Haylett
March 10, 2010 at 3:37 am
These applications include study applications for students, social networking applications, and plenty of more. Students can use various types of iPhone applications which are helpful in studies, doing home-work, preparing for exams, online tutorials, iPhone dictionary and plenty of more.