How to Fix Zoom Microphone Issues

Ever wondered why you’re talking on Zoom but no-one can hear you? You might have a mic problem. Learn how to fix Zoom microphone problems in this guide.
Zoom is one of the most popular videoconferencing apps available today. It’s replaced Skype at the top of the pack, becoming a verb in its own right.
Zoom is a great communication tool when it’s working properly, but it’s frustrating when it isn’t. We’ve all experienced that moment when we can hear everyone else on the call, but they can’t hear us.
Sometimes the solution is just the click of a button away, but the problem may be more complicated to fix. If this happens to you, here are some tips on how to fix Zoom microphone problems.
Check Your Microphone is Connected
If you’re using an external microphone (rather than a built-in microphone on your laptop or PC), then it may not be properly connected.
For wired microphones, make sure that it is securely plugged into your computer. If it is, try using a different port to see if this makes any difference. For wireless microphones, ensure that your microphone has sufficient charge.
You can try setting up and testing a microphone on Windows or fixing audio problems on Mac to see if this helps to fix Zoom microphone troubles. If you’re using a Bluetooth microphone, make sure that the Bluetooth radio is enabled on your PC or Mac.
Join a Zoom Call with Audio
When you first start the Zoom app, a pop-up will invite you to join with audio. If you dismiss this message, you won’t be able to use your microphone during your Zoom call until you join it with audio.
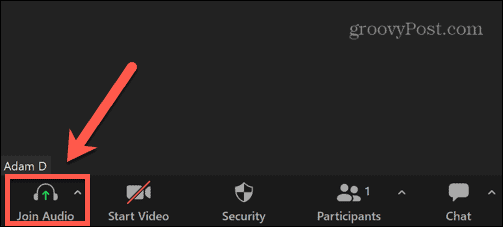
To join a Zoom call with audio:
- Move your mouse anywhere on the Zoom screen.
- In the menu at the bottom of the screen, click Join Audio.

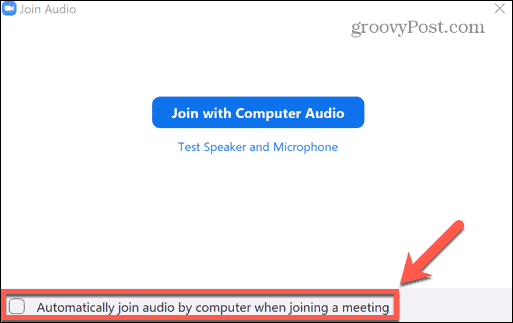
- If you want to automatically join with audio every time you use Zoom, check Automatically Join Audio by Computer When Joining a Meeting.

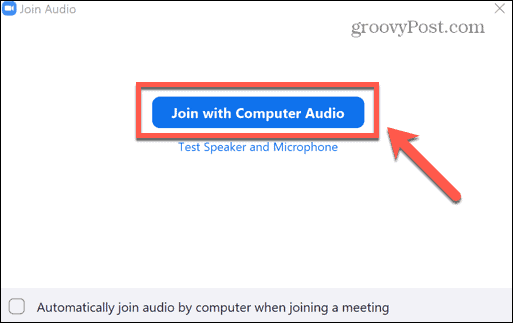
- Click Join with Computer Audio.
Turn Off Mute in a Zoom Call
One of the most common issues with Zoom calls is a muted microphone. There’s a Zoom setting that automatically starts each call with the microphone muted.
This helps you to avoid accidentally saying something you shouldn’t when Zoom is starting up and you aren’t aware that others can hear you. Once you’re ready to speak, you can unmute your microphone.
To unmute your microphone in Zoom:
- Move your mouse anywhere within the Zoom screen.
- In the bottom menu, click Unmute.

- Other participants should now be able to hear your voice.

Check That You’ve Not Been Muted by the Host
If you’re the host of a Zoom meeting, you have additional powers beyond those of the other participants. This includes the ability to mute anyone on the call, which allows you to turn off any unwanted background noise or distractions.
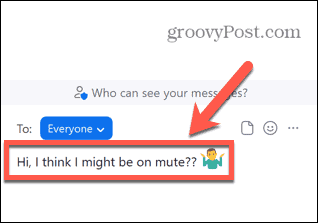
If you can’t be heard on Zoom, it may be that the host of the meeting has muted you. You can send them an instant message in Zoom to ask if that is the case.
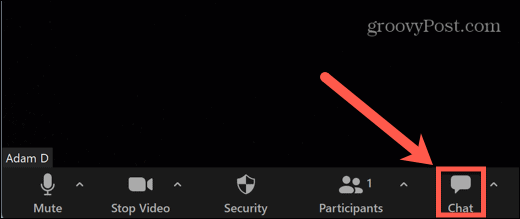
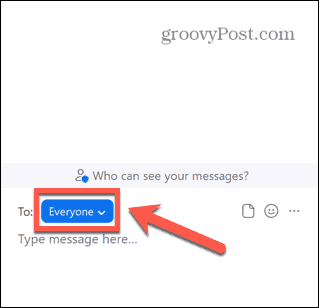
To send an instant message in Zoom:
- Move your mouse anywhere on the Zoom screen.
- Click Chat in the bottom menu.

- You can send the message to everyone or click the drop-down to select the meeting host.

- Type your message at the bottom of the chat window and press Enter to send it.

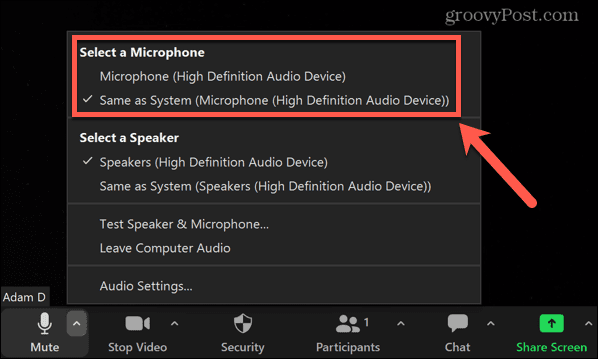
Select the Correct Microphone in Zoom
If you have multiple audio devices set up with your computer, Zoom may be using the wrong microphone. You can quickly select which microphone you want Zoom to use from within the Zoom menu.
To select your microphone in Zoom:
- Move your mouse within the Zoom window to bring up the menu.
- Click the arrow next to the Mute icon.

- Choose your microphone under Select a Microphone.

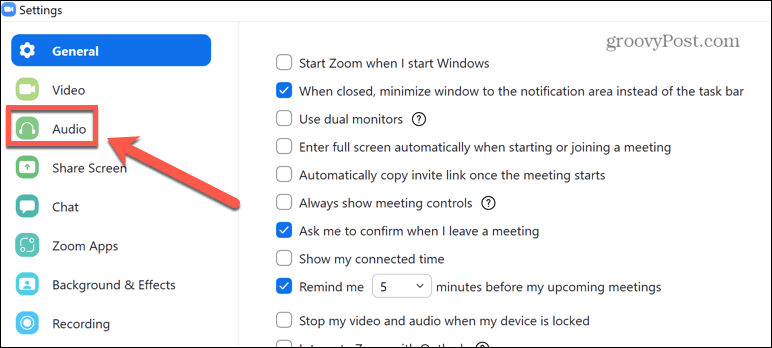
Check Your Zoom Audio Settings
Zoom has some advanced audio settings that may be causing problems with your Zoom microphone. You can tweak these settings in the app to see if it will fix Zoom microphone problems.
To change the Zoom audio settings:
- Launch the Zoom app.
- Click the Settings icon in the top-right corner of the window.

- Select Audio from the left-hand menu.

- Choose the microphone you want to use by default.

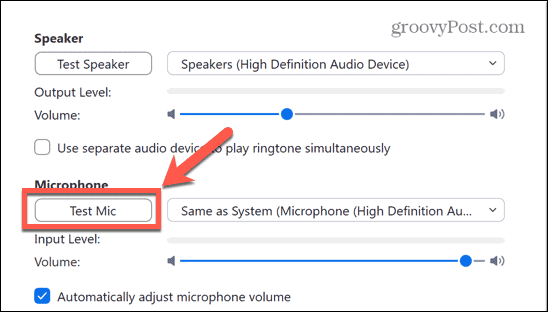
- You can click Test Mic to ensure this is working as expected.
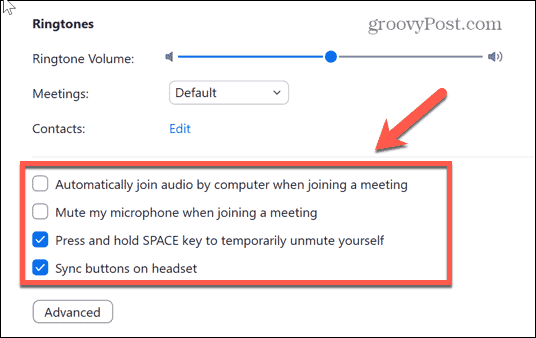
- At the bottom of the screen, you can change some key settings. These include automatically joining with audio, starting each meeting on mute, and only being heard when you are holding down the Spacebar.

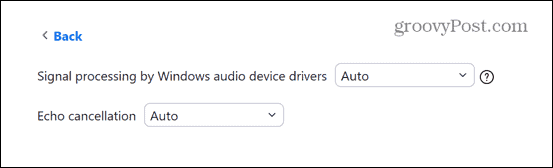
- Click Advanced.
- By default, these advanced settings are set to Auto. If they’re on a different setting, try setting them to Auto to see if this fixes your Zoom microphone issues.

- If not, try tweaking these settings to see if it makes any difference.


Close Apps That Are Using Your Microphone
If another app is making use of your microphone, this could stop Zoom from being able to use it.
The first thing to do is to try closing any apps that may be using your audio devices. Apps such as Apple Music, Skype, or Microsoft Teams may all make use of your microphone. Closing these apps completely might fix your Zoom microphone issues.
If this doesn’t work, try using the Mac Activity Monitor or Windows Task Manager to close any processes that could be using your audio devices.
Ensure Zoom Has Permission to Use Your Microphone
Apps need permission to use hardware devices such as webcams and microphones. If Zoom hasn’t been granted the correct permissions, it may not be allowed to access your microphone. You can change these permission settings with just a few clicks.
To allow Zoom to access your microphone on Windows:
- Click the Start icon.

- In the Pinned apps, click Settings.

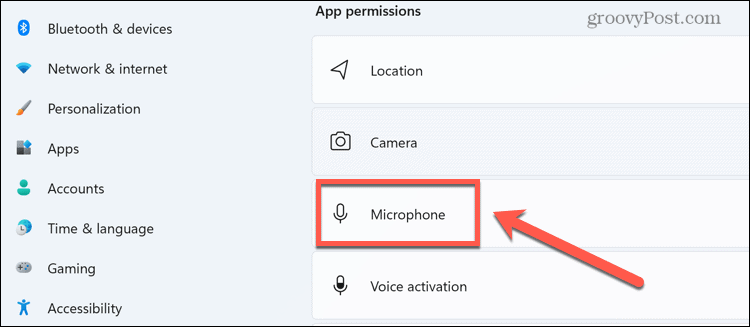
- From the left-hand menu, select Privacy & Security.

- Scroll down and click Microphone under App Permissions.

- Ensure that both Microphone Access and Let Apps Access Your Microphone are set to the On position.

- Scroll down and ensure that Zoom is also set to On.


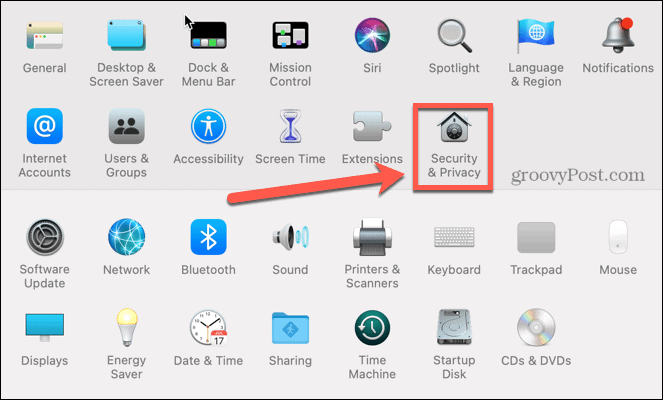
To allow Zoom to access your microphone on Mac:
- Launch System Preferences.

- Select Security & Privacy.

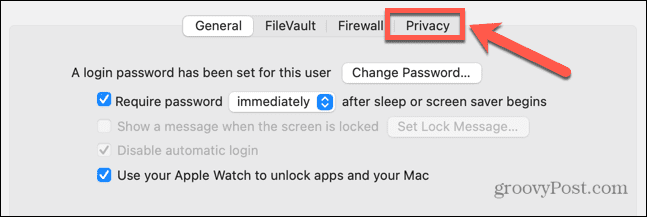
- Click the Privacy tab.

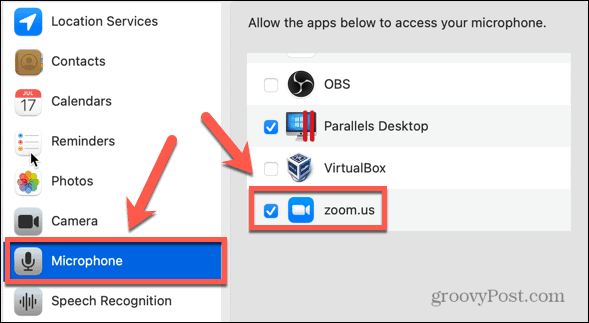
- Select Microphone from the left-hand menu and ensure that Zoom is checked.


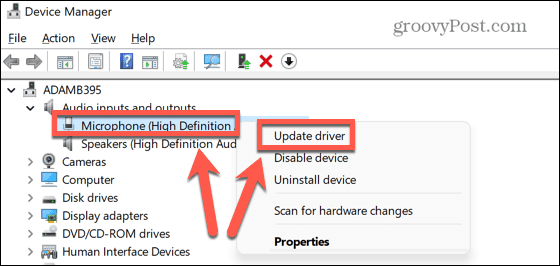
Update Your Device Drivers
If you’re having issues with your microphone in Windows, you may need to check that your device drivers are up-to-date. Updating these drivers can often fix audio issues on Windows PCs.
To update audio drivers in Windows:
- Open the Start menu.
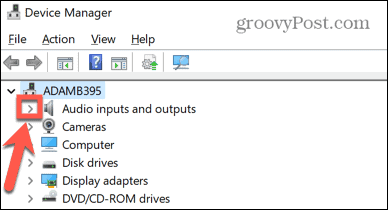
- In the search bar, type Device Manager and select the Device Manager app.

- In Device Manager, open the Audio Inputs and Outputs category.

- Right-click your webcam and select Update Driver.

- Select Search Automatically for Drivers.

- If there is an update available, follow the instructions to install it. You may need to restart your computer for the changes to take effect.


Restart Your Computer
It may be a cliché, but for a good reason: if you’re having trouble with your computer, try turning it off and on again.
Restarting your computer may help to clear any problems that are stopping your microphone from working with Zoom. It may also shut down any processes that are hogging your audio devices and not playing nicely with Zoom.
Reinstall Zoom
If none of the fixes above work, you may want to consider uninstalling Zoom and reinstalling it. This may fix any problems with your current installation.
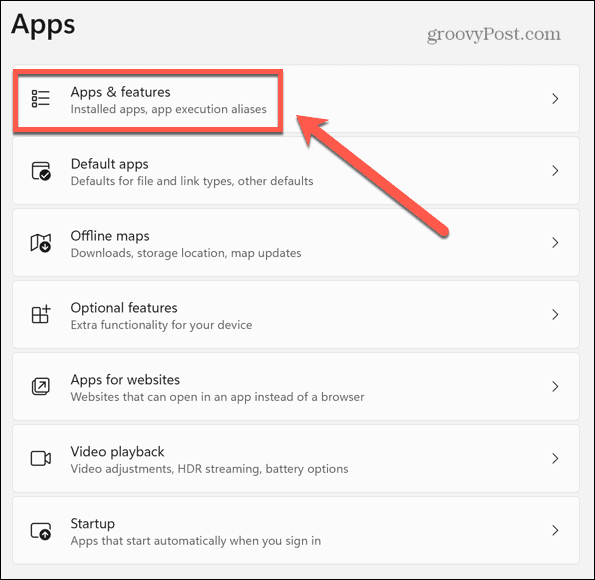
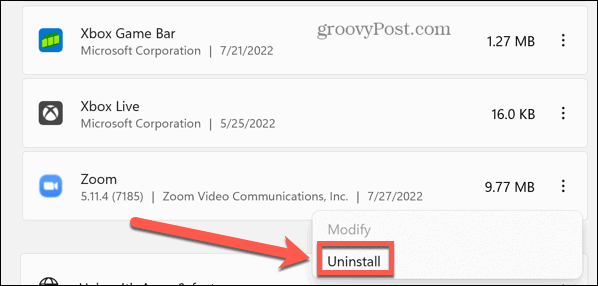
To uninstall Zoom on Windows:
- Open the Start menu.
- Select Settings.
- From the left-hand menu, select Apps.

- Click Apps & Features.

- Scroll down to Zoom and click the three dots icon.

- Select Uninstall.

- Once the process is complete, install the Zoom app again.


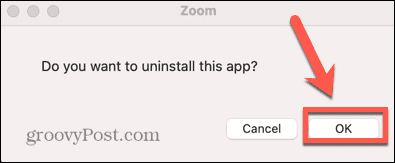
To uninstall the Zoom app on Mac:
- Launch Zoom.
- Click Zoom.us in the menu bar.

- Click Uninstall Zoom.

- Confirm you want to uninstall the app.

- Zoom will uninstall. Once completed, reinstall the Zoom app.


Get More From Zoom
Learning how to fix Zoom microphone problems ensures that you’ll never have people yelling ‘you’re on mute!’ at you ever again. You can decide exactly when people can hear you and when they can’t.
If you’re having trouble with video calls, knowing how to fix Zoom camera problems should be next on your to-do list. Once you have video and audio up and running, you can learn how to get started with Zoom properly.
When you’re feeling confident, you can even try out some custom Zoom backgrounds to really impress your friends or colleagues.


