How to Fix Broken Registry Items in Windows 10

If your Windows PC is having issues with broken registry entries, you’ll need to fix the problem. Here’s how.
The Windows Registry is a complex database of settings that, if left without maintenance, can fill up with broken and orphaned registry entries. Every time you upgrade Windows or remove old software, missing or broken registry items can begin to build up. This can have an impact on your system performance, especially if your PC looks for a crucial system entry that it can’t find or that has been corrupted.
Most users won’t ever need to access the Windows Registry, but almost all Windows services and third-party apps require registry entires to work. As the nerve center of the Windows operating system, you’ll need to make sure the Windows Registry is well maintained.
This includes figuring out how to fix broken registry items in Windows 10 when they appear. There are a few ways you can do this—here’s how.
Restore a Registry Backup
If you’re on top of your Windows maintenance, you may have already made a backup of the Windows Registry before. This will allow you to quickly restore the Windows Registry using this crucial backup file.
If you haven’t backed up the Windows Registry before, however, you won’t be able to follow this method.
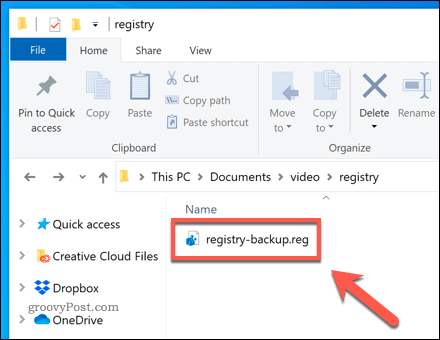
A backed-up Windows Registry is available as a .reg file. If you have this available, double-click on the file in Windows File Explorer. This will instruct the Registry Editor (regedit) to open and restore the file.
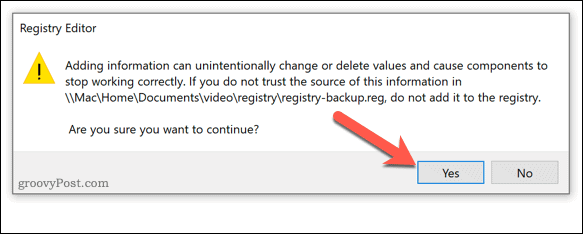
In the Registry Editor window, confirm you want to restore the Windows Registry by pressing the Yes option.
This may take a bit of time to complete, depending on the size of your file. Once restored, restart your PC. Any broken Windows Registry entries should be fixed, but this is dependent on whether the entries were broken in your last backup file.
Once you’ve repaired the Windows Registry, make sure to make a further backup to ensure you can repair it in the future.
Running Windows Automatic Repair to Fix Registry Issues
Unlike previous versions, Windows 10 has several useful tools for automatic system repair. One such tool is the Automatic Repair tool, which will attempt to fix any obvious problems with your system. This includes broken system registry entries, but may not fix entries for third-party apps.
To launch this, open the Windows Settings menu by right-clicking the Start menu and selecting the Settings option.

In the Windows Settings menu, press Update & Security > Recovery. From there, press Restart now under the Advanced setup option.

Windows will restart into the Choose an option boot menu. Press Troubleshoot > Advanced Options > Startup Repair, then sign-in using your local or Microsoft user account when instructed.

Once you’ve signed in, Windows will automatically begin the Automatic Repair process. If it detects any issues with your system, it will repair them. You may need to perform further maintenance to fix broken registry items for third-party apps, however.
Using System File Checker to Repair System Files
A corrupted registry could point to other issues with your Windows installation, including missing or broken system files. If you want to fix the problem, you can use the System File Checker (SFC) tool. This automatically repairs your system files and any Windows system registry entries to restore your PC health.
To run the SFC tool, right-click the Start menu and select the Windows PowerShell (Admin) option.

In the new Windows PowerShell window, type sfc /scannow and press enter to run the command.

The SFC tool will check your PC for errors. If any files are missing or corrupted, it will repair them automatically (where possible).
Using a Registry Cleaner
It’s fair to say that registry cleaner apps, such as CCleaner, have a bit of a bad reputation. They’re a solution in need of a problem for most users, unnecessarily making changes to the Windows Registry without clear instructions or safety precautions.
We’d like to stress that changing the Windows Registry using registry cleaner apps isn’t necessary for most users. They offer few benefits to users with healthy registry entries but include great risks, especially if you remove the wrong entries from your PC. Before using a registry cleaner, make sure you back up the Windows Registry manually before you begin.
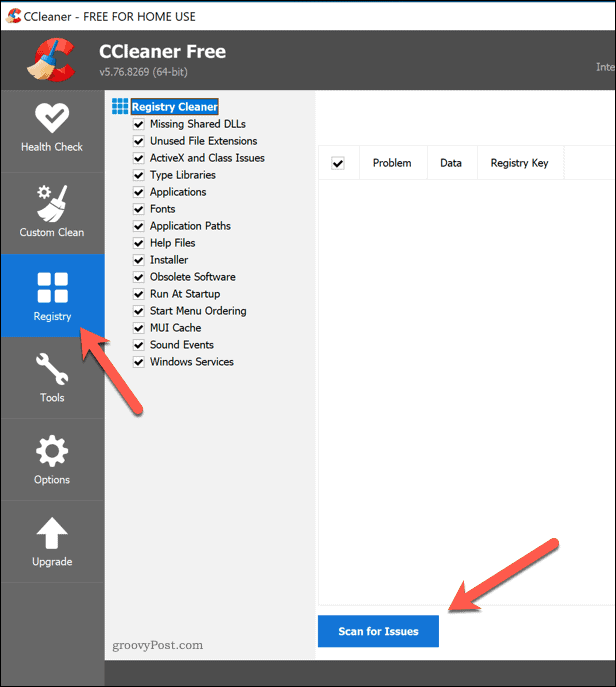
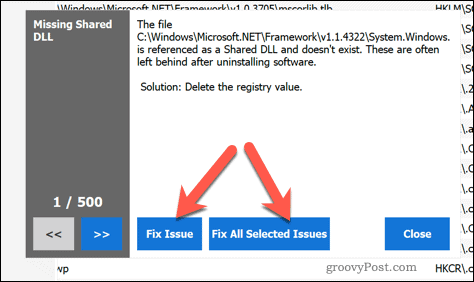
If you want to check your registry entries using CCleaner, open the app on your PC. From the Registry tab, select the items you want to check for, then press the Scan for Issues option.
Once the scan is complete, review the items and select any you wish to remove by pressing the Review Selected Issues option.

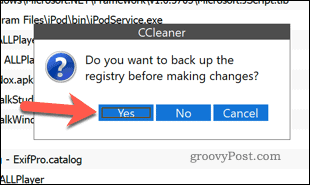
CCleaner will ask you if you want to back up the Windows Registry first. Select Yes to do this.
In the pop-up Windows, you can review each issue and select Fix Issue to fix it. Alternatively, press Fix All Selected Issues to allow CCleaner to automatically resolve any found issue.
Once you’ve resolved the issues, restart your PC to make sure the changes haven’t impacted your PC’s performance.
Resetting Windows 10
Unfortunately, if the Windows Registry is corrupted beyond repair and you don’t have a backup ready, your only option is to consider resetting Windows 10. This involves restoring Windows to its default settings, giving you a clean installation without the hassle of reinstalling Windows entirely.
However, resetting Windows may result in you losing previously installed apps, settings, personalization, and more. If you can, make sure you back up your files before you begin.
To reset Windows 10 (and assuming your PC can’t boot into Windows with a broken registry), you’ll need to boot into the Advanced Options menu. You can force this by restarting your PC and pressing the F11 or F8 key (depending on your system) before the spinning cursor appears.
Alternatively, force Windows to restart during the bootup process at least twice—Windows will load the Advanced Options menu automatically. In the Advanced Options menu, select Troubleshoot > Reset this PC.

You’ll need to decide whether you want to save your files or wipe your PC during the reset, so select one of the options provided.

Once the reset process begins, it can’t be stopped, and it will take some time to complete. Your Windows PC will have a restored Windows Registry once this is complete, but you’ll need to set up Windows again afterward.
Repairing the Windows Registry Properly
The Windows Registry is a hierarchical web of settings that, if corrupted, can bring down your PC. Using the steps above, you should be able to fix broken registry items in Windows 10. You can prepare for the worst by making a backup of your registry entries, allowing you to restore from a backup in the future.
If you think an app is making too many changes to your registry, you can find registry changes using apps like CRegistry Comparison. If your PC is really struggling, you can always use specialist software like Revo Uninstaller to keep your registry entries clean when you uninstall software on Windows.


