How to Edit Images in Microsoft Word

Microsoft Word includes several image editing tools that allow you to make changes to images in your documents. Here’s how to use them.
You don’t need expensive photo editing software like Photoshop to edit photos and other images for Microsoft Word documents. Although the Microsoft Office Picture Manager has been retired, there are still plenty of built-in tools to edit images in Word.
Microsoft Word allows you to format colors and brightness, add borders, crop image sizes, add special effects, and more, so here’s how to do it. While the instructions may vary, these instructions should work for Word 2016 and higher, including Microsoft 365 (formerly O365) and Online.
Cropping Images in Microsoft Word
There are a few ways to crop an image in Microsoft Word. Start by inserting the image into your Word document (Insert > Pictures) and selecting the image.

To begin formatting your selected image, click Format > Crop (or Format > Crop > Crop). You can also enter the image cropping mode by right-clicking the image and selecting Crop.
This will change the outline around your image from resizing to cropping.

Move the crop outline tools around your image to reduce the image area to its final size. Grayed-out areas will be removed from the final image once the crop edit has been confirmed.
Once you’re happy, click once outside of the image or press Enter on your keyboard.

Formatting Image Colors
Word allows you to format the colors used in your image without exporting it to a photo editor first. You can customize the image sharpness, brightness, saturation, tone, and contrast levels, either manually or using one of several preset filters.
To access the image formatting tools, right-click on your image and press Format Picture at the bottom.

This will bring up the Format Picture menu on the right-hand side. Click the Picture icon (furthest right) to access the image color editing tools.
Under Picture Corrections, move the sliders for each category to sharpen or soften an image or increase or decrease the brightness and contrast levels. You can also click Presets for each category, selecting one of the thumbnails to apply those changes to your image instead.

Under Picture Color, you can change the tone and saturation levels for your selected image. Move the sliders for each option left or right to increase or decrease each level.
Click Presets to set these levels using one of the provided preset options.

If you’re unhappy with any of the color changes you’ve made, click the Reset button underneath each category to return your image to its original state.
Adding Special Effects to Images
Microsoft Word also includes several special effects that can be easily applied to images. These include image shadow, glow and reflection, soft edges, and a 3D bevel effect.
To add these special effects, enter the Format Picture menu (right-click > Format Picture) and click the Effects icon (second from the left). Click on each sub-category to access each setting.
To add a shadow to your image, click Shadow and move the sliders to set transparency, size, angle, color, etc. You can also click Preset to preview and add a Word-defined drop shadow instead.

Click Reflection and follow the same instructions to add a custom or preset image reflection to your image. Do the same to Glow to add an image glow and Soft Edges to soften the edges around your image.
To add a 3D bevel effect to your image, click 3-D Format. Select the effect you want for both the top and bottom sections of your image by clicking Top Bevel and Bottom Bevel, selecting one of the pre-defined options.
You can also customize the depth, contour, material effect, and lighting levels for your 3D bevel effect using the drop-down menus and option boxes.

You can also add one of several preset artistic effects to your image. These combine several effects into one to change your image design.
To do this, click the Artistic Effects sub-category, then click the Artistic Effects icon. Select one of the preset options using your mouse to apply it to your image.

Compressing Images in Microsoft Word
Adding images to a Word document can vastly increase its size. By compressing the images, you can reduce the file size of your document as a whole.
To format a single picture, click Format > Compress Images and ensure that the Apply only to this picture checkbox is enabled. If you want to compress all of your attached images, click to uncheck this checkbox.
Compressing images will reduce the quality on a sliding scale from HD quality (330 pixels per inch) to basic email quality (96 pixels per inch).
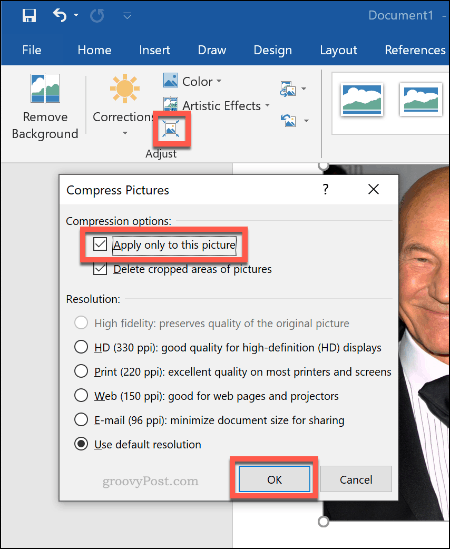
The higher the quality, the bigger the Word file, so choose your preferred quality, then click OK to compress your images.
Basic Image Editing Made Easy
These editing tools make it easy to make basic changes to images in Microsoft Word. You can also resize images in Windows 10 without needing an image editor too.
If you need to make bigger changes to your images, you can try some of these free Photoshop alternatives instead.


