How to Disable Boot from USB or CD in BIOS Setup

Booting a live CD or bootable Linux USB is one of the oldest tricks in the book when it comes to skirting parental controls. Here’s how to stop it.
Windows 10 has a number of built-in features that help parents monitor and restrict what their kids can access on a computer. But the problem with building security and parental control features into the operating system is that you can simply bypass them by bypassing the operating system itself. You might think that’s a little too advanced for your kid, but believe me: I’ve seen the question asked and answered on social media. (In fact, we cover booting from Live CDs, bootable Windows flash drives, and bootable Linux USBs here at groovyPost.)
Windows 10 and the UEFI firmware introduced Secure Boot, which adds another layer of protection. But this too can be circumvented. That is unless you disable booting from anything but your internal hard drive directly in your BIOS. It’s an extreme measure and it has some pros and cons. But if you want to put a computer on extreme lockdown, here’s how to do it.
Disable USB Booting and CD Booting in the BIOS
The first step is to access your computer’s BIOS. This varies greatly by manufacturer, but generally speaking, it involves mashing a certain key while your machine boots up. Andre has already written the ultimate guide to accessing your UEFI or BIOS setup utility. Check it out, figure out how it works on your computer and meet me back here.
Okay, are you in? Is your screen filled with ugly text and intimidating technobabble? Good. Let’s proceed.
Poke around in the BIOS settings until you find something like BOOT ORDER or BOOT DEVICES. Again, this will vary depending on your BIOS. Here’s an example from Andre’s HP:
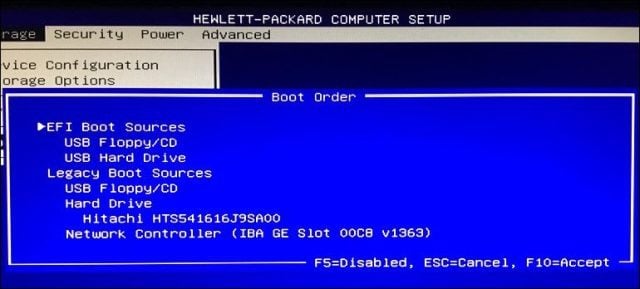
HP Laptop BIOS Boot Sources
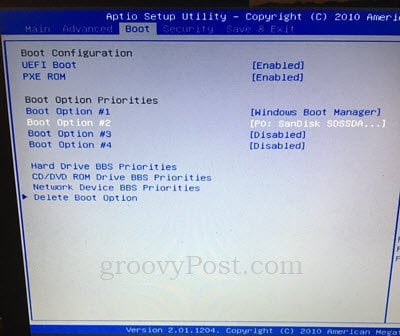
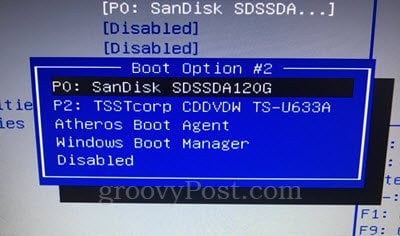
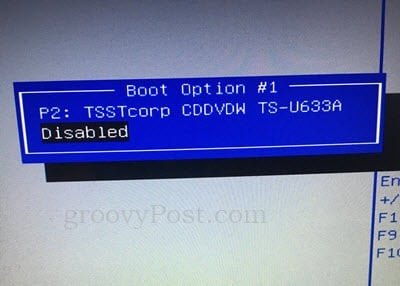
On my ASUS laptop, you access these options from the Boot tab. You can set the boot options below:
You can also go into the CD/DVD ROM Drive BBS Priorities and Network Device BBS Priorities and disable the options in there. Once you do that, they won’t even show up as options anymore.
Your BIOS setup screen may look a little different or a lot different. If in doubt, leave us a comment on what kind of computer you have and we’ll try to find you specific instructions.
Once you’ve disabled booting from the USB or CD drive, go ahead and save and exit. To test it out, try booting from a Windows CD or a Linux live USB or CD.
Password Protecting Your BIOS
So, what’s to prevent your aspiring hacker of a son or daughter from pulling up this very tutorial and undoing what you’ve just done? Simple: a BIOS administrator password.
When you set a BIOS administrator password, no changes can be made to the BIOS configuration without the password.
Now, a big word of caution: if you forget your BIOS password, there isn’t a whole lot you can do to recover it. If you’ve disabled USB or CD booting and then corrupted your operating system and then forgotten your BIOS password, there is practically nothing you can do to get your computer back up and running. BIOS settings are stored on the motherboard itself, so completely wiping your hard drive will do nothing. Depending on your laptop, you may be able to reset your BIOS by moving a jumper or removing the CMOS battery. But this won’t work on computers.
You’ve been warned.
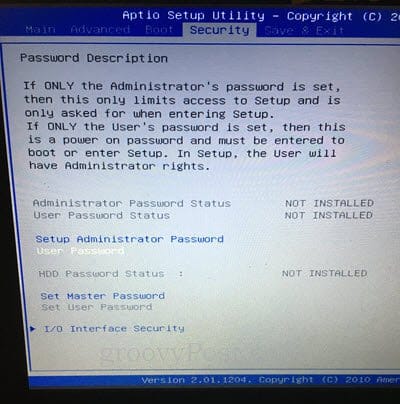
You’ll usually find the password settings on the Security tab in your BIOS setup page. Follow the on-screen instructions to set the password. And don’t forget it.
Conclusion
As I’ve mentioned, there are some pros and cons to fiddling with your BIOS for security reasons. On the one hand, it’s the only way to prevent someone from overriding whatever software controls you have in place by booting a different operating system. Secure Boot helps to prevent unauthorized boot devices from loading, but this can be circumvented by disabling Secure Boot in the BIOS. Password protection is your best bet if you want to lock things down tight.
The risk is that while locking kids or would-be hackers out, you’re also locking yourself out. This can be problematic if you ever need to reinstall Windows or if you want to dual-boot another operating system. Proceed with caution before you go monkeying around in your BIOS. Back up all your data and make sure you are comfortable with all the changes you are making and are familiar with how to undo them if need be.
Good luck!
Do you feel like you’re armed with enough knowledge to lock down your boot devices in the BIOS? Ask your questions and leave your thoughts in the comments.


Paul Johnson
December 8, 2017 at 2:09 pm
A company executive gave me a nice Dell laptop because they couldn’t access the bios. I couldn’t either. Ended up pulling the drive and ram and trashing it. Shame.
Shelly
January 16, 2020 at 7:54 am
Hello,
I am wanting to buy a laptop and either a new motherboard for my existing computer or a whole new computer, but I need to be able to disable external boot options as mentioned in this article. On my current motherboard, it does not appear to be an option. Is there anyway of telling if the computer/motherboard will have these settings in the bios prior to purchasing it? Thank you
Justauser
August 21, 2020 at 2:18 am
Do you have any article about disabling booting from external media when the BIOS does not have this option?
George Jenkins
June 23, 2021 at 9:42 am
Your Chrome instructions worked great! I changed the device to Safari/Mac and the 21H1 64-bit Pro ISO became available. I downloaded and now I can create my UFD’s for installs. Thanks for your work finding this technique.