How to Debloat Windows 10 with Windows Debloater

In this article we’ll look at the most important scripts you should run immediately using the Windows 10 Debloater app.
In most articles that show you how to make Windows run more quickly and efficiently, they cover things like cleaning temporary files, uninstalling applications, or even restoring Windows 10 to an earlier restore point.
The reality is that even if you were to completely reinstall Windows 10 from scratch, it still comes with preinstalled apps and settings that make it run less efficiently than it could. This is what we refer to as “bloat”.
Thankfully, there’s a powerful utility available on GitHub called Windows 10 Debloater. It provides a powerful set of scripts that you can tailor run using an easy-to-use user interface. In this article, we’ll look at the most important scripts you should run immediately using the Windows 10 Debloater app.
How to Install Windows 10 Debloater
The Windows 10 Debloater removes applications and resets settings that could impact your system in ways that you didn’t expect. For this reason, it’s a good idea to take the time to take a Windows 10 restore point before moving forward.
Next, visit the GitHub Windows 10 Debloater page and select the green Code button at the top of the file list. Select Download ZIP.

Place the ZIP file anywhere on your computer that will be easy to get to. Unzip all files.
Windows 10 Debloater Settings
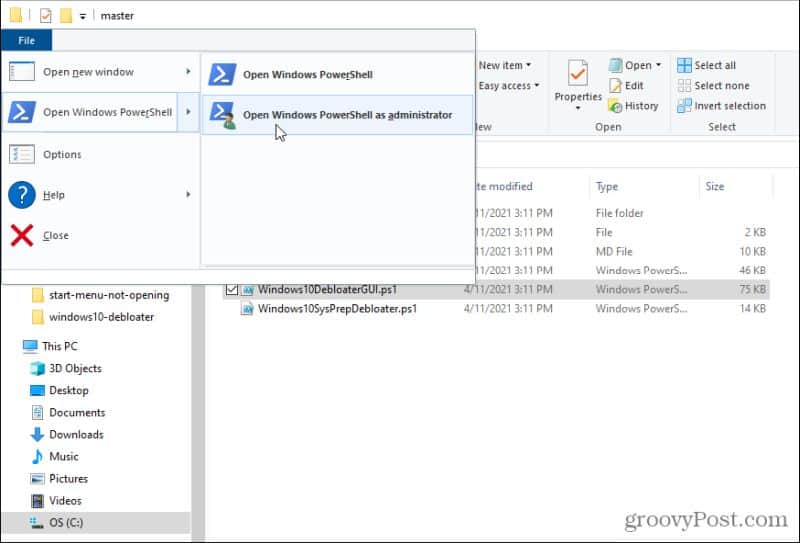
Inside the directory where you’ve unzipped the Windows 10 Debloater files, select Windows10DebloaterGUI.ps1, select File from the menu, select the arrow next to Open Windows PowerShell, and select Open Windows PowerShell as administrator.
PowerShell will open in Admin mode inside the same folder as the debloater files. Type .\Windows10DebloaterGUI.ps1 to launch the GUI script.
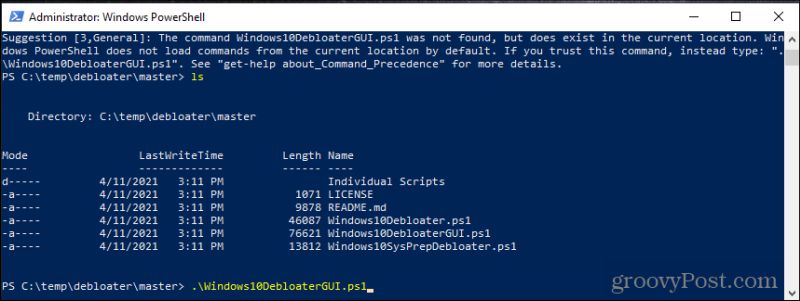
You may see a security warning message. Just type R and press Enter to continue.

Finally, the Windows 10 Debloater app will launch and you’ll see the user interface with all options.
If this is a fresh Windows 10 installation, you can safely select Remove All Bloatware and let the utility clean up everything.

However, if you’re running this on a Windows 10 system that you’ve been using for a while, you may want to customize what bloatware apps and settings actually get changed. To do this you can select Customize Blocklist. Here, you’ll see a list of default apps that come installed with Windows 10.
This list includes utilities and apps that you can’t remove from the system. You’ll also see unchecked boxes next to what Windows 10 Debloater normally doesn’t remove. You can select these to extend the cleanup process if you like.

Just be careful not to remove anything that’s important. If you don’t know what one of these items is, you shouldn’t choose to delete it.
If you scroll down the list, you’ll see items with white checks inside the checkbox. These are the items that Windows 10 Debloater will normally clean off your system by default. If you see anything here that you don’t actually want to delete, then deselect any of these items.

If you want to use this same customized list in the future, select Save custom Allowlist and Blocklist to custom-lists.ps1. This will update a file of that name in the same directory as the Windows 10 Bloatware utility.
You can see the entire list of “Bloatware that is removed” on the GitHub page.
Using Windows 10 Debloater
If you didn’t make any changes to the Blocklist, you can just select Remove All Bloatware and let the utility do its thing. While running, you’ll see the individual commands running in PowerShell.

If, while the script is running, you see some error messages, it’s possible you didn’t correctly launch PowerShell as an administrator.

If this happens, you’ll need to close the GUI and then repeat the process above to launch the app again as administrator.
It’s important to make sure these commands run properly because default Windows 10 scheduled tasks are often unnecessary and consume far more system resources than they should.
Running Other Changes
After Windows10Debloater has removed all of the bloatware, there are a few other options you can use to clean up your Windows 10 installation further.
You can enable or disable Cortana, Edge PDF takeover (where Edge takes over as your default PDF application), and enable or disable Windows Dark Theme.
Most interesting are the Other Changes and Fixes in the bottom section. Here you can perform all of the following cleanup tasks.
- Uninstall OneDrive: Users have reported having difficulty completely uninstalling OneDrive from Windows 10. This script will clean up all traces of OneDrive.
- Unpin tiles from Start Menu: Annoyed with tiles on the Start menu? This script will remove it.
- Disable telemetry/tasks: Removes services Microsoft uses to gather bugs and other issues to improve the overall quality of the Windows OS.
- Remove bloatware regkeys: Cleans up any remaining registry keys following the bloatware cleanup script.
- Install .Net V3.5: Programmers are often annoyed that .NET framework isn’t present on Windows 10. This script will reinstall it.
You may not need to run most of these scripts. But if your intention is to make your Windows OS as efficient as possible, you should at least run Disable Telemetry/Tasks and Remove Bloatware Regkeys.
Running Unpin Tiles From Start Menu will also make your Start Menu launch more quickly and efficiently.
Confirming Windows 10 is Debloated
Once you’ve run the debloater software, make sure to restart your computer. This will launch all Windows processes fresh, and ensure that all registry changes take effect.
There are three things you’ll likely notice immediately after running the Windows 10 Debloater scripts. First, Windows should start up much more quickly than normal. Secondly, the Start menu will be much more responsive.
And third, with the tiles gone the Start menu will look much cleaner and will respond much more quickly.
There are few other things you can do to improve your Windows 10 experience than debloating the system. You’ll be very glad you did. And remember, if anything goes wrong, you can always recover from one of your captured restore points.


zay
May 20, 2022 at 10:04 am
Love the gui feature. Those additional cleanup tasks such as disabling Cortana, can they be added to the custom script?
Marc
August 14, 2022 at 11:50 am
You can also try ShutUp10, an excellent utility that does many of the same things. It’s a free download, just look it up.
elvin
June 4, 2023 at 1:33 pm
You can easily create mess with debloater. Please use with caution. I created mess and was fixing it around 2 hours afterwards.
:(
MurderChickenXL
September 3, 2023 at 10:44 pm
Yeah, that GUI is garbage. Small font and the window isn’t resizeable, grey text on a dark grey background, which makes it even harder to see the large amount of text. Plus it doesn’t detect what’s NOT on your system. A lot of my other tweaking apps do. Credit for the effort but the scriptwriter needs to go back to the drawing board. I’m avoiding this