How To Customize the DNS Service on Kindle Fire

Recently I visited a network that locked down external web surfing through bogus DNS servers. I was able to set a static DNS servers on my Kindle Fire HDX.
Recently I visited a network that locked down external web surfing by providing bogus DNS servers. Fortunately, I was able to easily set it to static servers on my Kindle Fire HDX and within about 30 seconds, I was back in business. Here’s how I did it.
Custom DNS Kindle Fire HDX
From the Kindle Fire Options Menu, Click on the Wireless icon.


On the next screen tap on Wi-Fi.


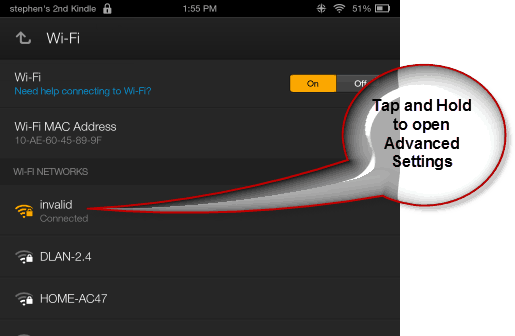
Tap and Hold your Wi-Fi network to open the Advanced Wi-Fi settings.


Then tap Advanced Settings.


Now check the box “Show Advanced Settings.” Tap the IP Settings drop-down and change DHCP to Static.


With IP settings set to Static, scroll down and change both entries to 8.8.8.8 and 8.8.4.4 which is Google’s Public DNS. Or, you can use another DNS service you prefer, such as OpenDNS or Cloudflare DNS.


At least with my Kindle Fire HDX, it kept the DHCP assigned IP address and Gateway provided by my Wireless Routers DHCP scope. If you want to be extra thorough, you might also want to change your IP address to a higher IP in the range just to make sure it doesn’t step on another device on your network at a later time.
7 Comments
Leave a Reply
Leave a Reply


Jacky Estacado
October 23, 2014 at 9:27 am
For DNS 2, can’t I just use the alternate google dns ip of 8.8.4.4?
Matt
January 15, 2017 at 2:11 pm
Thanks for above advice. Followed to the letter, only the save button is greyed out so once changes made cannot save= no fix
vic
March 10, 2017 at 7:21 am
You need to fill in ip address and gateway also.
Janeen Gingrich
July 17, 2018 at 4:46 pm
This is very helpful! I got to the very end, however, and the ‘save” option was greyed out. Ugh! Any ideas? Thanks!
Jeffrey Sun
November 21, 2019 at 1:55 pm
I got the same results, ugh!
klr
September 19, 2020 at 8:21 am
follow the advice on ip address and gateway. it worked on my iphone 3s
Mark H
May 5, 2021 at 6:34 pm
Yes you need to Change IP address to higher one as well for save button to work