Create and Manage User Accounts and Privileges in Windows 10

User accounts in Windows 10 go beyond Microsoft and Local accounts. Learn about managing privileges and login credentials in Windows 10.
Since the release of Windows 8 in 2012, Microsoft has been moving its operating-system towards a cloud-first philosophy. The release of Windows 10 puts that strategy in full swing. This has a big effect on how you log in to your Windows 10 PC. Authenticating on Windows 10 takes on two primary methods: a Microsoft Account or a Local Account. Each account can also be configured with different login credentials, privileges, and preferences. In this article, we’ll show you how to manage all your Windows 10 accounts
Adding, Configuring, and Changing Windows 10 Accounts
Whether it’s a work computer, a personal computer, or a family PC, any given Windows 10 device may have multiple users with multiple levels of responsibility. The wide range of options for configuring your Windows 10 accounts and privileges and permissions addresses this. Part of the purpose is to protect your system and your personal information—you wouldn’t want a guest to have full administrative control of your Windows computer and its security settings, etc. You can also set up accounts to protect users themselves. In a previous article, we showed you how to set up a Child account using Family Safety which can be used to do things like manage screen time or restrict Windows Store purchases and web browsing activity.
Create Additional Accounts
You’ll create your first Windows 10 account when you first set up and configure a new Windows 10 PC.
If you want to add another user to your computer, you can do so by opening Start > Settings > Accounts > Family & other people. Under Other people, click Add someone else to this PC.

In the resulting dialog, enter a username, password, confirm the password then create a hint. Click Next to complete the creation of the account.

Delete Accounts
If at any time you would like to delete an account, select the account, open Start > Settings > Accounts > Family & other people then click Remove.

Click Delete account and data.

Change Account Privileges
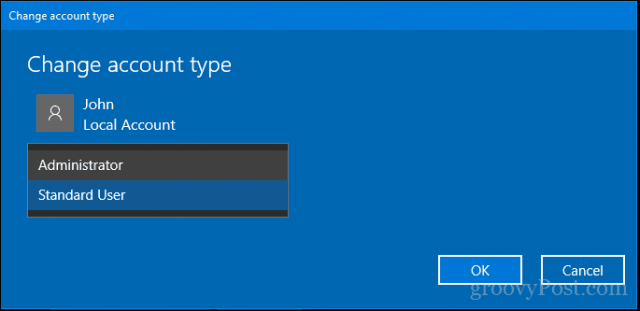
Your account type determines what you can and cannot do in Windows 10. By default, the first account you set up in Windows 10 is known as a Standard Administrator. This account can do most tasks such as install applications and drivers as well as add different types of users to the computer. When you want to change the privilege of an account, sign in to an Administrator account, open Family & other people in Settings. Select the account then click Change account type.

Click on the Account type list box, choose your privilege then click OK.
What about other account types in Windows 10?
So, we are aware of the two common account privileges Windows 10 offers by default: Administrator and User. But there are several types of account privileges you can apply to an account.
In order to do that, you need to access the hidden user accounts control panel item.
To do that, press Windows key + R, type: control userpasswords2 then hit Enter.
Please be aware, this is a legacy interface, which Microsoft might one day remove in a future release. But for now, you can still access it.
In this dialog, you will see all the accounts available within the system. To change the privileges of one of the accounts, select an account then click Properties.
Select the Group Membership tab then select the Other radio box. Within the list box, you will find an array of account privileges. Some of these accounts are pretty much the same in functionality. The most common one you might find useful is the Power Users privileges, which is just a notch below Administrators. A Power User can create and modify local user accounts on the computer and share resources such as a printer. The other accounts are more useful in organizations with different types of users that are part of a large network and authenticating on a domain.

For a detailed description of each, check out this Technet article.
Also, check out our previous article about creating a guest account in Windows 10 for temporary access to your device.
Changing Passwords
Updating your password is a healthy security practice every Windows 10 user should do from time to time. This along with other strategies such as two-factor authentication can keep your computer and information security. Individual users can change their own passwords after the administrator sets up their accounts.
Changing passwords can be performed by opening Start > Settings > Accounts > sign-in options. Under Password, click Change.

Enter your current password. Click Next.

Enter the new password, confirm it then create a hint. Click Next.

Click Finish.

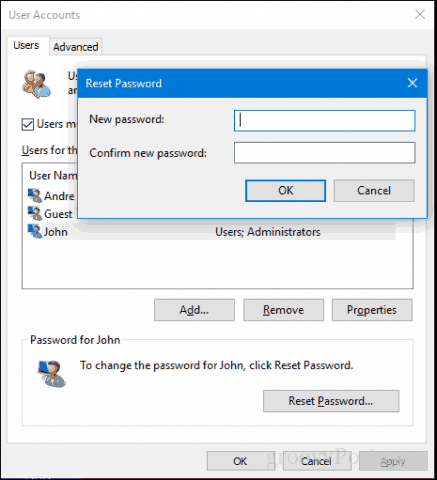
If you want to change the password for another user, you will have to use the old Control Panel User accounts item.
To do that, press Windows key + R, type: control userpasswords2 then hit Enter.
Select the account, then click Reset Password. Enter the new password, confirm it then click OK.
Switching Between Microsoft and Local Accounts
There are many perks to signing in with a Microsoft account, including syncing your files with OneDrive or syncing your favorites with Edge. But if you’d prefer logging in the old way, due to privacy concerns, internet connectivity issues, or personal preference, you can easily switch back and forth between a local account and a Microsoft account.
Switch from a Microsoft Account to a Local Account.
Open Start > Settings > Accounts > Your info then click Sign in with a local account instead.

Enter your current password then click Next.

Choose a username, password, confirm it then create a hint. Click Next.

Click Sign out and finish.

Wait while the local account is created.

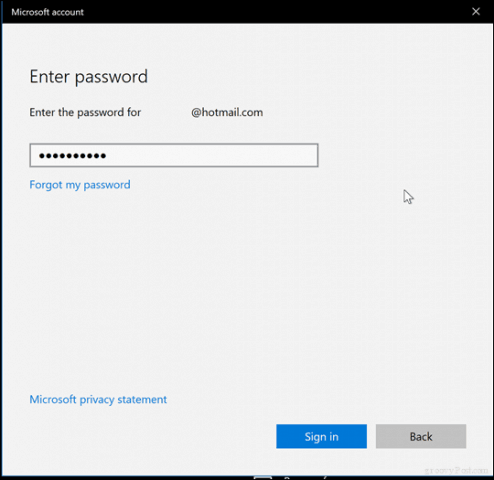
Switch from a Local Account to a Microsoft Account
When you want to go the other way, it is just as easy. Open Start > Settings > Accounts > Your info then click Sign in with a Microsoft account instead.

Enter your email address. If you don’t have one, you can use this opportunity to create one. Click Next.

Enter your Microsoft Account password. This is the password used to sign into your Outlook.com or Hotmail.com account. Click Next.
Enter the current local account password. Click Next.

If you don’t have a Windows Hello device, click Skip this step. You should now be signed in.

Enable Built-in Local Administrator account.
Windows 10 includes a hidden Administrator account you can use to manage all the resources of the computer. In previous versions of Windows, such as Windows XP, this account was readily available when you set up your computer for the first time. It was actually an easy way to make your computer vulnerable to malicious attacks and rogue programs. The Administrator account should only be used in emergencies, such as the inability to sign in successfully or a corrupt user profile. Read our previous post for details on How to Enable or Disable the Built-in Administrator Account in Windows 10.

Managing Accounts from the Command Line (net user)
The command line can also be used to manage and create accounts. Open Start, type: CMD, right click CMD then click Run as administrator.
To view a list of user accounts on the system, type net user then hit Enter.

Here is how you can create a user account with a specific privilege:
Type the following then press Enter:
net user Username Password /add
For example: net user John mypassword123 /add
You should see the following message: “The command completed successfully.” You should now be able to click Start > username to switch to your new account.

If you want to add the user to a particular group such as Administrator, Power User or Limited User, use this command:
net localgroup GroupPrivilege UserName /add
Example: net localgroup administrators Andre /add
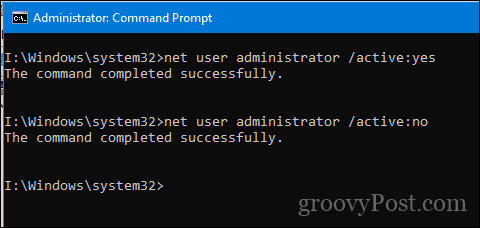
You can also use the command line to enable the built-in Administrator account, which you can use to manage all the resources of your computer.
At the command prompt, type:
net user administrator /active:yes
Disabling it is just as easy, type:
net user administrator /active:no
Conclusion
That’s a look at some of the basics of managing your account in Windows 10 and changing the user privileges when needed. We have covered other aspects of managing user accounts not mentioned here such as using Windows Hello for sign-in, joining a Windows Server domain, or creating a child account. So, be sure to check out those articles if you are interested. We have also covered different ways you can let users sign in, such as using a PIN or Picture Password. Dynamic Lock is a recent addition, which lets you use your smartphone to sign in by pairing it to your computer.
Is there anything I missed you felt I should have mentioned? If so, let me know in the comments so we can build on it.


Aly
December 22, 2017 at 8:08 am
Can I also add my name as user account? and with admin privilege? can I then delete my original account and keep the new user as the main user account?
Orcadian
January 6, 2020 at 3:06 pm
I’ve read this whole page (also https://www.groovypost.com/howto/change-account-name-windows-10/) but there is a lot of info here.
I’ve changed the name of my main user account and I now want to rename my \Users folder so that it matches. What I need to know is: Do I need to log in as The Administrator, or will an account with Admin privilege do the job?
Thanks for help!
John Terdik
April 22, 2023 at 6:33 pm
I have a laptop I want to pass on to a friend, I added an account for him, he does not have a Microsoft account so I added him as a local user. It was necessary to add Administrator privilege’s to is id. Now when I sign-on using his ID numerous application are failing. Originally these applications were installed under my ID, I assume I had installed them for all users but I’m not sure.