How to Create a Contact Group or Distribution List in Outlook

If you email the same group of people regularly, whether for business or pleasure, you can save time by creating a contact group in Outlook.
If you send emails to the same group of people regularly in Outlook, you can save yourself time by creating a new contact group. A contact group (also known as an email group, distribution list, or contact list) allows you to add a group of addresses to your email simultaneously. This saves you time as you don’t need to add each person one by one.
It also reduces the risk of adding someone by mistake or using the wrong email address. You might also ask how to create a group in Outlook. The good news is you can do it in Outlook. Here, we’ll show you how to create a contact group in Microsoft Outlook on your desktop and on the web.
How to Create a Contact Group in Outlook on PC or Mac
If you’re using the Outlook desktop app on your PC or Mac, you can create a new contact group by following these steps.
- Launch the app and click the People (Contacts) icon.
- Go to the Home tab and click New Contact Group in the ribbon.
- Give your group a Name at the top.
- Click Add Members in the ribbon and pick From Outlook Contacts or From Address Book (per your preference). You can also adjust this in the next menu, if necessary.


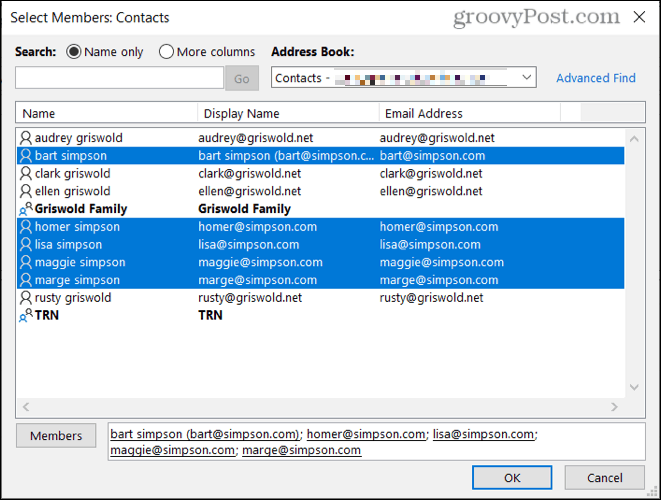
- To add one member at a time, select them in the list and click the Members button on the bottom left. Alternatively, double-click their name.
- To add more than one member at a time, hold Ctrl as you select each person, then click Members. You can add both individuals and groups. To use a different contact list, click the drop-down on the top right below Address Book.
- Once you’ve added everyone to your Outlook contact group, you’ll see their addresses to the right of the Members button. Click OK if you’re finished.


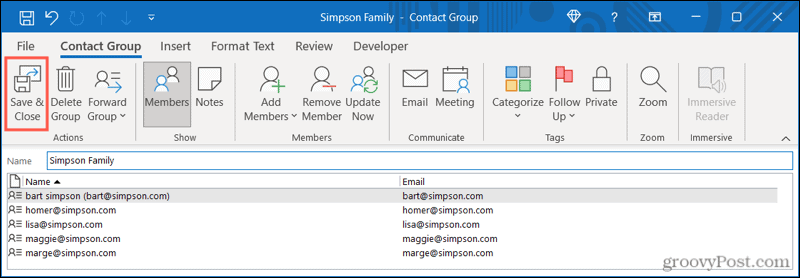
- Review the group name and members, then click Save & Close in the top-left when you’re done.


- The new group will appear in your People (or Contacts) list. Clicking the list allows you to view the current members. You can also send an email to them directly by pressing Send email.


How to Edit a Contact Group in Outlook on PC
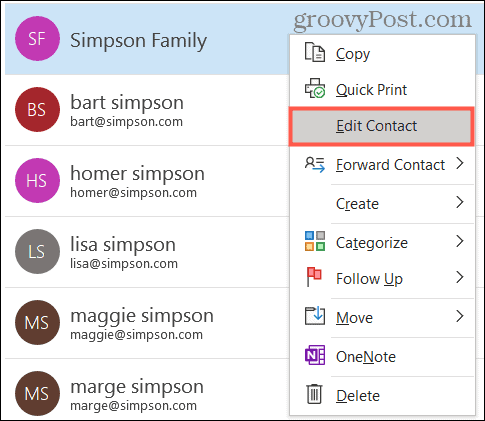
If you want to add or remove members of an Outlook contact group or change the group’s name, right-click the group in your People (Contact) list and select Edit Contact.


You’ll then see the initial contact group set-up menu appear. From here, you can change the name of the group or use the Add Members or Remove Member buttons in the ribbon (as needed).
When you’re ready, click Save & Close after making any adjustments to the group.


How to Create a Contact List in Outlook Online
Using the Outlook website, you can also create and maintain contact lists for your Outlook account. Contact groups here work exactly the same as they do in the Outlook desktop app, allowing you to email a regular group of contacts.
To Create a Contact Group in Outlook On the Web
- To start, open the Outlook website and sign in.
- Click the People icon in the navigation.
- Click the arrow next to New contact in the top-left, then press New contact list.


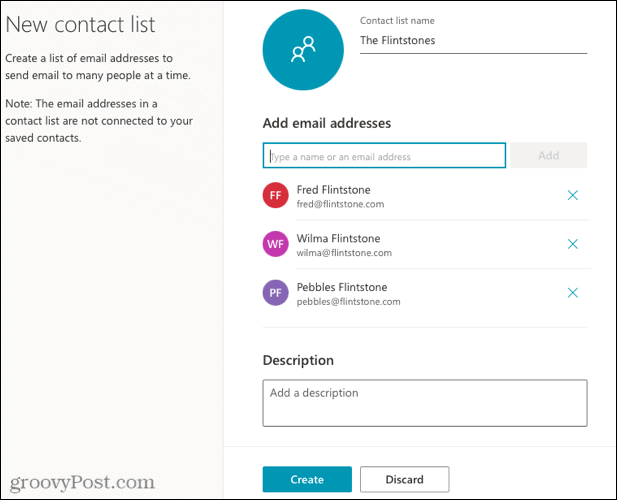
- Enter a Contact list name.
- Type a name or email address for each person you want to include. You can add both individuals and groups.
- Optionally, enter a description for the list to help you remember the group’s purpose.
- Click Create.


Your contact list will appear in your list of contacts. It will also appear in the All contact lists section of the People navigation on the left.
As before, you can view your contact group members, or use the group to send an email by pressing Send email.


How to Edit a Contact List in Outlook Online
If you want to add or remove contact group members (or change the group’s name) in Outlook online, right-click the group in your People (Contact) list.
From the menu, select Edit. Alternatively, choose your group, then click Edit on the right.


You can change the list name, enter a name or email address to add more members or click the X icon (positioned to the right of a member) to remove them.
When you’re ready, click Save to finish making your changes.


How to Send an Email to Your Contact Group in Outlook
Whether you use Outlook on your desktop or on the web, sending an email to the group you create is simple.
In the Compose menu, begin by typing the name of the contact group into the To field. You should see the group appear as a suggestion—select the group or list, and it’ll pop into the field.


If you want to expand it to see all member email addresses, click the plus sign on the left. You’ll then see everyone in the group or list in the To field.


Save Time and Reduce Errors With Email Groups in Outlook
You can create an Outlook contact group or list for your best pals, family members, coworkers, or project team. It’s all up to you! It can save you a lot of time from entering names or email addresses one by one, ensuring you’re emailing the correct addresses (and avoiding any potential mishaps).
For more, take a look at how to add contacts to a safe senders list in Outlook.
Leave a Reply
Leave a Reply


