How To Connect to Anyone’s Windows 10 with Quick Assist

Quick Assist is a free built-in tool in Windows 10 that allows you to help out a friend or family member with their PC. Here’s how to use it.
Quick Assist is a Remote Control application to use if there is a need to remotely control a Windows 10 machine. It works without the need to reconfigure firewalls. Next time you need to remote in and help a friend or alike, just remember to ask them to start Quick Assist, and you are connected in no time. You know it is always there, no install needed like with Remote Desktop RDP.
What is Quick Assist?
Quick Assist is a built-in remote control application in Windows 10. It has been there since the Anniversary Update (1607) and still, it seems so few know about it.
Its executable, quickassist.exe, is found at c:\windows\system32. Easily found in the Windows start menu or search.

Requirements?
The Quick Assist application needs to be started on both sides. It requires both machines to be running Windows 10 and an internet connection. The person helping also requires a Microsoft Account. There is no direct peer to peer connection since both clients connect to the Microsoft cloud. Therefore you don’t need to worry about opening up security on the Windows Firewall for this to work.
How to Start a Quick Assist Session
It is really easy to start and the application will guide you through the process.
To start a remote control do the following (Helper is the person who remotes in to help and the Requestor is the person who requests assistance/help):
- Helper: Starts Quick Assist on a Windows 10 machine. Simply hit the Windows button and type in ‘Quick Assist’.

- Helper: Click the Assist another person button.

- Helper: If the login account is associated with a Windows Cloud Account you are good to continue. Otherwise use an existing Microsoft Account or create a new one.
- Helper: Verify it is your correct Microsoft Account that it’s signed into. The name will be displayed to the remote part when requesting sharing options later in the process.
Let the person you want to help know the code, by either email, phone, chat or whatever means you got of contact. The code is valid for 10 minutes.

- Requestor: starts Quick Assist. Enter the code given by the Helper. Click on the Share screen button.

- Helper: Choose whether you want to request ‘Take full control’ to do actions on the remote session or if only ‘View screen’ is needed and you can guide the remote person.

- Requestor: If you trust the person requesting the access click the Allow button.

- Helper: Remote Desktop session started and connected. Depending on the permission requested either for you to control the remote mouse or only the view the screen.


Connected, Now What?
There are two sharing options, full control or view only. If in full control there are two modes:
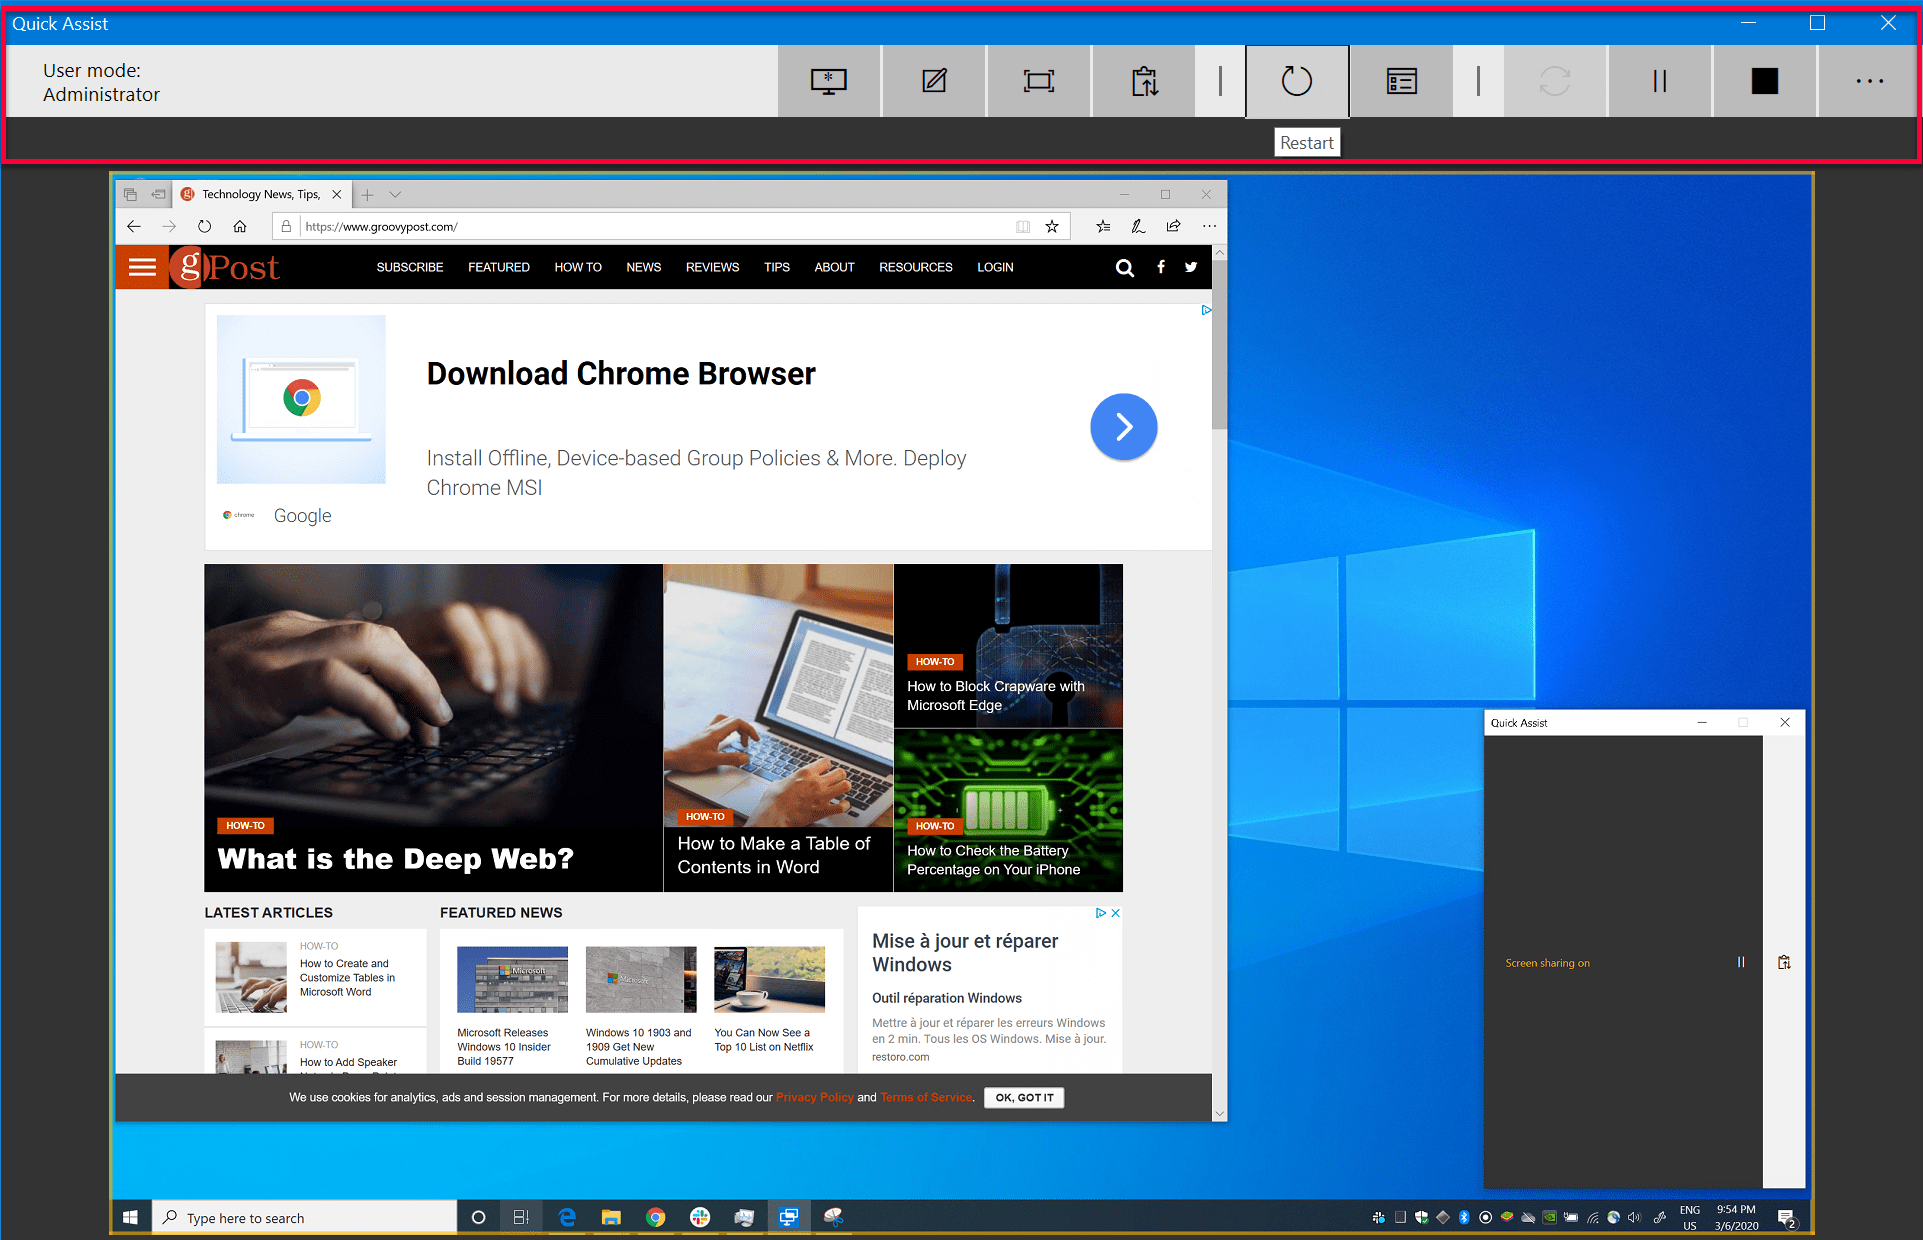
- User mode: Administrator – Remote user is a local administrator on the machine.
- User is not in administrator mode – Remote user is not a local administrator on the machine. For administrative tasks, you will need to elevate. If you need, for example, to install software that requires administrative permissions. A limitation is if UAC (User Access Control) is enabled the helper will get a black screen when it switches to Secure Desktop.
The Admin toolbar lets the helper do the following (most useful in bold):
- Select Monitor – If the remote machine got multiple screens you can select which one to see or switch between.
- Annotate – Great tool to draw on the screen for the remote part to see.
- Actual size – Enlarge the window to the actual size of the remote screen.
- Toggle instructions channel – For longer instructions to the remote user.
- Restart – Restarts the remote machine.
- Task Manager – Opens the task manager on the remote machine, a quick way to view the resources used.
- Pause – Pause/Restart the session.
- End – Ends the session.
End Remote session
The helper and the requestor can end the session. Close the Quick Assistant window by clicking on the X in the upper right corner or click on the stop button. A message appears saying “Screen sharing has ended”.
Conclusion
Could Quick Assist replace professional third parties remote sessions tools such as TeamViewer, LogMeIn, or Dameware?
Quick Assist doesn’t run as a service, and it works with Windows 10 only. It also has some limitations with UAC. I would say it can’t fully replace the professional tools. However, it works perfectly if you want to remote support or help friends and family on Windows 10. You know it’s always there and no firewall reconfiguration or other prerequisites are needed. And the best part is it’s free.
If you have any questions about accessing a user’s session/desktop without a password, join the discussion in our Windows 10 Forum.


