How to Take a Screenshot in Office and Insert It into a Document

If you’re composing a document in Word or PowerPoint presentation, you might come across an image you’d like to quickly insert. Here’s how to insert a shot.
If you’re composing a document in Word or PowerPoint presentation, you might find an image you’d like to insert quickly. There are third-party tools like SnagIt that will let you do it, but you might not be aware of the screenshot utility built into Office. Here’s a look at how to use it.
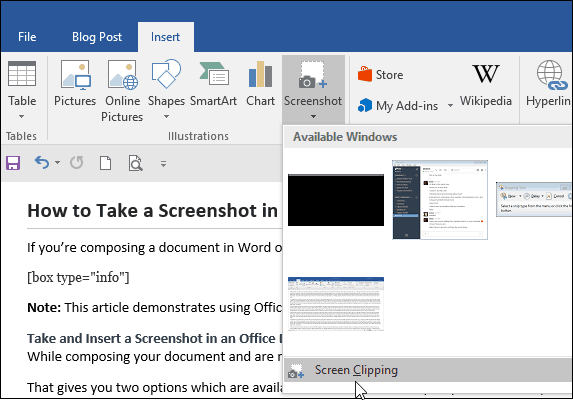
While composing your document and ready to take a shot, go to Insert on the ribbon and click the Screenshot button in the Illustrations section. That gives you two options which are available windows that are open (not minimized) that you can choose. Or, select Screen Clipping so you can grab a specific screenshot you want. Do note that you can’t take a shot of the application that you’re using to take the shot, though. If you select Screen Clipping, it works like the Snipping Tool, a utility built into previous versions of Windows. The screen grays out, and you can drag the cursor to select the area of your screen you want to capture. Then the screenshot will automatically be placed into the document you’re creating. If you need to edit the image further, you can use the editing tools included in the Office app. This is a great solution if you need to pop in a screenshot into a document quickly without the need to use a separate third-party utility. It’s also worth noting that you can use this option if you’re using Microsoft Word to create and publish blog posts. You can also use it in the other apps included in the Office Suite like Excel and PowerPoint.Take and Insert a Screenshot in an Office Document


5 Comments
Leave a Reply
![]()
Recommended for you


Ziggy
April 15, 2016 at 8:37 pm
I’ve been using Office 2010 for yonks and I wasn’t aware of this feature! So, thanks Brian – this is going to make inserting clips into Office so much easier for me.
Brian Burgess
April 16, 2016 at 12:04 am
You bet Ziggy! It’s definitely a handy feature that will improve your workflow.
Kate Connolly
April 18, 2016 at 1:33 am
Thank you so much – I’ve been using Alt Prtscn for years and it is such a pain. This is so much easier
j
May 4, 2016 at 3:59 pm
You can also use the “snipping tool” found in the accessories folder in windows7. it lets you, free form, rectangle, window or full screen. You can then copy and paste or save the snip in several picture formats.
Mike
October 4, 2017 at 9:50 am
This is great! BUT … does it work for Word for Mac? Or just Windows-based versions?
Thanks!