
In the third part of our series on Windows Live Photo Gallery 2011 (Wave 4), we’ll be showing you some of the editing features that are built into Windows Live Photo Gallery. While the basic adjustments and visual effects that you can apply to your photos won’t come anywhere near the sheer Photoshopping might of professional photo editing software, for a free program intended for casual sorting, organizing, publishing and printing of photos, the features included in Windows Live Photo Gallery 2011 are fairly groovy. The absolute necessities—such as cropping, red eye reduction and rotation—are upfront and intuitive while some geekier features, such as color temperature, tint and hue and exposure, are available as well. You can even get into some of the more subtle aspects, such as retouching and noise reduction, which will impress your friends and family but are just as easy to pull off as cropping and resizing.
Let’s take at a video tour of the project before we jump into the screenshot tour shall we!
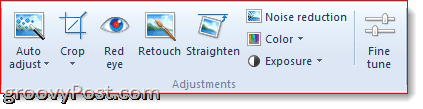
All of these features are accessible via the Edit ribbon.

Manage and Properties
The Manage and Properties sections are fairly straightforward. Here, you can rotate, delete, select, copy and paste your photos. You can also change the filename, resize the file and adjust the timestamp on the file. Note that these options will change the files themselves. Also note that you can change the properties directly from the Info Pane, which we showed you in our previous tutorial on Importing, Sorting and Tagging Photos in Windows Live Photo Gallery 2011.
One thing I like about the Resize feature is that it automatically maintains the aspect ratio (there’s not even an option not to do so) so your photo doesn’t get smushed or stretched. You’ll simply be asked to enter the maximum dimensions in pixels. Windows Live Photo Gallery will then resize your photo so that neither the height or width exceeds those dimensions. Also, if you don’t want to save over the original, you can change the “Save to” folder by clicking Browse. I recommend creating a new folder called “My_photos_resized” or something like that.

I do wish there were a way for you to resize by proportion or percentages or even inches or centimeters. But Windows 7’s built-in printer interface does a pretty good job of choosing actual print size dimensions for you, if you do intend to print them at home.
Adjustments
The next group of editing features lets you make some more detailed changes to your pictures. From the browser view, you can make “quick” adjustments, but I recommend double-clicking the photo so you’re viewing just one picture at a time. This not only gives you a few more options, but it also reveals the Crop option and the Fine Tune panel.
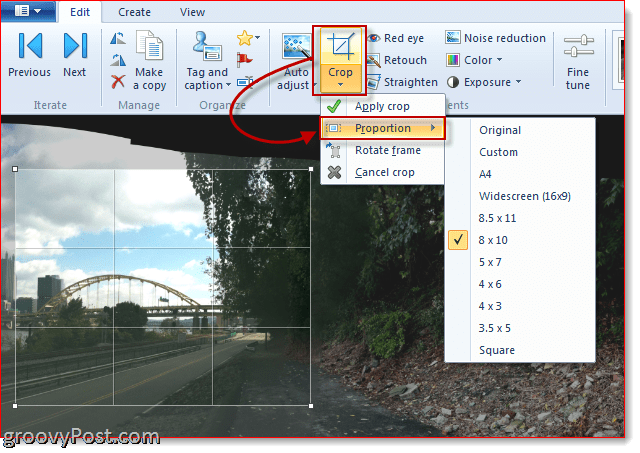
The Crop feature is pretty handy. Earlier, I was complaining about the lack of proportional resizing features, but Windows Live Photo Gallery 2011 makes up for it here. You can do a typical custom crop by simply drawing a box around the area you’d like to crop. But more usefully, you can Click Crop and choose Proportion to choose a common printout dimension. When you choose a proportion, your crop box will automatically be resized. You can also rotate the frame to make an 8 x 10 into 10 x 8 or a 4 x 6 into a 6 x 4, etc. In this way, you can ensure that your everything you want to make it into the frame fits in perfectly.
The other photo editing features include:
- Red eye – Allows you to remove the red eye effect caused by flashes. Simply draw a box around the eyes to apply. Tip: For close-ups, you may get better results by doing one eye at a time. Otherwise, you may get some discoloration outside of the eye.
- Retouch – Lets you remove blemishes, such as scars, acne and moles. You too can be an airbrushed supermodel!
- Straighten – Automatically adjusts the horizontal alignment of the picture. Good for those drunken action shots. That is, unless you were going for that Dutch angle efffect.
- Color – Adjusts the color temperature, tint and saturation. Click the button itself to let Windows Live Photo Gallery automatically adjust it according to what it thinks looks best. Or, you can click the arrow to choose from several different presets.
- Exposure – Adjusts the exposure of the photo. Same drill as with color—click the button once to go with Windows Live Photo Gallery’s best guess. Click the arrow to choose from some presets.
- Noise Reduction – Automatically removes “noise” (i.e. graininess and colored speckles).
- Effects – Not really part of the adjustments section, but it fits in with the others. Here, you can choose effects from the gallery such as sepia tone, cyan tone, black and white, orange filter, yellow filter and red filter.
You can apply these adjustments one at a time, or you can click Auto adjust to apply several adjustments all at once.

You can change which ones get applied, as well as the jpeg compression quality by clicking the arrow beneath Auto adjust and choosing Settings…

These photo editing features and adjustments are a bit hard to describe. So, I encourage you to try them out for yourself. Or watch this video demonstrating some of the photo adjustments:
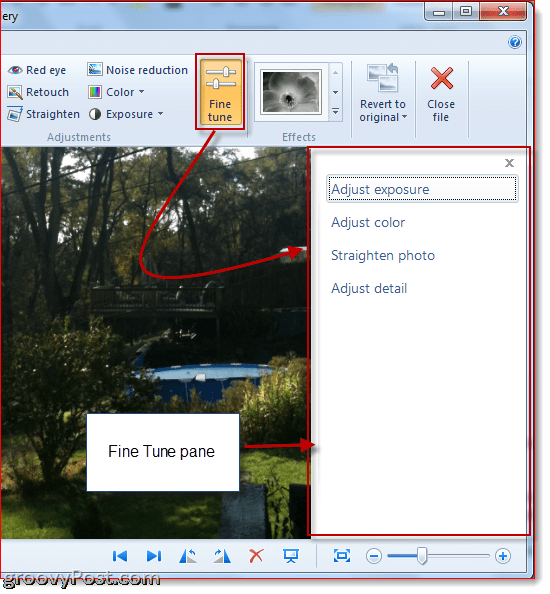
Fine Tune
You can use the above quick buttons to alter these attributes, or you can get even more tweaky with the Fine Tune panel. Click Fine Tune to reveal it on the right-hand side. Here, you’ll have a variety of sliders that you can use to adjust the various attributes of the photo. Click the Check Mark if/when you’re satisfied with what you’ve done.
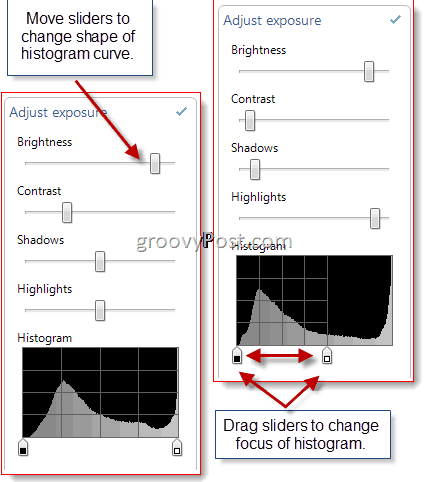
One groovy feature that I should point out: in the Adjust exposure section, you can move the sliders or you can shift the histogram around to alter the photo.
Revert to Original
Now, if you’re anything like me, tweaking and editing photos will actually net a worse looking effect than if you would’ve just left it alone. Luckily, there’s the Revert to Original button. This lifesaver hangs out in the top-right hand corner of the window. By default, Windows Live Photo Gallery 2011 saves originals indefinitely in C:UsersYOURUSERNAMEAppDataLocalMicrosoftWindows Photo GalleryOriginal Images. So, if you edit a photo, publish it, share it, close Windows Live Photo Gallery, turn off your computer and come back three months later, you can still click that Revert to Original button and undo the damage you did. Note, however, that the Revert to Original button won’t undo resizes, filename changes or rotations (which is why you should save your resized photos to another folder).

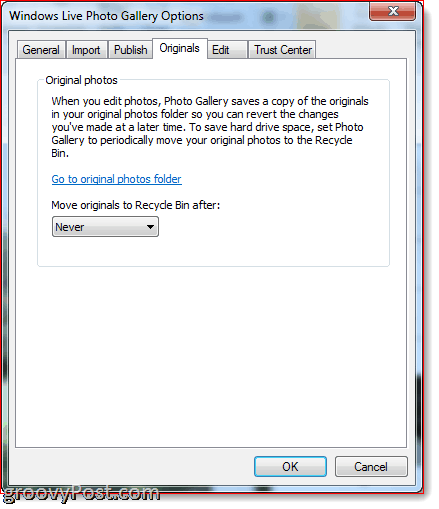
If you don’t want all your hard drive space being eaten up by original photos, you can change how Windows Live Photo Gallery handles them by clicking the arrow beneath Revert to original and choosing Settings… You can choose how long Windows Live Photo Gallery will keep originals in the drop-down menu. After a period of time, Windows Live Photo Gallery will automatically move photos to the Recycle Bin—which means there’s still time to recover the original, if you make a mistake.
Conclusion
Overall, Windows Live Photo Gallery 2011 gives you a decent set of photo editing and adjustment features. While you are still far from a professional photo editing suite such as Photoshop or Gimp, you should have everything you need for basic photo editing. You can eliminate red eye, boost the brightness, straighten a photo and zap some pimples before framing a family portrait so that everyone looks as good as technology intended them to look. Oh, and it’s easy and free.


Greg Bishop
November 3, 2010 at 1:41 pm
RE UNDO: I used the (Old) “UNDO” button A LOT when editing. Rather than (quote/unquote) “Revert to Original button and undo the damage you did”… which UN-DOES EVERYTHING I DID…. The UNDO Button allowed me to undo the last thing I did without affecting ALL THE OTHER Editing I had done. PLEASE PLEASE PLEASE restore that UNDO option!
Devlin
July 18, 2011 at 6:12 pm
The undo button is still there and never went away.. it was just relocated to the top bar where back and next are located. And you can always use the shortcut Ctrl+Z which is the universal undo command in any windows program.
groovinJackman
November 3, 2010 at 3:20 pm
Greg — If you look above the ribbon in the top-left, you’ll notice the QuickAccess toolbar. That has your standard undo/redo buttons. A little out of the way, I know, but if you right-click it and choose “Show Quick Access Toolbar Below the Ribbon” it hangs down a bit more prominently.
Other than that, I’d also recommend having your fingers close to CTRL-Z at all times ;-)
Greg Bishop
November 3, 2010 at 8:26 pm
Very much appreciated, groovinJackman!! : )
Gan
March 7, 2011 at 5:07 am
Actually in the 2011 version, the undo button is different from the older version. In the older one, after I have make changes to the photo, when I come back later, I can still undo the changes I made one by one, without revert to original completely. This new 2011 version, only allows to undo changes one by one (using the buttons as suggested by GroovinJackman) while you are still in the editing session. Once you get out of the session, saved the changes. And when you go back later, you can ‘revert to original’ completely. The buttons to undo backward and forward would be grey out, and not available for undo.
In this sense, I prefer the older version.
Jenany
November 11, 2011 at 8:33 am
THANK YOU THANK YOU THANK YOU!!! I just installed this program because Picasa was glitching out and I thought I’d try something different. I really like this one EXCEPT I could NOT find the UNDO button anywhere! Duh. Now that I see it, I feel like an idiot. Thanks to your post & comments, I am a better informed human being. :)
Kim Proulx
April 5, 2013 at 6:37 pm
I was looking for a way to create the sepia effect that highlites certain aspects with reds and pinks. Maybe it is called something else instead of sepia.
Thank you.
Karen Bailey
December 15, 2018 at 7:40 pm
Hi there:
I’ve been using Photo Gallery for a long time and already have learned new things by reading this. The one question I didn’t see answered is ‘can I revert to original’ on multiple photos at once or do I have to do it one by one.
Thank you.