![Add The Quick Launch Bar To Windows 7 [How-To]](https://www.groovypost.com/wp-content/uploads/2010/02/image_thumb.png) In all versions of Windows including the latest Windows 7, the file extensions are hidden by default. Perhaps it’s because Microsoft did some case study in the past and found that people don’t like being able to see file extensions??? Who knows. All I know is, with hidden file extensions, it’s not easy to (A – Find a file at times and (B – Rename files (specifically their extension.) This is why the below Step-by-Step to configure Windows to display file extensions is one of the first things I do on new systems.
In all versions of Windows including the latest Windows 7, the file extensions are hidden by default. Perhaps it’s because Microsoft did some case study in the past and found that people don’t like being able to see file extensions??? Who knows. All I know is, with hidden file extensions, it’s not easy to (A – Find a file at times and (B – Rename files (specifically their extension.) This is why the below Step-by-Step to configure Windows to display file extensions is one of the first things I do on new systems.
How To Display File Extensions In Windows 7
1. Right-Click the Start Orb, and then Click Open Windows Explorer.

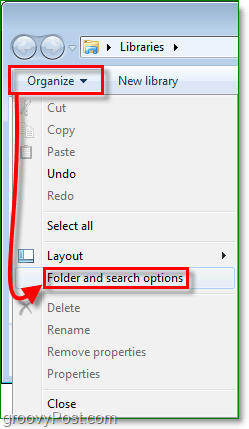
2. In Explorer, Click Organize. Then Click Folder and search options.
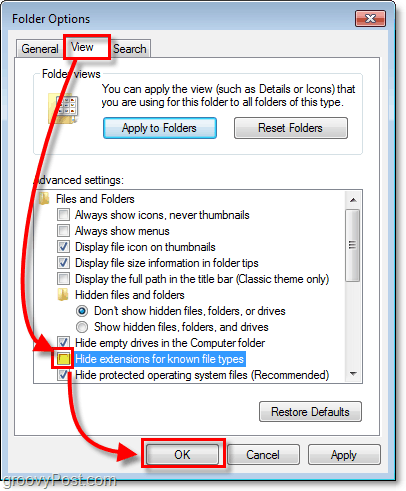
3. In the Folder Options window, Click the View tab. Next Click and Uncheck the Hide extensions for known file types check box. Click OK to finish.
All done!
Instantly your files will show their extensions at the end of their file name. Now you can even use the Right-Click > Rename feature to change file extensions manually as well (just make sure you know what you’re doing first.)

Speaking of customizing Windows 7, take a look at this How-To for enabling Check Boxes to Select Folders and Files in Windows 7.


Shockersh
February 9, 2010 at 11:46 am
Can I get an amen!
Honestly I think not showing extensions is fine in mist cases however if your a geek and need to make a change or edit something, showing file extension is a must yeah.
Jamie Butler
February 22, 2010 at 7:29 am
It is also good when you rename files. The reason they hide is to simply things, everything is automated anyways. For old timers and programmers we got to know the extension.
jitendra vyas
May 31, 2010 at 4:52 pm
Thanks for tip. I was looking for this.
charlieh
March 3, 2011 at 6:32 pm
Thank you!!! Why did MSFT hide such a fundamental aspect of using windows?
Joel Sandberg
October 26, 2011 at 8:42 am
Thana k you, but . . . .
Windows 7 appears to “foget” you made this change and reverts to the default everytime I turn on my computer.
How can I tell Windows that this is my preffered/default setting – to show file extension types all of the time.
Thank you.
Michael
January 5, 2012 at 10:02 am
Hide known file extensions:
I am having the exact same problem. I have a month old Dell XPS 8300, win7 Home premium.
Whenever I change folder options (deselect) hide known file extensions, click apply and ok, it allows me to see file extensions. But, when I reboot, the hide known file extensions box is selected again – aargh.
I have gone into the registry and made the suggested changes (change from 0 to 1), etc., to no avail
Any new fixes?
John
November 2, 2011 at 5:56 pm
@Joel Sandberg. Not to come across as a wise ass, but are you clicking “apply” before you click on “ok”?
If so, than I can not understand why that would happen to you. If I figure something out, I’ll let you know. J.
Joel Sandberg
November 3, 2011 at 9:57 am
Thank you for the attension to details.
Yes, I am clicking apply.
Yes I click apply to all folders.
Then OK,
It works fine for one day (i.e. until I re-start Windows).
I can not find a way for these settings to be remembered day to day.
I have asked the IT support at my company, and they do not kn ow a way to have this stored permanently (is there a registry setting?)
Thank you.
Joel
John
November 4, 2011 at 4:36 pm
@Joel Sandburg,
I’ve tried with no success to replicate what you’re experiancing and I can’t. Without being able to work with the issue first hand, I don’t know what to tell you.
Hopefully someone else with more knowledge in this sort of thing will see this and point you in the right direction.
I wouldn’t advise messing with the regestry though, unless you do a complete system image & backup first.
J.
Marie
November 14, 2011 at 6:25 am
My Windows 7 just stopped showing extensions for .dwg and pdf files. I went through your steps and they still don’t show up. Do I need to reboot for this to work?
Dave
June 9, 2012 at 12:27 pm
Thank you, thank you, THANK YOU!
Other web sites say, basically, the same thing, “Click on the ‘My Computer’ icon …” There is NO “My Computer” icon on my desktop! Your approach was more direct and should satisfy everyone’s problem with this issue.
Maybe I forgot to say …
THANK YOU!
shakir
September 18, 2014 at 12:52 am
thankssssssssssssssssssssss
gautam kumar
October 6, 2014 at 11:56 am
i was searching for this view internal file structure for two days and i found here!
thanXXXXXXXXXXXXXXXXXXXXXXXXXXXXXXXXXXXXXXXXXXXXXX